
List of Exercises to Do at Home Without Equipment
Introduction
Exercising at home without equipment is a convenient and effective way to stay fit, improve mobility, and boost overall health—no gym membership or fancy gear required. Whether you’re aiming to build strength, enhance flexibility, improve cardiovascular endurance, or simply stay active, bodyweight exercises offer a versatile solution.
These routines can be tailored to suit all fitness levels and require minimal space, making them ideal for busy schedules or limited environments. From energizing full-body movements to targeted muscle toning, home workouts without equipment empower you to take control of your wellness journey anytime, anywhere.
Exercises
Shoulder rolls

- Position: Sitting or standing position.
- Start by giving yourself the biggest shoulder shrug possible. Next, thrust the shoulders forward to start protracting them.
- Make the switch to dropping the shoulders and then pulling them back.
- When finished, this is a clockwise or counterclockwise circular motion.
- Hold duration is five to ten seconds.
- Repetition should be ten per session.
Shoulder blade squeeze
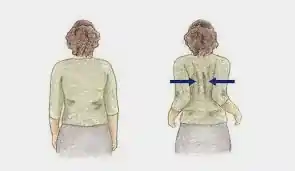
- Position: Sitting or standing position.
- With your elbows bent and your palms facing forward, raise your arms to shoulder height.
- Squeeze your shoulder blades together as you extend your arms back. Go back to where you were before.
- Hold duration is five to ten seconds.
- Repetition should be ten per session.
Pendulum exercise
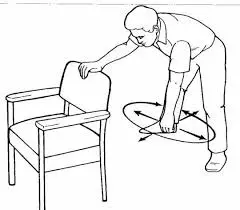
- Position: Standing position.
- Place your feet somewhat wider than shoulder-width apart, and place the hand of your unaffected shoulder on the table as you stand next to it.
- Allow your arm to swing freely from front to back while shifting your weight forward and backward.
- After you’re at ease with these motions, shift your body so that your arm swings in a circle, taking care not to disturb your shoulder muscles.
- Hold duration is five to ten seconds.
- Repetition should be ten per session.
Bridging

- Position: Supine lying position.
- Start by maintaining both hands at your sides for support during this exercise, and maintain your knees bent.
- Now, use your lumbar muscles to raise the portion of your buttocks.
- Repeat after slowly going back to the beginning position.
- Hold duration is five to ten seconds.
- Repetition should be ten per session.
Self hamstring stretching

- Position: Standing position. Place your right foot in front of your left as you stand.
- Bend at the waist and slowly lower your forehead to your right knee.
- Maintain a straight knee position.
- Cross your left foot in front of your right to repeat on the opposite side.
- Hold duration is five to ten seconds.
- Repetition should be three per session.
Heel slide

- Position: Supine lying position.
- As near to your buttocks as you can, slide your heel.
- Your knee should only be bent to a comfortable position.
- It shouldn’t hurt, although you might feel a little pressure or anything around your knee.
- Hold duration is five to ten seconds.
- Repetition should be ten per session.
Straight leg raise
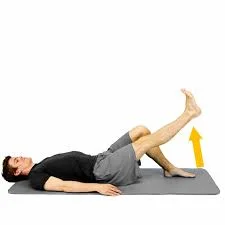
Straight leg raise steps:
- Position: Supine lying position.
- With your legs comfortably spread out on the floor and your hips squared, lie on your back.
- Place the foot flat on the floor and bend the knee of your uninjured leg to a 90-degree angle.
- Contracting your quadriceps (the group of muscles on the front of your thigh) will stabilise the muscles on your straight leg.
- Hold duration is five to ten seconds.
- Repetition should be ten per session.
Side leg raise

- Position: Side-lying position.
- On a mat or the floor, lie on your right side. With your feet placed on top of one another and your legs outstretched, your body should be in a straight line.
- For support, cradle your head with your elbow bent or place your arm straight on the floor underneath it.
- Lift your left leg softly off your lower leg as you release the breath. When your obliques or lower back muscles begin to flex, stop lifting your leg.
- Hold duration is five to ten seconds.
- Repetition should be ten per session.
Prone leg raise

- Position: Prone lying position.
- Place your hands beneath your forehead while lying face down on an exercise mat.
- Make sure your toes are pointed and your legs are straight behind you.
- One leg should be raised slowly and without bending the knee.
- Do not raise your hips off the ground.
- Slowly and deliberately lower your leg back down.
- Hold duration is five to ten seconds.
- Repetition should be ten per session.
Bicycle crunch

Bicycle crunch steps:
- Position: Supine lying position.
- To stabilise your spine, contract your core muscles and pull in your abdomen.
- Use your hands to gently hold your head. Lift your feet off the ground by slowly bringing your knees up to a 90-degree angle while pulling your shoulder blades back.
- Exhale and, starting slowly, pedal like you’re on a bicycle, bringing one knee up to your armpit and straightening the other, both legs higher than your hips.
- In order to contact your elbow to the opposing knee as it rises, rotate your torso.
- With the second leg extended and the other knee drawn toward your armpit, twist to the opposite side until your elbow meets the opposing knee.
- Hold duration is five to ten seconds.
- Repetition should be ten per session.
Clamshell

Clamshell steps:
- Position: Side-lying position.
- With your knees bent at a 45-degree angle and your legs stacked, lie on your side.
- Use your upper arm to support your body while resting your head on your lower arm. Because the upper hip has a propensity to sway backwards, make sure your hipbones are stacked on top of each other.
- Pulling your belly button in will help you engage your abdominals, which will stabilise your pelvis and spine.
- After pausing, place your upper leg back on the ground as it was at the beginning.
- Hold duration is five to ten seconds.
- Repetition should be ten per session.
Heel raise

- Position: Standing position.
- For balance, place your hands lightly on a chair or counter in front of you and stand with your feet a few inches apart.
- Keep your knees straight as you slowly lift your heels off the ground and roll up onto your toes. After that, carefully bring your heels down to the ground.
- Hold duration is five to ten seconds.
- Repetition should be ten per session.
Cat-Camel stretch
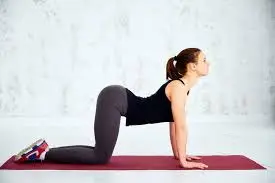
- Position: Tabletop position.
- Your ribs should be down, and your pelvis somewhat tucked in. Throughout the action, keep your chin tucked down, like you’re cradling an egg beneath it.
- In order to complete the cat stretch, exhale while you slowly start to round your spine toward the ceiling, bring your head toward the floor, and tuck your pelvis.
- To complete the cow stretch, take a deep breath, raise your head toward the ceiling, and slowly start arching your back while untucking your pelvis. You want the movement to be regulated and smooth without putting undue strain on your spine.
- Hold duration is five to ten seconds.
- Repetition should be three per session.
Child pose
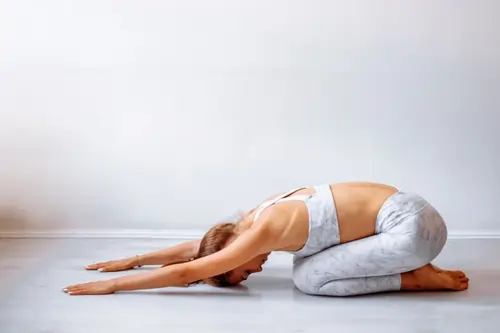
- Position: Sitting Position.
- With your big toes touching and the tops of your feet on the floor, spread your knees as wide as your mat.
- Root your forehead to the floor and place your belly between your thighs. Eyes, jaw, and shoulders should all be relaxed. Place your forehead on a block or two stacked fists if placing it on the floor causes discomfort. The vagus nerve is stimulated, and a “rest and digest” response is supported by an energy point located in the middle of the forehead, between the eyebrows. To get this calming effect, find a spot on your forehead that feels comfortable.
- Hold duration is five to ten seconds.
- Repetition should be three per session.
Double Knee to chest

- Position: Supine lying position.
- The front part of your knee should be held after you have flexed your hip as much as possible. Just under the knee, interlace your fingers.
- While progressing, you should add a modification. Given that performing both at once demands a significant amount of abdominal muscle, particularly for weaker backs, it is probably safest to begin with one and quickly progress to the other.
- Similar to the single-legged variation, clasp your wrists or interlace your fingers between your lower legs, just below your knees, if you are taking both up at once.
- Hold duration is five to ten seconds.
- Repetition should be three per session.
Step-up

- Position: Standing position.
- Step with your feet together or begin standing in front of a bench that is knee-height.
- Step your right foot onto the bench. Thrust your left knee up and push into your heel.
- Stepping back from the bench, lower your left leg.
- Hold duration is five to ten seconds.
- Repetition should be ten per session.
One leg stand

- Position: Standing position.
- Place your feet together and stand erect. When taking the test, stay safe and keep a steady object close by, such as a chair or kitchen counter, so you can grab it if you start to feel unsteady.
- Raise a foot off the floor. Avoid touching your legs, as this could provide you with additional stability. Keep track of the number of seconds you can stand on one foot by keeping an eye on a clock.
- Try the single-leg stance test while standing on a cushion or other soft surface if you can stand on one foot for at least 60 seconds. Hold duration is one minute.
- Repetition should be three per session.
Burpees

- Position: Standing position
- To begin, stand upright with your arms by your sides and your feet shoulder-width apart.
- Place your hands out in front of you as you begin to squat down. Extend your legs straight back as soon as they touch the floor to form a high plank position.
- As soon as you are in the high plank posture, hinge at the waist and jump your feet to your palms. As near to your hands as you can, place your feet; if needed, place them outside of your hands.
- Get to your feet and perform a jump squat right away.
- Hold duration is five to ten seconds.
- Repetition should be three per session.
Squat

- Position: Standing position.
- You should stand in a firm position and use the appropriate base of support when performing a squat.
- Force your hips back, bend at the ankles and knees, and press your knees slightly open as you assume a squat position with your heels and toes on the floor, shoulders back, and chest up. (Eventually, bend your knees to a 90-degree angle in order to achieve parallel.)
- Push into your heels, tighten your glutes, and stretch your legs to bring yourself back to a standing posture.
- Hold duration is five to ten seconds.
- Repetition should be three to seven per session.
Lunges
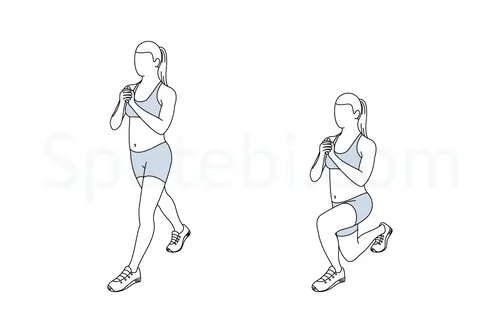
- Position: Standing position.
- Lower your body till the back knee is only a few inches above the ground while bending your knees. One thing to keep in mind for these exercises is that your body weight should be evenly distributed on both sides.
- The back knee is pointing toward the floor, and the front thigh is parallel to it.
- Push yourself back up to the starting position while keeping your weight on the heel of your front foot.
- Hold duration is five to ten seconds.
- Repetition should be three to seven per session.
Plank

- Position: Prone lying position.
- Start in the plank position with your toes and forearms on the floor, face down. Your elbows are precisely beneath your shoulders, and your forearms are pointing forward.
- Your head should be comfortable and fixed on the floor.
- Use your abdominal muscles to pull your navel toward your spine.
- Maintain an upright and firm torso and a straight body from your ears to your toes, without bending or sagging. This is the neutral spine position.
- Avoid tilting your ears and instead keep your shoulders down. You should place the balls of your feet under your heels.
- Hold duration is five to ten seconds.
- Repetition should be three to seven per session.
Bird Dog

- Position: Tabletop position.
- Form a straight line from your extended hand to your extended foot by extending the opposing leg behind you and pointing one arm straight out in front. Maintain a square hip position.
- If your lower back begins to arch, lift your leg as high as you can while keeping your back straight.
- Return to your hands and knees after a few seconds of holding.
- Try to limit any further hip mobility during the weight shift and maintain active abs throughout the entire workout.
- Turn to the opposite side.
- Hold duration is five to ten seconds.
- Repetition should be three to seven per session.
Superman

- Position: Prone lying position.
- Start by lying on your stomach with your legs straight and your arms above your head with the elbows at your ears.
- Then, using your core muscles, raise both arms and both legs straight up into the air while keeping your knees and elbows straight. The exercise’s name comes from this pose: You resemble the well-known red-caped superhero when he’s flying.
- Maintain a neutral neck posture, which entails keeping your gaze on the floor or six to twelve inches in front of you.
- Hold duration is five to ten seconds.
- Repetition should be three to seven per session.
Back extension stretch
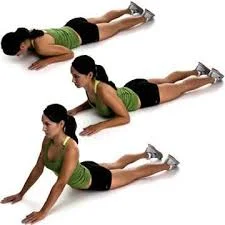
- Position: Prone lying position.
- On the pad, place your thighs. Secure them with your knees slightly bent, keeping your feet in line with your knees. Reach your arms out to the ground. Slide your shoulders back softly while using your core.
- Breathe in and stoop from your waist. Make contact with the ground.
- Hold duration is five to ten seconds.
- Repetition should be three to seven per session.
Pelvic rotation

- Position: Supine lying position.
- Bend your knees and lie on your back.
- Pull your muscles in and visualise your belly button going toward your spine to “brace” your stomach.
- Hold duration is five to ten seconds.
- Repetition should be three to seven per session.
Butterfly stretch

- Position: Sitting position.
- You can sit on the floor or a prop and press the soles of your feet together, too.
- Increase the intensity by bringing your feet closer to your hips.
- As you stretch and straighten your spine, tuck your chin into your chest.
- Feel the line of energy radiating out through the top of your head as you lengthen your spine with each breath.
- Drop heavily to the floor with each inhalation, then relax or sink a little deeper into the stretch.
- Hold duration is five to ten seconds.
- Repetition should be three to seven per session.
Dead burg exercise
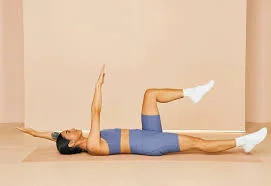
- Position: Supine lying position.
- Raise your hands till your elbows are above your shoulders and your fists are pointing inwards toward one another to begin.
- Lift your legs so that your knees and hips line up.
- As you exhale, slowly lower your right arm and left leg until they are just over the floor. On the other side, repeat.
- Hold duration is five to ten seconds.
- Repetition should be three to seven per session.
Standing lumbar extension
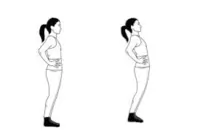
- Position: Standing position.
- Put both hands on the back of your hips to start. Your hips should be pushed forward as you extend your lower back. The lumbar spine should have a fairly uniform curvature.
- Hold duration is five to ten seconds.
- Repetition should be three to seven per session.
Walking

- Position: Standing position
- To complete the walking exercise effectively, start by picking a flat and safe area, such as a park, walking track, or treadmill.
- Start with five minutes of a simple warm-up, such as steady walking or gentle stretching.
- After that, begin walking at a leisurely pace while maintaining an upright posture, relaxed shoulders, and arms that swing naturally at your sides.
- Keep your body straight, contract your core, and gently land on your heels before rolling forward to push off with your toes. Increase your pace gradually until you can walk quickly enough to chat but not sing.
Breathing exercise

- Position: Sitting position.
- Begin by using diaphragmatic breathing, which involves taking a slow, deep breath via your nose to allow your belly to expand completely, and then softly letting it drop through your mouth.
- A slow rhythm of roughly 4 seconds in and 6 seconds out is what you want. For five to ten minutes, repeat this cycle.
- Another option is box breathing, which involves taking four breaths, holding them for four counts, exhaling for four counts, and then repeating the process.
- Avoid straining and maintain a steady breathing pattern throughout the exercise. Bring your attention back to the breath gently whenever it strays.
- Daily use of this technique can help lower stress, increase lung capacity, and promote mental clarity.
Avoid these home exercises if you have acute or chronic lower Back Pain.
When experiencing lower back pain, you should avoid performing the following activities at home:
- Partial crunches or curl-ups: A disc bulge is one of the various alterations that can develop when pain in the lower back is present. Age-related changes, lumbar canal stenosis, and these exercises exacerbate your lower back discomfort.
- Standing or sitting on your toes: this exercise can overstretch your lower back muscles and exacerbate your pain.
- Leg lifts (both legs together): This type of exercise puts more strain on the lumbar region and causes instability in the core.
- High-impact exercises, such as burpees and jumping jacks, can cause pain and jar the spine. Twisting motions, such as twist crunches and Russian twists, put the spinal discs under torsional stress.
- Lifting large weights: exercises such as deadlifts and weighted squats put additional strain on the lower vertebrae.
- Forward bending movement: Yoga poses that involve forward bending (such as touching toes or sitting in a forward fold) may cause irritation to the spinal nerves.
- Exercises for Back Hyperextension (Superman posture if unpleasant) stretch the muscles in the lower back and arch the spine.
- Cycling with bad posture: This type of exercise puts stress on the lumbar area because of the constant bending position.
- Plank with Poor Core Control: Sagging and increased back pain can result from a weak core.
Avoid these home exercises if you have acute or chronic Knee Pain.
Avoid doing some at-home activities that overstress or put strain on your knee joints if you experience knee discomfort. These may exacerbate discomfort or result in further harm.
When you have knee discomfort, you should avoid doing the following activities at home:
- Deep squats: They can exacerbate inflammation or cartilage injury since they place a lot of strain on the knee joint.
- Lunges: If done incorrectly, forward or walking lunges can put a strain on the knees.
- Jumping activities: that put impact stress on the knees include burpees, jumping jacks, and jump squats.
- Running on hard surfaces or in place might exacerbate knee discomfort due to the impact.
- High-impact aerobics: These exercises might cause knee irritation since they require a lot of leaping or bouncing.
- Weighted full leg extensions: This exercise directly strains the kneecap.
- Step-ups and stair climbing: these should be avoided if they hurt, since they put a lot of strain on the knees.
Benefits of exercise
- Enhances cardiovascular health: Lowers the risk of heart disease and stroke by improving lung and heart function.
- Weight management: Aids in weight management by promoting calorie burning and preserving a healthy metabolism.
- Strengthens bones and muscles: Lowers the risk of osteoporosis and frailty by promoting bone density and muscular growth.
- Boosts immune function: Consistent exercise can lower inflammation and improve immunological response.
- Reduced mood swings: Improves mood by raising serotonin and endorphins, which lessen stress, anxiety, and depression.
- Enhances cognitive function: Following aerobic exercise, it improves memory, focus, and decision-making.
- Improve sleep cycle: Encourages deeper, more restorative sleep by assisting you in falling asleep more quickly.
- Boosts energy levels: Enhances mitochondrial and oxygen supply, which lessens weariness.
- Promotes healthy ageing by preserving independence and mobility while lowering the risk of chronic conditions like diabetes, arthritis, and some types of cancer.
- Increase lifespan: Frequent exercise is linked to better quality of life and reduced mortality rates.
Prevention during exercise
- Warm up correctly: To get your muscles and joints ready, start with 5–10 minutes of dynamic stretching or mild aerobic exercise.
- Make use of proper form: To prevent strain, prioritise technique over intensity, particularly when performing bodyweight exercises like push-ups or squats.
- Begin slowly: Increase complexity, length, and intensity gradually to give your body time to adjust.
- Remain hydrated: To promote muscular function and circulation, sip water prior to, during, and after your workout.
- Pay attention to your body: If you experience severe discomfort, lightheadedness, or extreme exhaustion, stop; these are indicators that you need to relax or adjust. To avoid falls or mishaps, clear your area of debris and make sure the surface is firm and non-slip.
- Dress appropriately: If necessary, put on supportive shoes and breathable, flexible clothing.
- Assure ventilation: A location with enough ventilation helps control temperature and avoid overheating.
- Start with the warm-up or cool-down, which provides you with a very good boost for exercise.
- Overtraining: Too much exercise without a break can cause burnout, exhaustion, or overuse problems.
- Ignoring contraindications: you should avoid exercises that could exacerbate any joint problems or medical illnesses you may have.
Contraindications
The following are reasons why doing exercises at home without any equipment is not recommended:
- Acute wounds, including sprains, fractures, or problems following surgery.
- Cardiovascular conditions (e.g., unstable angina, recent heart attack) or uncontrolled hypertension.
- Severe pain in the joints, flare-ups of arthritis, or instability in the spine.
- Severe osteoporosis with a high fracture risk.
- Respiratory issues, such as severe COPD or uncontrolled asthma.
- Neurological disorders that impact motor function, balance, or coordination (e.g., Parkinson’s disease, stroke sequelae).
- Severe vertigo, dizziness, or fall risk.
- Extreme obesity or physical restrictions that make it challenging to move safely.
- High-risk pregnancy or pregnancy issues (unless prescribed by a physician).
- Any unexplained pain, discomfort in the chest, or dyspnea while exercising.
Conclusion
When done properly, at-home exercise without any equipment is a safe, practical, and affordable way to stay active, increase fitness, and preserve general health. It is adaptable to various age groups and fitness levels, gives flexibility, and takes up little room.
However, it’s crucial to take into account each person’s unique health problems, use appropriate forms, and stay away from workouts that could exacerbate pre-existing injuries or medical illnesses.
Home workouts can be a good substitute for gym training if done carefully, under supervision, and consistently. They can help people gain strength, flexibility, endurance, and a higher quality of life.
FAQs
Is a 20-minute home exercise effective?
Yes, if done consistently and at the right intensity, a 20-minute at-home workout can be quite beneficial. Muscle tone, cardiovascular health, mobility, and calorie burning can all be improved with quick workouts that include strength, flexibility, and cardio-based exercises. Even 20 minutes a day can eventually result in major health advantages because consistency and proper technique are more important than workout duration. It gives novices a realistic place to start, and it simply integrates into everyday schedules for people with hectic schedules. A 20-minute workout at home can be sufficient to enhance general fitness, energy levels, and mental health when paired with a healthy diet and way of life.
Which workout, without any equipment, burns the most calories?
Combining a squat, push-up, and jump, this full-body workout works several large muscle groups at once, raising heart rate and calorie consumption significantly. In addition to seated squat, other high-intensity bodyweight workouts that increase strength, endurance, and cardiovascular fitness include mountain climbers, jump squats, and high knees. These exercises are great options for weight reduction and general fitness without the need for equipment since they involve explosive movements and constant engagement, which burn calories during the workout and increase metabolism afterwards.
How to do the squat exercise?
Standing with your feet shoulder-width apart and your toes pointing slightly outward is the proper way to perform a squat exercise. Maintain a raised chest, contract your core muscles, and focus directly ahead. Keeping your knees in line with your toes, slowly bend them as you start the exercise by pushing your hips back as though you were going to sit on a chair. Make sure your heels stay flat on the ground and your back stays straight as you lower yourself until your thighs are parallel to the floor or as low as your mobility permits. To get back to the beginning posture, completely extend your hips and knees by pressing through your heels. As you descend, inhale, and as you ascend, exhale.
What are the benefits of home exercises?
Exercise at home has several advantages for emotional and physical well-being. It makes fitness more accessible and inexpensive by enabling people to maintain an active lifestyle without the requirement for a gym membership. Working out at home allows you to schedule your workouts at any time that works for you, which helps you stay consistent. Additionally, it offers a cosy and private setting, which lessens the hesitancy or self-consciousness that some people might experience in public settings. In terms of physical health, at-home workouts help with weight management, energy enhancement, cardiovascular health, muscle strength, and flexibility. Encouraging the release of endorphins improves mood, reduces stress, and increases focus.
Which exercise should be avoided while having lower back pain?
Exercises that put undue strain or stress on the spine and surrounding muscles should be avoided when dealing with lower back discomfort. Exercises that put more strain on the spinal discs and lower back muscles, like toe touches, sit-ups, leg lifts, and heavy lifting (particularly deadlifts or squats done incorrectly), can exacerbate back pain. Avoiding high-impact exercises like running, jumping, or twisting motions is also advised because they could make the discomfort worse or cause more damage. Furthermore, if performed improperly, workouts that require deep backbends or severe spinal rotation—like some advanced yoga poses—can cause lower back discomfort.
Which exercise should be avoided while having neck pain?
Exercises that strain the neck muscles or cause the cervical spine to move excessively should be avoided if you have neck pain. By squeezing or tightening the neck and shoulder region, exercises like overhead presses, crunches, shoulder shrugs with large weights, and sit-ups can exacerbate neck pain. In a similar vein, if high-impact activities like sprinting, jumping, or contact sports result in neck jarring, they should be avoided. Pain and stiffness can also be exacerbated by stretching activities that require deep neck extensions, backward bending, or quick neck rotations. Furthermore, bad posture during aerobic or strength training exercises might make neck pain worse.
What are the common mistakes when doing exercise at home?
When working out at home, a lot of people make typical mistakes that can lower workout efficiency and raise the risk of injury. Ignoring the warm-up and cool-down, which are crucial for getting the muscles ready and avoiding pain, is one of the worst errors. Joints and muscles can be strained by bad posture and improper technique when performing activities like push-ups, planks, and squats. Another common mistake that results in exhaustion and muscle damage is overtraining without adequate recovery. Additionally, some people use uneven floors or don’t wear appropriate footwear, which can lead to foot pain and balance issues. Furthermore, doing haphazard workouts without development or without adhering to a set training program may not provide the intended outcomes.
Which exercise should be avoided while having knee pain?
Exercises that place undue strain or pressure on the knee joints should be avoided when knee discomfort is present. Running, leaping, and deep squats are examples of high-impact exercises that can exacerbate discomfort and further injure joints. Because they put more strain on the knees, exercises like lunges, full squats, leg presses with large weights, and high-intensity aerobics should also be avoided. Sports like basketball and soccer that require twisting or abrupt direction changes can also make knee discomfort worse. Instead, to stay healthy without making your knee issue worse, concentrate on low-impact activities like swimming, cycling, or light stretching while being supervised by a physiotherapist.
References
- Song, D. (2023, September 2). Shoulder Roll — Rehab hero. Rehab Hero. https://www.rehabhero.ca/exercise/shoulder-roll
- Shoulder squeeze Exercise | Saint Luke’s health System. (n.d.-b). https://www.saintlukeskc.org/health-library/shoulder-squeeze-exercise
- Freutel, N. (2016, December 19). Pendulum and codman exercises for shoulder rehabilitation. Healthline. https://www.healthline.com/health/fitness-exercise/pendulum-exercises-for-shoulders#Standing-Pendulum-Exercises
- Cronkleton, E. (2020b, November 24). How to do heel slide exercises. Healthline. https://www.healthline.com/health/exercise-fitness/heel-slides#cautions
- Inverarity, L., DO. (2022b, November 21). How to do a straight leg raise. Verywell Health. https://www.verywellhealth.com/how-to-the-straight-leg-raise-2696526
- Prone leg raise – Trainwell. (n.d.). Trainwell. https://www.trainwell.net/exercises/prone-leg-raise
- Ms, E. Q. (2023, May 26). How to do a bicycle crunch: fitness tips, variations, and common mistakes. Verywell Fit. https://www.verywellfit.com/bicycle-crunch-exercise-3120058
- How to do heel raises | NYP. (n.d.). NewYork-Presbyterian. https://www.nyp.org/healthlibrary/multimedia/how-to-do-heel-raises
- Buettner, K. (2018, September 18). How and Why You Should Do the Clamshell Exercise. Healthline. https://www.healthline.com/health/fitness-exercise/the-clamshell-exercise#classic-clamshell
- Superman Exercise. (n.d.). [Video]. Hingehealth. https://en-gb.hingehealth.com/resources/articles/superman-exercise/
- Davis, N. (2020a, May 29). 13 Body-Burning moves that require no weights. Healthline. https://www.healthline.com/health/fitness-nutrition/no-weight-workout#3-Yoga-Poses-to-Build-Strength
- Seaver, M. (2024, December 19). Here’s How to Do Squats Properly, Safely, and Effectively Every Time. Real Simple. https://www.realsimple.com/health/fitness-exercise/workouts/squat-form
- Cpt, P. W. (2024b, June 13). How to do lunges: proper form, variations, and common mistakes. Verywell Fit. https://www.verywellfit.com/how-to-lunge-variations-modifications-and-mistakes-1231320
- Ms, E. Q. (2024c, May 13). How to do a plank: proper form, variations, and common mistakes. Verywell Fit. https://www.verywellfit.com/the-plank-exercise-3120068
- Pt, L. I., DO. (2021, July 5). How to do a single leg stance. Verywell Fit. https://www.verywellfit.com/single-leg-stance-exercise-for-better-balance-2696233
- Pt, B. S. (2024, June 7). 6 easy hamstring stretches to do at home. Verywell Fit. https://www.verywellfit.com/hamstring-stretches-2696359
- Ryt, A. P. (2024b, July 7). How to Do Child’s Pose in Yoga. Verywell Fit. https://www.verywellfit.com/childs-pose-balasana-3567066
- Rogers, P. (2024a, June 28). Bird dog exercise: proper form, variations, and common mistakes. Verywell Fit. https://www.verywellfit.com/how-to-do-the-bird-dog-exercise-3498253
- Cpt, A. A. (2024b, August 6). Knees to chest stretch for low back muscles. Verywell Health. https://www.verywellhealth.com/knees-to-chest-exercise-296870
- Cronkleton, E. (2020b, January 17). How to do a better butterfly Stretch. Healthline. https://www.healthline.com/health/butterfly-stretch#steps
- Pelvic tilt exercise. (n.d.). https://www.columbiadoctors.org/health-library/multimedia/pelvic-tilt-exercise/
- Nunez, K. (2024a, January 25). How to do back extension exercises. Healthline. https://www.healthline.com/health/back-extension-exercise#tips-to-start
- Song, D. (2023a, June 21). Standing lumbar extension — Rehab hero. Rehab Hero. https://www.rehabhero.ca/exercise/standing-lumbar-extension