Grasshopper Pose (Parsva Bhuja Dandasana)
What is Grasshopper Pose?
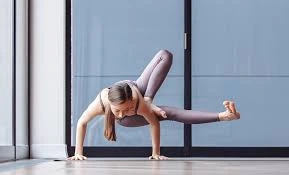
Grasshopper Pose (Parsva Bhuja Dandasana) is an advanced arm-balancing yoga posture that combines a deep twist with strong core and hip engagement. It helps build upper-body strength, improves balance, and enhances overall body control.
The lower back must be flexible enough to move in a twist, the hips must be sufficiently warmed, and the forearms and wrists must possess the strength to support the body in a twist. When in a twist, the power of the pelvic floor and core muscles aids in maintaining balance while breathing gently.
Meaning:
Bhuja Parsva The Sanskrit term “dandasana” means “side,” “bhuja” means “arms,” “danda” means “stick,” and “asana” means “pose.” This pose requires the body to remain balanced on either side of the arms while maintaining a straight leg like a stick. Its form resembles that of a grasshopper at rest. The name is, thus.
Grasshoppers are renowned for their lengthy and precise leaps, which are made possible by the tremendous force produced by their legs. In the same vein, performing Parsva Bhuja Dandasana strengthens and energises the practitioners’ muscles, enabling them to perform powerful motions on a regular basis.
Muscle Work During Grasshopper Pose:
- Arms and Shoulders Muscles
- Hip Muscles
- Gluteus Muscle
- Quadriceps Muscle
How to Perform?
- Start by learning the Half Chair Pose, or Parivrtta Ardha Utkatasana, which involves folding your right leg and placing it on your left thigh. Using your hands, perform Namaste Mudra. Then, slightly turn your torso to the right so that your right knee meets your right foot’s heel.
- Come on the balls of your left foot from here. Keeping your torso twisted, slowly descend to the position where your palms are shoulder-width apart and away from the left side of your body.
- Now, try shifting your weight onto your arms by shifting your shoulder forward so that the elbow can provide the angle required to keep the bending stance.
- In order to reach the ultimate pose, place your right foot firmly over your right elbow and gradually lift off your left foot as well. In the direction of your left knee, maintain a straight left foot.
- To engage your hips, now let your thighs press against the hip joint. After holding this position for as long as your body permits, carefully place your left foot on the ground and raise your right foot from your right elbow.
- Next, return to the Parivrtta Ardha Utkatasana by slowly bringing your torso to the centre and lifting your palms, and then unwind.
Benefits:
Enhances Digestive Health:
The grasshopper pose’s forward bend puts strain on the abdomen and massages the digestive tract. Consequently, it creates a stimulated phase that includes the presence of undigested material, stomach dilatation, and a drop in the pH of the stomach contents. Neural, hormonal, and local reactions make up this phase. These reactions cause strong contractions and discharges.
Increases Adaptability:
This pose is a little difficult for practitioners because of the twisting, but it also gives the body speed. Stretching throughout makes the waist, lower back, spine, thighs, and shoulder blades extremely flexible. increases total flexibility as a result.
Strengthens the Upper Body:
The grasshopper pose’s final position places a lot of strain on the upper body. The upper body’s musculoskeletal system is activated by this bodyweight tension, strengthening the shoulder, wrist, forearms, back muscles, and spine. Consequently, make someone an artistic warrior.
Enhances Concentration and Focus:
This asana’s physical exertion raises dopamine, norepinephrine, and serotonin levels in the brain, which in turn improves practitioners’ ability to focus and concentrate. But it might also be useful in lessening the signs of ADHD (childhood neurodevelopmental disorders).
Lessens anxiety and tension:
The grasshopper stance improves blood circulation throughout the body because of its advanced nature. The brain’s feel-good neurotransmitters, endorphins, are further released when the pituitary and hypothalamus glands are stimulated. Consequently, it aids in the person’s recovery from stress and anxiety.
Beginner’s Advice:
- New practitioners of the grasshopper position may experience hamstring and hip stiffness. To release the tension between the hips and hamstrings, one should practise preparatory poses. Because flexibility lessens the number of the asana’s drawbacks.
- Beginners should go through the twisting and turning of their bodies as they can easily hold the ultimate position. To prevent the elbow’s shakiness, which could cause the foot to shift on the elbow, they should also firmly place their palms on the ground.
- The practitioners go from standing to arm balancing. In order to help the upper body maintain the weight of the legs, they can use their left elbow to support their left hip.
Preparatory Pose:
- Half Pigeon Pose
- Side Crane Pose
- One-Legged King Pigeon Variation with a twist
- Revolved Firelog Pose
- Malasana
Modifications:
- Practitioners must shift their shoulders forward to create an angle in the elbows to support the grasshopper stance. Inexperienced balancers may be more likely to fall forward. One way to avoid this is to put a bolster or a soft cushion beneath their head to keep it from hitting the ground.
- Blocks can be placed beneath the palms of practitioners who are unable to sustain the high position, which is necessary for perfect balance. The balanced structure of the stance is further enhanced by the fingers clutching the block.
- Because the final posture of the grasshopper pose requires a lot of core power, it can be challenging for practitioners to keep their left leg straight. Then, one can just rest his/her foot on the blocks.
Variations:
Baby Grasshopper Pose:

An easier variant of the primary grasshopper stance is the baby grasshopper pose.
In the grasshopper stance, the lower body is balanced, and the left leg is supported by the two hands. The tiny grasshopper, on the other hand, becomes simple because it requires the practitioner to hold their bodyweight with their left hand and right leg. In the final stance, however, the body is still bent to the left.
Funky Grasshopper Pose:
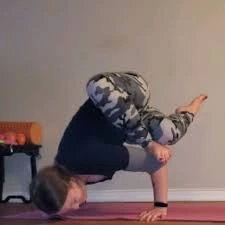
The advanced version of the grasshopper posture, known as “funky grasshopper pose,” places the torso on the left palm and right forearm, with the right thigh resting on the left upper arm and the right foot’s sole on the triceps. The shoulder is still slightly inclined towards the ground.
Precautions:
- When performing the grasshopper stance, one should firmly place their palms on the ground as they descend to the floor in a twisted torso. Avoid quickly transferring your weight onto your palms, as this could cause an elbow injury.
- The most crucial alignment for the grasshopper position is to place your foot on your triceps or elbow. Therefore, practitioners need to remember that the inner arch of the foot is directly on top of their triceps or upper elbow.
- The shoulder must be somewhat forward to offer the required balance when practitioners start to raise their left leg. Instead of lifting the back of the hand, one should concentrate on pressing the fingers deeply into the ground.
Contraindications:
- Grasshopper posture should be avoided by practitioners who suffer from pain in the elbow, knee, pelvis, spine, neck, wrist, or any of these joints. Ignoring this would make the suffering worse.
- This asana should not be performed by pregnant women who are in the final stages of their pregnancy. However, before starting the practice in the beginning, one should speak with a doctor.
- It is recommended that practitioners who suffer from carpal tunnel syndrome avoid doing the grasshopper position. This could exacerbate your hand’s tingling and numbness from pressure on your wrist’s median nerve.
- This asana should not be performed by those with high blood pressure since the twisting may put pressure on the heart, which could be lethal. Therefore, avoid doing the position or see your doctor before doing so.
Conclusion:
Grasshopper posture is a great approach to strengthen your upper body and increase the flexibility of your thighs, hamstrings, groin, and spine. However, by relieving the practitioners’ stress and worry, it also aids in resolving the mental elements. Regular practice of this pose might have long-lasting benefits for the practitioner.
FAQs
What are the benefits of the Grasshopper Pose?
Strengthens the core and upper body. Lifting and maintaining the pose requires isometric contraction of the pectorals, anterior deltoids, triceps, and deep core stabilisers like the transversus abdominis and obliques.
increases the mobility of the hips.
What is the Grasshopper Pose in yoga called?
The yoga pose Parsva Bhuja Dandasana, sometimes called Grasshopper Pose, opens the hips, improves focus, and strengthens the arms, shoulders, and core muscles.
What muscles does the Grasshopper Pose work?
The yoga pose Parsva Bhuja Dandasana, sometimes called Grasshopper Pose, opens the hips, improves focus, and strengthens the arms, shoulders, and core muscles.
Does the Grasshopper Pose require flexibility?
This pose, also known as Grasshopper Pose, combines an arm balance, a deeper hip opening, and a twist. The lower back must be flexible enough to move in a twist, the hips must be sufficiently warmed, and the forearms and wrists must possess the strength to support the body in a twist.
Is the Grasshopper Pose an arm balance?
I find that Baby Grasshopper Pose is a delightful arm balance that is frequently very approachable. Because of its low point of gravity, you can always grab for your leg if you can’t reach your foot, but maintain the grip from above.
How do you warm up for the Grasshopper Pose?
Opening the lower back and core muscles with a standing hip opener…
Opening the lower back, gluteus maximus, and hip flexors when seated…
Arm balance poses, which strengthen the pelvic floor and core muscles and open the hips
What are the benefits of a Baby Grasshopper Pose?
Ankles, wrists, back muscles, thighs, shoulders, arms, and legs can all be strengthened with the baby grasshopper position. This arm balance pose facilitates deeper breathing and opens the rib cage. This enhances the respiratory system’s performance. Additionally, this pose strengthens the muscles in your pelvic floor.
References:
- Grasshopper Pose (Parsva Bhuja Dandasana): How to Do, Benefits, Precautions – Fitsri Yoga. https://www.fitsri.com/poses/grasshopper-pose
- Grasshopper Pose Yoga Pose (Parsva Bhuja Dandasana). Tummee. https://www.tummee.com/yoga-poses/Parsva Bhuja Dandasana