

Home Exercise For Muscle Gain
Introduction
Home exercises for muscle gain are an effective way to build strength, improve fitness, and increase muscle mass without going to a gym.
With the right combination of bodyweight exercises, resistance bands, or dumbbells, you can target all major muscle groups from the comfort of your home.
The good news? Effective muscle building doesn’t require advanced tools or a costly gym subscription. You can achieve remarkable outcomes from your living room with commitment and the appropriate strategy.
Everything you need to know about building muscle at home with the least amount of equipment and the best outcomes will be covered in this tutorial. Let’s talk about:
- The fundamentals of at-home muscle building
- The advantages of at-home muscle-building exercises
- The top 12 at-home workouts for gaining muscle
- An example of an at-home exercise program for gaining muscle
- Advice on optimizing your workouts and gaining muscle at home
- The key principles of building muscle at home
Just before delving into particular exercises, it’s necessary to know the underlying concepts that promote muscle growth:
- Progressive overload: If you want to grow muscle, you must continuously challenge your muscles by increasing resistance, volume, or intensity.
- Adequate protein consumption and an overall calorie excess are necessary for muscle growth in order to supply the building blocks for new tissue.
- Adequate recuperation: Muscles develop during downtime rather than during exercise. Make sure you’re getting adequate sleep and giving your muscles time to rest in between workouts.
Consistency, proper nutrition, and progressive overload are key factors for achieving the best muscle-building results through home workouts.
The benefits of building muscle at home
According to regular gym settings, working out at home has several benefits, especially when it comes to gaining muscle:
- Convenience: You don’t have to wait for equipment to become available or travel to and from your gym.
- Privacy: For beginners who might feel self-conscious, working out at home is ideal.
- Cost-effectiveness: Reduce the cost of money and gym subscriptions.
- Flexibility: Exercise whenever you choose, at any time of day.
- Efficiency: Focused exercises result in less time wasted.
Building muscle at home develops self-motivation and discipline that extends fitness into other facets of life.
Home Exercise For Muscle Gain
Chest & Triceps
Push-ups

Start on all fours with your hands slightly wider than your shoulders. begin on all fours. Get on your hands and knees and find a comfortable area on the floor to work out. Place your palms flat on the floor, just behind your shoulders. Point your fingers directly in front of you. Keep your head and neck in alignment with your back by looking straight down.
To prevent soreness in your hands and wrists, perform push-ups on an exercise mat.
Make a straight line with your back by extending your legs. As far back as you can, walk your feet. Place your feet close to one another or a few inches apart, then use the balls of your feet to support your weight. For the duration of the push-up set, maintain a straight back and legs.
Avoid causing your body to become out of alignment by either raising your hips too high or allowing them to droop too low.
Your elbows should be at a 90-degree angle as you descend to the ground. As you bend your elbows, contract your core, and take a deep breath. As you lower your body toward the floor, maintain a straight back and legs. When your chest reaches between two and three inches (5.1 and 7.6 cm) from the ground, stop.
To get more control over your motions, try lowering yourself for around two seconds.
As you firmly press your hands against the floor, exhale. Without bending your knees, allowing your hips to drop, or raising your hips, raise your body. You’ve finished one rep when you straighten your arms and return to your starting position!
You run the danger of hurting your elbows if you lock them as you go back to your starting position.
Don’t worry if your arms begin to shake or if you are unable to return to your initial posture.
Make an effort to perform as many push-ups with proper technique as you can. To establish an appropriate beginning point, count how many push-ups you can perform in a row without losing form. Include the workout in your schedule and take a day off in between. Try increasing the number of repetitions or sets in your workout as the push-ups become more possible to push yourself and gain muscle.
Try performing five to ten push-ups at a time as a good place to start. Try increasing the number of repetitions by five at a time until that becomes comfortable.
Chair dips

Use a bench, stable chair, park bench, large step, or other elevated surface that is about knee high.
Starting from the most evident posture is the simplest method to execute chair dips. Take a seat and surround the front edge of the chair or bench with your fingertips. Your buttocks should be slightly off the chair as you slide your body forward. Start with your arms outstretched. Make sure your heels are slightly ahead of your knees by adjusting your feet.
Phase of Lowering (Eccentric)
Don’t let your elbows flare out to the sides or sink into your chest; instead, keep your arms parallel and aim them directly behind you. Just drop until your elbows are at a 90-degree angle, then stop.
Phase of Lifting (concentric)
Push yourself back to the beginning posture with your triceps.
Back & Biceps
Pull-ups

Hold a pull-up bar with hands that are a little broader than your shoulders.
Hold the pull-up bar with your palms facing away from you for a traditional pull-up. With your feet off the ground, either straight or slightly bent, hang from the bar while keeping your arms outstretched.
Alternatively, place your hands with your palms facing you for a little simpler variant. This exercises your lats more forcefully and is also known as a “chin-up.”
Pull your torso up with your arms until your chin is slightly above the bar.
Exhale and pull yourself straight up while solely using your arms. Pull your elbows downward. Pull until your chin barely clears the pull-up bar, aiming for a fluid and leisurely rise (count “one Mississippi” to help pace yourself).
As you raise yourself and contract your core, cross your feet below you to maintain the center of your bodyweight. Draw your shoulder blades inward and downward.
When performing a pull-up, avoid arching your back or kicking your feet. It can cause injury and doesn’t increase your strength.
After a little while, take a breath and descend again until your arms are fully stretched. Move at a steady speed to strengthen your muscles and get ready for the next pull, just like you did on the way up.
Work your way up to around five pull-ups, starting with only one. Try two to three sets of five each day, then progressively increase the reps until you can complete sets of ten.
Inverted rows

Aim for two to three sets of eight to twelve repetitions for the inverted row. Throughout all sets and repetitions, pay close attention to maintaining proper technique.
1. Place a barbell at around waist height on a squat rack.
2. Under the barbell, lie face-up.
3. Use an overhand grip to hold the barbell just outside of your shoulders.
4. Squeeze your glutes and contract your core to raise your hips. From head to toe, your body should be in a straight line. Throughout the exercise, keep your chin tucked, as though you were holding an egg below it. This position should be the starting point for all repetitions.
5. Start the upward motion by bending your elbows to a 45-degree angle and pulling the bar into the center of your chest using your lats.
6. As you draw your body in the direction of the barbell, let your shoulder blades retract. You should align your upper arms with your body.
7. At the peak of the exercise, make sure your body is still in a straight line.
8. Straighten your elbows and descend to the beginning position while keeping your rowing alignment. Let your shoulder blades extend.
Superman exercises

The “Superman” is one self-directed workout that can be beneficial. The Superman exercise is a low-intensity strengthening and stability workout that can be done every day. Additionally, it can help avoid pain by strengthening your lower back. Just be careful not to do it alone, but to incorporate it into a more thorough regimen.
To carry out the Superman:
To begin, lie on your stomach with your arms extended above your head, elbows near your ears, and your legs straight.
Then, using your core muscles, slowly raise both arms and legs straight up into the air while maintaining a straight knee and elbow.
The exercise’s name comes from this position: when you fly, you mimic the well-known red-caped superhero.
Maintain a neutral neck position by keeping your eyes either on the floor or six to twelve inches in front of you.
After reaching the highest posture, maintain it for a short while before lowering your arms and legs gradually to the floor.
Legs & Glutes
Squats
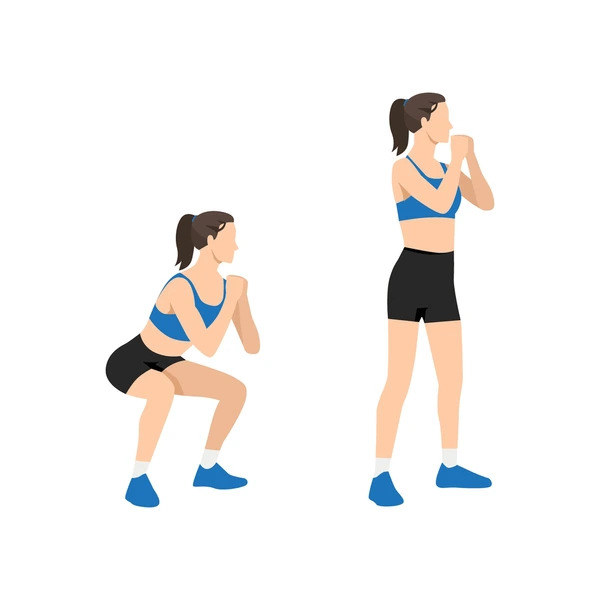
When performing these exercises, maintaining this correct form will reduce your risk of strain or injury. Additionally, it is helpful to keep in mind the differences between the eccentric and concentric portions of squats as you approach slowly toward the floor and then swiftly raise yourself up from a squatting position.
Here’s how to properly perform a simple squat:
As if you were sinking into a chair, hinge at your hips and push your butt back.
Bend your knees and maintain them wide as you slowly lower your body; do not collapse inward.
Lower your hips as far as you feel comfortable or until your thighs are parallel to the floor. Keep your weight on your heels and your knees aligned with your toes while you perform this.
Hold the position for three to five seconds while keeping your spine neutral to avoid straining your lower back.
After adjusting your alignment and posture, repeat the exercise ten to fifteen times.
You can grasp onto a strong chair, countertop, or railing for additional balance and support if squatting proves to be challenging. Squats with your back against the wall are another option.
Lunges

Every major muscle group in your lower body is worked during a lunge, including:
Your quadriceps assist you in pushing yourself back up after a lunge.
The glutes, which aid in standing up following a lunge.
Your hamstrings are used to lower your body into a lunge. By carefully lowering yourself into a lunge, you may emphasize your hamstrings even more.
Lunge Forward
Place your feet hip-width apart and point them forward. Pull your belly button up and in toward your spine to activate your core. You should start in this pose.
Keeping your feet hip-width apart, take a step forward with your right foot. With your front thigh parallel to the floor and both legs forming a 90-degree angle, bend your knees. Lower your body as near to the ground as you can, or until your left knee touches it. Maintain a strong core and an upright torso (try not to lean forward). Imagine that someone is attempting to topple you over while you are performing the lunge to fully activate these muscles.
To go back to the beginning position, pause, then squeeze your glutes and push through your front foot. Be sure to stand upright. That’s one rep from beginning to end.
You can switch legs or perform all of your repetitions on one side before moving on to the other; the latter may feel more difficult because you’re straining the same muscles continuously for a longer amount of time.
Bulgarian split squats

Finding the right foot placement to do the Bulgarian split squat comfortably requires some trial and error, which is the most important thing to keep in mind. One foot will be placed on a seat behind you, but to reach the precise position that feels best, you might need to hop your front foot about a little. To make sure you’re set up correctly, it’s acceptable to try a few practice repetitions before beginning your main set.
For the most basic Bulgarian split squat, all you need is a solid chair or bench, though a plyo box would do. You might wish to add kettlebells or dumbbells for more resistance as you get used to the activity.
With your feet hip-distance apart, your shoulders back, your chest and eyes pointing straight ahead, and your core engaged, take a position about two feet in front of a strong bench or chair.
There are two ways to accomplish this. One way is to position the top of your foot on the bench such that your ankle joint is about in line with the bench’s edge. The alternative is to flex your ankle and use your toes and the ball of your foot to find your balance, much like in a classic lunge exercise.
Make sure your feet are still around hip distance apart, if not slightly more.
Your elevated foot should not be directly behind your front, as this will make balancing much more challenging.
Recall that the exercise’s engagement and movement are concentrated on the front leg; your back foot serves only to keep you balanced.
As you proceed through the exercise’s downward phase, engage your core with your chest raised and your eyes fixed forward. Bend your left knee, letting your right knee and ankle bend naturally without using your back leg to support the weight.
As you descend, maintain an even distribution of weight over your left foot. Make sure your left knee stays in line with your left toes by hingeing slightly forward at the hips so it doesn’t bow outward or collapse inward. Towards the end of the exercise, you could notice that your left knee begins to slightly protrude over your left toes. This simply depends on how comfortable you are and how flexible your ankles are, so it’s neither necessarily bad nor wrong.
During this downward phase, inhale and descend until your left quadriceps are about parallel to the floor.
Push through your left foot to return to standing, and power the exercise’s upward phase using your left quadriceps and glute. Breathe out as you push yourself to stand.
After doing a complete set to one side, step your right foot off the bench or chair.
Calf raises

As long as it’s in a secure setting, stand on the edge of any kind of step, including stair steps. Make sure the step is near the ground and not too high. If you lose your balance, you don’t want to fall too far.
Calf Raises steps:
Keep your tailbone tucked in and stand erect. Pull in your abdomen and upper ribs to activate your core. Make sure the balls of your feet are firmly planted on the step’s edge. You should have your heels over the edge.
Use a nearby wall or railing to practice this technique if you feel unsteady or like you’re losing your balance.
Put your hands on the railing or the wall.
To stand on your tiptoes, raise your heels. Keep your legs straight and place the majority of your weight on the balls of your feet.
For two seconds, remain on your tiptoes. Next, shift your weight away from the balls of your feet and start to descend your heels. Your heels should be lowered till they are below the platform or step.
The downward motion should cause your calf muscles to stretch.
Continue doing this until you’re fatigued.
Glute bridges

- Bend your knees and lie flat on your back with your feet flat on the floor. Your toes should point straight ahead, your feet should be hip-width apart, and your heels should be six to eight inches from your glutes.
- With your palms toward the ceiling, place your arms by your sides.
- Tighten your glutes and core as you start to elevate your hips toward the ceiling.
- Without arching your back, raise your hips as high as you can. The goal is to raise your hips until your body is in a straight line from your knee to your hip and shoulder.
- Squeeze your glutes as hard as you can while maintaining the highest position for two seconds.
- Slowly lower your hips to the floor while keeping your glutes and core taut.
- You should feel your glutes the most throughout this exercise. If your hamstrings seem to be working the hardest, try moving your feet back, closer to your glutes.
- If you feel that your lower back muscles are working the hardest, go back to the starting position and realign your back such that your hips are tucked under and your abs are engaged. As you raise your hips, try to maintain a neutral core to avoid arching your lower back.
Core
Planks

Plank exercises train your core muscles, which are located between your diaphragm and pelvic floor. The area is also known as your trunk. These muscles support your movements and keep your spine stable.
The following are some of the core muscles:
Running along the side of your abdomen are your obliques. Rectus abdominis (commonly known as “abs”)
The transversus abdominis is the deep abdominal muscle that surrounds your sides and spine.
In general, plank workouts improve your capacity to stabilize your abdomen. Planks can also stimulate other linked muscles, such as your lower back, hamstrings (the muscles in the backs of your thighs), and glutes (the muscles in your buttocks).
How to execute a plank
Raise your body off the ground while in the pushup position to execute a standard high plank. To achieve proper form, make sure you:
Your elbows are precisely below your shoulders.
While using your glutes, slightly tilt your pelvis forward.
It has a tight core. Your abdominal muscles should be contracted. Lawton states, “It should be firm if someone poked your abdomen.” “You can accomplish that by slightly rotating your hips backward.”
The back and butt are straight rather than dropping or protruding.
Side planks

It’s helpful to execute a conventional plank with both hands before moving on to a side plank. This will ensure that you feel sturdy in the pose and that all of your muscles are used.
Start in a high plank position with your shoulders stacked over your wrists, your legs extended far behind you, and your toes tucked. As you contract your core and bring your belly button closer to your spine, pull the muscles on the sides of your abdomen inward (do not suck in). While keeping your head in a neutral position, gently squeeze your glutes. Draw a straight line from your heels to the top of your head by looking slightly ahead.
Next, position your left foot on top of your right by rolling to the outer edge of your right foot. As you swivel your hips and shoulders to face the side, properly stack your left hip and shoulder over your right.
Take care not to sink into your shoulder as you apply firm pressure with your right hand. Keep your hips up and stacked rather than tilting your pelvis up or down.
Lift your left arm to the sky. Hold this position for ten to sixty seconds.
Pivot back through the center to return to the high plank position, then repeat on the opposite side. Before moving to the other side, you can also drop your hips to the floor for a little break if needed.
Hollow body holds

How to Perform a Hollow Body Hold
Hollow grips are actually challenging for their seeming simplicity. Take your time adding them to your schedule; start with the modifications before moving on to the full workout.
Here’s how to complete a hollow hold securely and what changes you can make.
How to Perform a Hollow Hold, Step-by-Step
Start by lying on the ground with your legs extended and your arms extended at your sides.
Tuck your pelvis under and place your lower back on the mat. There shouldn’t be any space between your lower back and the mat.
Start with one leg extended, then extend the other leg to join it. Next, extend both arms alongside your ears and lift your head, neck, and shoulders off the ground. Your physique has to look like a boat.
Hold for ten seconds, progressively extending the time as you go.
Leg raises

Lie flat on a light cloth, a yoga mat, or the ground.
Attach your complete back body, from your head to your rear end, firmly to the floor to ensure there is no gap between your lower back and the floor.
You can keep your feet and toes relaxed.
While keeping your posture as straight as possible, take a breath and slowly raise both of your legs together. Your goal is to make your legs entirely vertical such that your body resembles a capital. Doing this could take some time.
As you progressively drop your legs, gently exhale. Lower them till they are just a few inches above the ground.
Pause, then complete the next repetition. For beginners, a session should last about ten repetitions, or thirty seconds if you want to record the time. As you gain strength, you can progressively increase the number of repetitions.
Full Body
Burpees

Place your feet shoulder-width apart as you stand. Stand with your knees straight and your arms at your sides. At the beginning of each burpee, remember to pinch your buttocks, maintain a flat back, and tighten your abs.
If you are performing burpees at the gym, check your posture in the mirror or get input from a personal trainer.
To lower your body to the floor, bend your knees slightly and hinge forward with your hips. As you do this, keep your arms close to your body and your back straight.
When placing your hands on the ground, keep them close together so they are immediately below your shoulders. Avoid locking out your elbows while extending your arms straight.
To get into the plank posture, kick your feet back. At the same moment, jump both feet back behind you, placing them shoulder-width apart. As you do this, keep your hands firmly planted on the ground to support your body.
Once you are on the ground, look at yourself in the mirror. From your head to your feet, your body should be in a straight line. Lower your hips and butt a little if they are higher than the rest of your body.
Fall all the way to the ground. To perform a pushup, carefully drop your chest to the floor after you are in the plank position. Keep your arms tight to your body, your elbows up, and your hands flat on the ground.
Jump forward with your feet while applying pressure with your arms. As you tilt forward at the hips and bounce your feet toward your chest, keep your hands flat on the ground and use them to push off from the ground. Complete this in a single, fluid motion.
This portion of the burpee is frequently referred to as a “frog jump.”
To complete the motion, jump straight up. Jump straight up with your hands and arms elevated above your head once your feet are back under your upper body, then land in a standing stance. To complete the burpee, you can either leap as high as you can or simply hop a short distance in the air.
As you do this, be careful to maintain your core active. When you jump, stand tall and flex your abs.
To finish one set of burpees, perform 15 repetitions. You might want to start with five consecutive burpees if you’re a beginner. Alternatively, you might perform two or three sets of 15 burpees during your workout.
Time yourself while performing burpees, for example, for 30 seconds. You can perform burpees for longer stretches as you gain strength.
Bear crawls

Put yourself in a push-up position. Put yourself in a plank or push-up position to begin the bear crawl. Make an effort to divide your weight equally among your limbs. To lift your upper body off the ground, extend your arms.
Your hands should be slightly wider than shoulder width, with your fingers pointing outward.
Bear crawls on your knees are a good place to start if you’re a newbie. In addition to being a little simpler, this exercise helps you maintain a straight, flat back when crawling.
Get on your toes and extend your legs straight behind you to perform the full bear crawl. The width of your feet should be significantly more than that of your shoulders.
When you try to make your body a straight line from head to heel, your hips should be somewhat higher than they would be in the plank position.
Both your legs and your back should be straight and flat. To assist you in staying in the proper position, tighten your glutes.
FAQs
Which exercise is best for muscle gain at home?
Top at-home exercises for muscle gain include compound bodyweight exercises that target several muscle groups, such as push-ups, squats, lunges, pull-ups,s and dips, as well as dumbbell exercises like rows and presses. For maximum growth, do 8 to 15 repetitions and focus on progressive overload (getting harder over time).
The Best Bodyweight Exercises for Building Muscle
Chest & Arms: Pushups (wide, narrow, decline); dips.
Back: Pull-ups, or dumbbell rows (if available).
Legs: Squats, lunges, glute bridges.
Shoulders: Pike pushups or overhead presses with dumbbells.
Core: Planks, leg raises.
Top tips for success
Progressive Overload: As moves become easier, increase the difficulty by increasing reps, decreasing rest, or using a slower tempo.
Consistency: Set up a routine, like a 4-day split, and stick to it. (e.g. push/pull/legs) to allow for adequate recovery.
Nutrition: Ensure sufficient protein intake to promote muscle synthesis.
Good Routine For Beginners
Squats: 3 sets of 10-15 reps (use heavier weight for added resistance).
Push-ups: 3 sets to failure
Dumbbell Rows: 3 x 10-12 reps each arm.
Lunges 3 sets of 10-12 reps per leg
Plank: 3 sets, hold 30-60 seconds.
Can I grow muscles with home workouts?
Yes, you can build muscle with a home workout if you are using progressive overload, staying consistent, and eating enough protein. You can get a lot of hypertrophy from body weight (push-ups, pull-ups), resistance bands, or even household items. 30-45-minute sessions 2-3 times a week.
Must-Know Tips to Gain Muscle at Home:
Progressive overload: ( When exercises start feeling easier, increase the difficulty by doing more reps, sets, reducing rest period,s or adding resistance (e.g., a weighted backpack)
Targeted Exercises: Focus on compound movements like pushups (chest/triceps), pullups (back), squats (legs), and lunges.
High Volume/Intensity: Do 70-300 reps/muscle group/work, but focusing on sets that take muscles close to failure.
Equipment Options: Not necessary,ary but resistance bands, dumbbells, or a pull-up bar can improve results.
Daily Structure That Works:
Frequency: 2-3 times a week is sufficient for strength training.
Structure — Work the opposing muscles (i.e., push-ups/rows) and keep rest periods short (1-2 minutes) to maximize intensity.
Nutrition: Make sure you’re eating enough protein for muscle repair and growth.
Why does the 7-minute workout work?
The 7-minute workout is a full-body exercise that takes minimal time or equipment. In as little as seven minutes, it works every major muscle group and raises your heart rate. This can help you get more fit over time by strengthening your heart, lungs, and muscles.
What is the 5-3-1 rule?
The 5-3-1 rule is a social health wellness tool designed to combat loneliness and improve well-being through intentional connection. It recommends:
5: Interact w/ 5+ people/groups per week (variety).
3. Maintain 3+ close relationships per month (depth).
1. Connect for an hour a day. (consistency)
The 5-3-1 Rule Explained.
Weekly (5): Reach out to five different people or groups – friends, family, coworkers, or neighbors.
Monthly (3): Build intimacy with three deeper conversations/experiences with your inner circle.
Daily (1) Spend about an hour each day socializing, such as a phone call, lunch with a colleague, or a walk with a partner.
Decreases Loneliness: Builds a solid support network.
Enhances Wellness: It functions as a “skincare routine for the soul” to reduce stress and boost contentment.
Sustains Social Fitness: Views relationships as a “living organ” that requires consistent nourishment.
Can I build muscle without a gym?
Yes, you definitely can build muscle without hitting the gym. Your muscles grow when you challenge them and overload them. It doesn’t matter if that challenge is a barbell, a pull-up bar, or your own body weight.
You just need a smart training strategy and a focus on diet to get results at home:
1. Main Bodyweight Exercises
Forget machines. Work compound movements that target multiple muscle groups:
Push-ups: Chest, shoulders, and triceps (progress to decline or one-arm push-ups for added difficulty).
Back and Biceps Pull-ups/Chin-ups. (If you don’t have a doorframe bar, try a strong tree branch or a playground..
Squats & Lunges: Quads and glutes.
Glute Bridges: Glutes, Hamstrings
Pike Push-ups: Targets shoulders and upper chest.
2. Training with Progressive Overload
If the exercises are too easy, your muscles won’t develop. You must continue to challenge them by:
More reps: Increase the number of pushups or squats in a set.
Slow down: Lower yourself down over 3–4 seconds (“time under tension”)
Changing the leverage: Make the movement more difficult (e.g., a normal squat to a one-legged “pistol” squat).
3. Nutrition (The Base)
Diet is 70% of the battle; you cannot build muscle out of thin air.
High Protein – Consume 1.6 to 2.2 grams of protein per kilogram of body weight to repair and build muscle fibers. Add foods like eggs, chicken, lentils, paneer, or soy.
Caloric Surplus: To fuel muscle growth, you need to eat slightly more calories than you burn.
4. Recovery & Consistency
Your muscles expand when you are at rest, not when you are doing out. Get seven to eight hours of sleep every night and try to work out each muscle group two to three times a week.
What should I eat to build muscle?
To build muscle,e you want to be in a calorie surplus while consuming good proteins ( chicken , eggs , fish , tofu ) , complex carbs ( oats , brown rice), and healthy fats . Lean red meat and dairy (such as cottage cheese) are key foods, along with nutrient-dense foods such as soybeans and almonds, to help repair and grow muscle.
Can I grow biceps in a week?
However, you can achieve better muscle tone, a stronger “mind muscle” connection, and a temporary “pump” (increased blood flow). With consistent training, you can expect to see visible, sustainable muscle growth in 4 to 12 weeks.
What workouts gain muscle?
Muscle building is founded on progressive overload — gradually increasing the weight, frequency, or number of repetitions in your routine. The best way is to use compound exercises (multi-joint movements) that work several muscle groups at the same time, and then add isolation exercises to work on specific muscles.
Can you build muscle after 50?
Yes, it is definitely possible to build muscle past 50. Yes, the body loses muscle with age, and it also develops “anabolic resistance,” or a decreased ability to synthesize protein. But muscles remain highly responsive to regular stimulation and nutrition at any age.
What builds muscle fast?
To build muscle quickly, you need high-frequency progressive overload, a hypercaloric diet rich in protein, and adequate rest. For rapid hypertrophy, you must continuously push your muscles to the max and give them the fuel to recover.
How to increase muscle strength at home?
Aim for twice a week or more. o compound exercises like push-ups, squats, lunges, and planks. Because these exercises work several muscle groups, you’ll want to push to the point of fatigue for maximum growth.
KEY PRINCIPLES OF SUCCESS
Progressive Overload: Keep increasing the difficulty of your workouts to keep building strength.
Nutrition: Enough protein to help your muscles repair and grow. Include foods like Greek yogurt, eggs, and lean meats.
Safety: Prioritize form over speed to avoid injury.
What foods should I avoid for muscle growth?
However, a lot of highly processed and packaged foods, including desserts, candies, and pastries, won’t provide you with the best energy to build muscle. When concentrating on growing muscle, these can be avoided. Alcohol can hinder rather than improve physical performance, which has been demonstrated to impede recovery.
References
- Ajani, L. (2025, March 4). How to do a Push-Up: Proper form & Variations to try. wikiHow. https://www.wikihow.com/Do-a-Push-Up
- Clinic, C. (2021, May 10). Got back pain? How the Superman exercise can help. Cleveland Clinic. https://health.clevelandclinic.org/got-back-pain-how-the-superman-exercise-can-help
- Dolan, M. (2026, January 21). How to do pullups: proper form, variations, & training plan. wikiHow. https://www.wikihow.com/Do-Pullups
- How-To Do DiPs. (n.d.). eFIT30 Online Training for Women. https://efit30.com/blog/how-to-do-dips
- Cave, K. (n.d.). How to do a Glute bridge [Video]. https://blog.nasm.org/how-to-do-a-glute-bridge
- Cerqua, P. (2025, May 14). 3 ways to do a burpee – WikiHow Life. https://www.wikihow.life/Do-a-Burpee
- Clinic, C. (2021, November 18). Why you should start doing planks. Cleveland Clinic. https://health.clevelandclinic.org/plank-exercise-benefits
- Clinic, C. (2026, January 16). Squats: How to do them and why they rock. Cleveland Clinic. https://health.clevelandclinic.org/proper-squat-form
- Dolan, M. (2024, April 14). 3 ways to do calf raises – WikiHow. wikiHow. https://www.wikihow.com/Do-Calf-Raises
- McCoy, J. (1970, January 1). How to Do a Lunge with Perfect Form. https://www.onepeloton.com/blog/how-to-do-lunges
- Sparacino, A. (1970, January 1). Why side planks deserve more of your attention—and 8 spicy variations to try. https://www.onepeloton.com/blog/side-planks
- Theriot, D. (2025, October 16). 3 ways to do bear crawls – WikiHow Fitness. https://www.wikihow.fitness/Do-Bear-Crawls


