50 Best Physiotherapy Exercises at Home
Introduction
Physiotherapy exercises at home are an effective way to improve strength, flexibility, balance, and overall physical function without needing special equipment. Whether you are recovering from an injury, managing chronic pain, improving mobility, or simply maintaining a healthy lifestyle, home-based physiotherapy exercises can support your rehabilitation and fitness goals. These exercises are designed to enhance joint mobility, strengthen muscles, improve posture, and reduce the risk of future injuries.
Regular practice of physiotherapy exercises can help relieve common conditions such as back pain, neck stiffness, shoulder discomfort, knee problems, and muscle weakness. They are suitable for people of all ages, including seniors, athletes, office workers, and individuals recovering from surgery. Consistency is key, as performing these exercises regularly can lead to better movement patterns, improved circulation, and increased independence in daily activities.
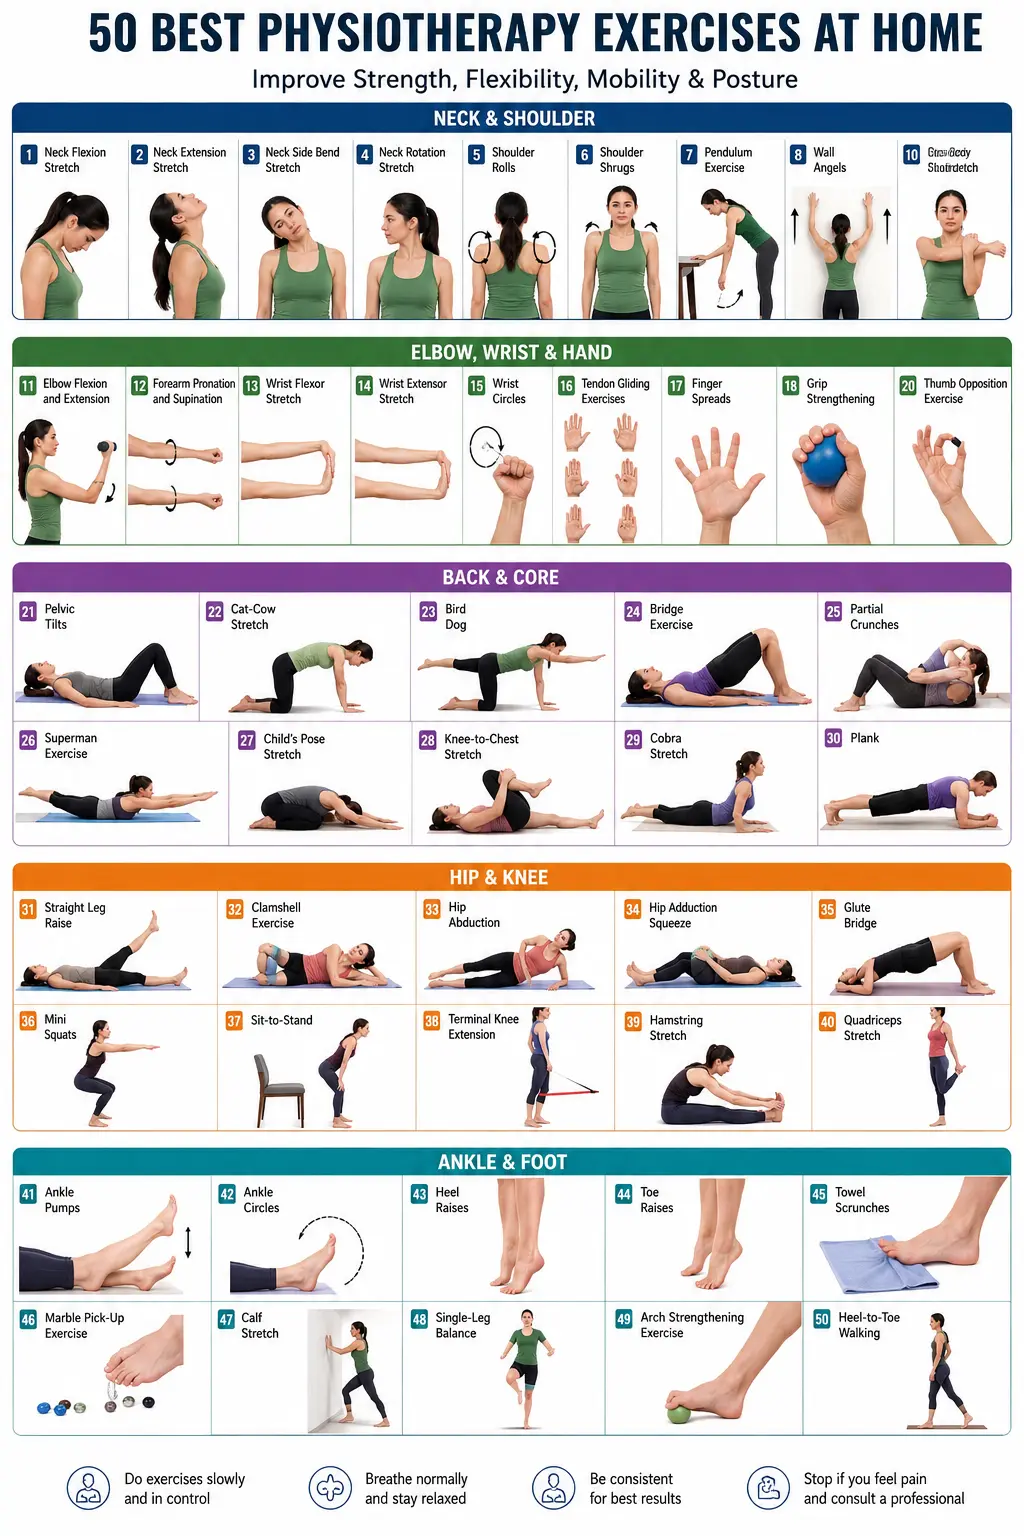
This collection of the 50 best physiotherapy exercises at home includes a variety of stretching, strengthening, balance, and mobility exercises that target different parts of the body. Most exercises require little to no equipment and can be easily incorporated into your daily routine. Always perform movements within a comfortable range and consult a healthcare professional if you experience pain or have a specific medical condition. Start slowly, stay consistent, and enjoy the benefits of improved physical health and well-being.
50 best physiotherapy exercises
Neck & Shoulder
Neck Flexion and Neck Extension


Step 1: Starting Position: Place your feet hip-width apart, with your arms by your sides and your toes pointing forward or slightly outward. To stabilize your spine, stiffen your abdominal muscles, or “brace.” Then, without arching your lower back, depress and retract your scapulae, or bring your shoulders down and back.
Step 2: Make a “double-chin” by forcing your chin straight into your neck while you slowly lower your chin toward your chest (neck flexion). Return to the beginning position after holding for 15 to 30 seconds.
Step 3: Bring your head up toward the ceiling while slowly bringing the base of your skull toward your back (neck extension). Keep your shoulders down, back, and relaxed. Return to the starting position after holding for five to ten seconds.
Step 4: Complete two to four repeats in total.
Step 5: Exercise Variations: (1) Bring one hand behind your head and position your fingertips directly at the base of your skull to increase the stretch during flexion. Put a little pressure on it. (2) Raise one hand to your forehead and lightly press with one or two fingers to increase the stretch during extension.
Chin tuck
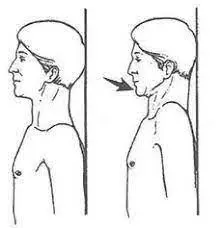
The essential muscles in your neck that support your head are worked by these. They encourage proper posture and increase endurance.
How to do it:
- Bring your chin close to your chest and nod your head. Next, extend the back of your neck as though you were dragging your head’s crown upward.
- While you maintain this position, try to concentrate on letting your jaw muscles relax.
- To return to the beginning posture, relax your neck muscles.
Neck Side Bend

Do this while standing, keeping your arms by your sides and your feet hip-width apart.
- Try to touch your right shoulder with your ear while you gently bend your head in that direction. When you sense a stretch, stop. Avoid lifting your shoulder.
- Return to the starting position after holding the stretch for five to ten seconds. Repeat the set one to three times.
- On your left side, repeat.
- Put your palm on the side of your head that is tilted over your head and gently pull with your fingertips for further stretch.
Neck Rotation

You can stand or sit while doing this.
- Maintain a straight back and a head that is exactly over your shoulders.
- Turn your head slowly to the right until your shoulder and side of your neck start to stretch.
- After five to ten seconds of holding the stretch, carefully move your head forward once more. Do the set one to three times.
- On your left side, repeat.
Shoulder Rolls

- Raise both shoulders.
- In a smooth circular motion, roll your shoulders back and then down.
- After a few repetitions, roll forward in a different direction.
- Advice:
- Don’t be jerky; instead, move slowly and carefully.
- Muscles worked:
- Deltoids, or shoulders
- Upper back (rhomboids, trapezius)
- Muscles in the neck and chest (gently mobilized)
- Advantages
- Relieves neck and shoulder stiffness and strain.
- Draws the shoulders back and opens the chest to improve posture.
- Improves shoulder joint mobility and circulation.
- Excellent for a warm-up or cool-down.
Shoulder Shrugs
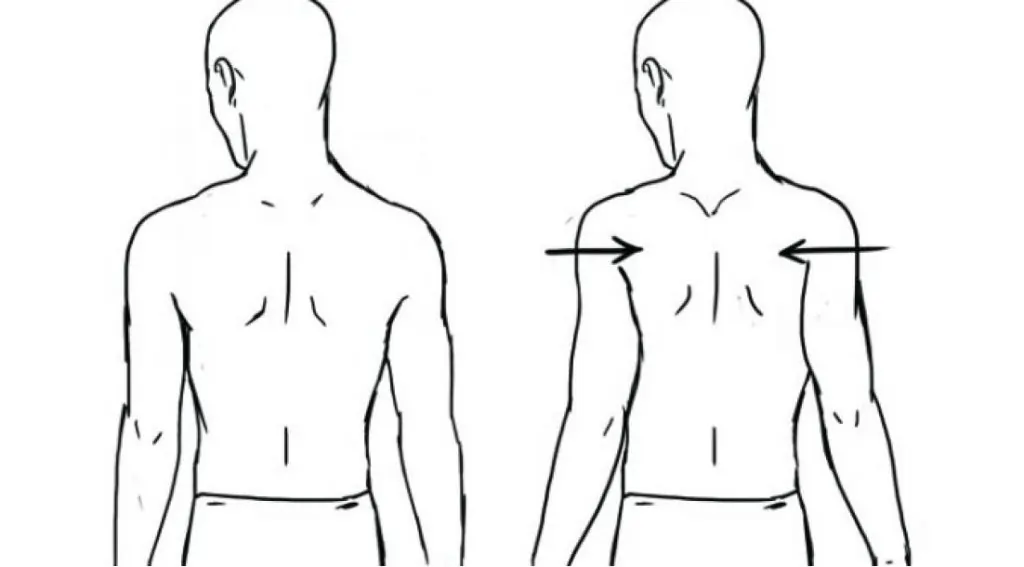
To perform this exercise safely and correctly, follow these instructions.
- To begin, stand with your feet flat on the ground. The distance between your feet should be shoulder-width.
- Turn your palms to face each other while keeping your arms by your sides. Now bend down and grasp the weights if you are using them for the exercise.
- To align your knees with your toes rather than beyond them, bend them slightly. Maintain a straight neck, an upright chin, and a straight face.
- Raise your shoulders as close to your ears as you can while taking a breath. To feel your muscles’ resistance, move slowly.
- Repeat the exercise after lowering your shoulders once more and exhaling.
- Start with three sets of ten repetitions. As your shoulder strength increases, you can increase the number of repetitions.
Try gradually increasing the number of repetitions to three sets of twenty, four times a week.
Try performing this exercise without weights at first if you’re doing it to relieve neck or shoulder pain. To make sure you’re not worsening an injury or pinched nerve, start carefully by performing fewer repetitions and sets.
Pendulum Exercise
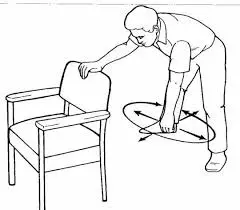
If you were given any particular instructions, follow them. After quitting, give your doctor or physical therapist a call if the pain persists.
- As soon as instructed, do this exercise with the afflicted arm:
- With your good arm resting on a table or chair, bend over.
- On the side that hurts, relax your arm. Allow it to hang straight down.
- Move your body slowly until your arm begins to swing in a circle. Next, go in the opposite direction. The arm should then swing forward and backward as you move your body. Finally, shift it from side to side.
- Allow your arm to gently sway due to gravity and your body’s movements. Avoid lifting or moving your arm with your shoulder muscles.
- Spend five to ten minutes doing the workout three times a day. Every sixty seconds, alter your movement’s direction.
Wall Angels

- With your hands approximately head height, press the backs of your arms and hands on the wall.
- Raise your arms in the direction of the ceiling.
- Your shoulders, neck, and upper back may extend as you perform each repetition.
Scapular Retraction

Exercises that involve pulling the shoulder blades together in the direction of the spine are called scapular retractions. In these workouts, however, the shoulders do not rise toward the ears.
- With your feet flat on the ground, take a lofty seat in a firm chair.
- Lightly place your hands on the sides of your waist or your hips.
- Gently pull your shoulder blades back and down while keeping your chest raised, as though you were attempting to tuck them into your back pockets.
Cross-Body Shoulder Stretch

- With your feet flat on the ground, take a tall seat or stand.
- Keep your chest raised while letting your shoulders down.
- At shoulder height, extend one arm straight across your chest.
- Gently draw the arm slightly above the elbow toward your chest with your other hand.
- After holding the stretch for 20 to 60 seconds, let go.
- On the opposite side, repeat.
Elbow, Wrist & Hand
Elbow Flexion and Extension
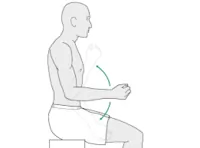
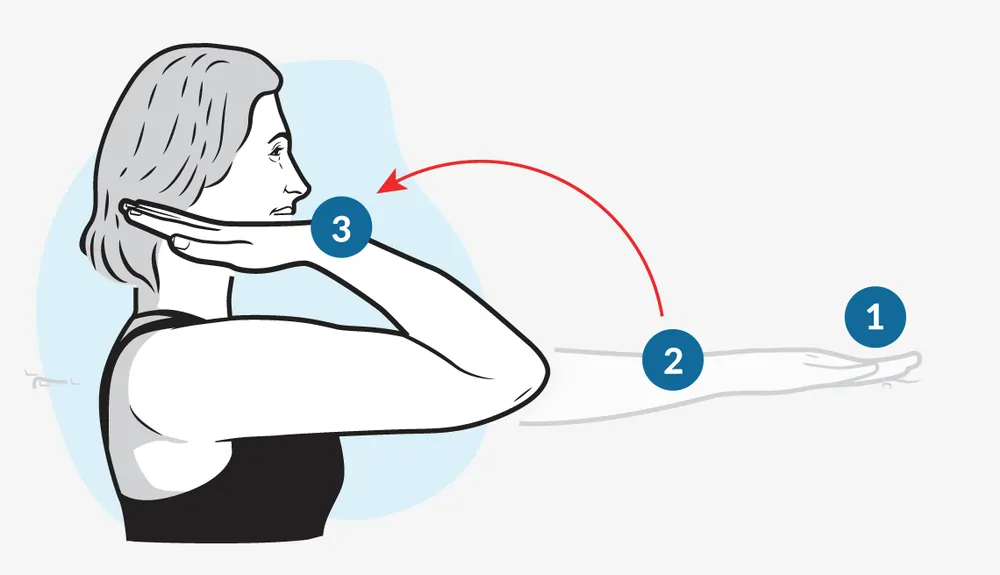
- The capacity to bend your elbow is known as elbow flexion. To improve this range of motion:
- Keep your arm by your side when you stand.
- As much as you can, bend your elbow. Grasp your wrist or forearm with your other hand to apply light pressure.
- After five to ten seconds of holding, straighten your elbow.
- Ten times over, repeat.
- Use extension exercises to improve full elbow straightening. Here’s how:
- With your elbow resting on a table, take a seat. For comfort, you might want to place your upper arm on a cushion or folded towel.
- After fully extending your elbow, apply pressure on your wrist or forearm to intensify the stretch.
- Use pressure to extend your elbow as far as you can, then maintain the stretch for five to ten seconds.
- Let your elbow bend slightly after releasing the strain.
- Do the workout ten times.
- Holding onto a weight of two to three pounds can also help you extend your elbow a little.
Forearm Pronation and Supination

- Supination is the capacity to flip your wrist so that your hand is facing up. This action happens at both your elbow and your wrist joint. Try the forearm supination range of motion exercise to get better at supinating your hand.
- To perform the exercise:
- With your elbow bent at a 90-degree angle, stand or sit with your arm at your side. Two
- Turn your wrist and hand so that your palm is facing up while keeping your elbow at your side.
- Reach under the forearm of your supinated arm with your opposite hand to increase the stretch’s pressure. Gently apply pressure by rotating your hand more into supination while holding onto your wrist.
- The ability to turn your palm down is known as forearm pronation. For activities like pouring coffee or playing the piano, this action is essential.
- To do the ROM stretch for forearm pronation:
- With your elbow tucked in at your side and bent 90 degrees, you can either stand or sit.
- Reach your other hand across the top of your forearm after turning your hand and wrist as far as you can.
- Take hold of your wrist and further pronate your arm.
- After applying pressure for five to ten seconds, release the stretch.
- Ten times, repeat the pronation ROM stretch.
Wrist Flexor Stretch

Stretch your wrist flexors:
- With your palm toward the ground and your elbow straight, raise one arm in front of you.
- With your fingers pointing toward the ceiling, use your other hand to gently draw the palm of your outstretched hand as close to you as is comfortable.
- As you perform this stretch, let your fingers relax and bend.
- For ten to thirty seconds, hold the stretch.
- Release the pressure and go back to where you were.
- Continue with the other arm.
- Perform two to six reps on each side.
- Your wrist, hand, and forearm may feel stretched during each repetition.
- Everybody is unique, as are their wrists. Therefore, you might need to adjust this exercise to suit your needs.
Wrist Extensor Stretch

Step for Wrist Extensor Stretch
- Point your fingers toward the ground while extending the arm with the afflicted wrist in front of you.
- Gently bend your wrist farther with your other hand until your forearm feels mildly to moderately stretched.
- For a minimum of 15 to 30 seconds, hold the stretch.
- Do these two to four times.
- Repeating these actions with your other wrist is a good idea.
Wrist Circles
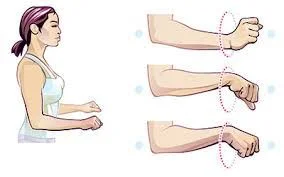
- Face forward and maintain a straight posture.
- Start rotating your wrists while holding your hands together by loosely locking your fingers.
- Continue rotating until the set is finished.
Tendon Gliding Exercises

- Thumb abduction brings the thumb slightly palmar as it moves away from the middle finger because the thumb is positioned at an angle to the plane of the other four digits.
- Abductor pollicis longus and brevis muscles.
- Thumb adduction brings the thumb back to a position next to the second digit and in the direction of the third finger, although the thumb’s plane of abduction and adduction is at an angle to the other digits.
- Adductor pollicis muscles.
Finger Spreads

- Practice the abduction and adduction of your fingers.
- This entails pushing the fingers apart after squeezing them together.
- While the fingers of the opposite hand are squeezing toward one another in an attempt to keep the interlock, try to draw one hand away.
- You can place a piece of paper between your thumb and the pad of your fingers, squeeze it, and then try to remove it with your opposing hand to strengthen your thumb’s attachment to the pad.
Grip Strengthening

Instead of starting with the hardest gripper you can hardly move, start with one you can close with clean control. A mild to moderate gripper that permits 8 to 12 repetitions without wrist collapse, handle slip, or soreness is often a beginner-friendly option.
- For monitoring development and testing stronger closing over time, fixed-resistance grippers work best.
- Grippers that may be adjusted are ideal for novices who require smaller adjustments.
- Finger spring tools: Better than maximum strength for mild dexterity exercises and finger control.
- Digital dynamometers are more useful for force testing than for long-term strength development.
- Light tools and soft rings are better for extremely light hand work, easy recovery sessions, and warm-ups. Rather than letting the bottom handle fall toward the wrist, place it in the palm.
- Instead of only squeezing with the thumb and index finger, finish the closing with the ring and pinky fingers while keeping the wrist neutral or slightly stretched.
- Wrist position: Do not fold them forward; instead, keep them neutral.
- Place the handle deep enough so that the fingers may complete the closure.
- Apply pressure with all four fingers, paying particular attention to the bottom two.
- Tempo: Close carefully, wait for a moment, and then slowly open.
- Step 1: Regular Close
- Put one handle deep in your palm and encircle the other handle with your fingers. For two to three sets of eight to twelve repetitions per hand, squeeze the gripper shut, hold it for a while, and then lower it under control.
- Step 2: Negative Control
- After using both hands to assist in closing the gripper, take out the helper hand and oppose the opening phase as gently as you can. When you are still unable to cleanly close a harder gripper on your own, this is a powerful choice.
- Step 3: Focus Curl Your Fingers
- To train each finger more carefully, use a very light resistance choice or a light finger spring tool. This is helpful when the last portion of the closure seems weak or when the ring and pinky fingers lag.
Thumb Opposition Exercise
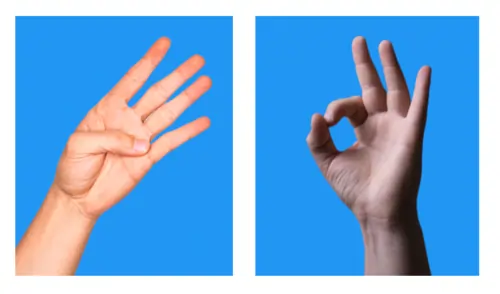
Thumb opposition exercises don’t require any equipment and can be performed almost anywhere. Here’s how to use the simple version:
- Simple Finger Opposition Order
- Start Position: Take a comfortable seat and place your hand, palm up, on the table or in your lap.
- Thumb to Index: Make an “O” shape by touching the tips of your thumb and index finger.
- Thumb to Middle Finger: Touch the tip of your middle finger with your thumb.
- Thumb to Pinky: Lastly, touch the tip of your pinky finger.
- Aim for 10–15 repetitions in each hand as you carefully and slowly repeat this pattern. To test your coordination even further, you can switch the sequence from pinky back to index.
Hand open and close Exercise

- Simple Fist Squeeze
- Curl your hand into a soft fist and place your thumb over the outside of your fingers. Squeeze gently. Hold this for 5 seconds.
- Open your hand as wide as you can.
- Spreading your fingers apart.
- Goal: 10 repetitions with each hand.
Back & Core
Pelvic Tilts
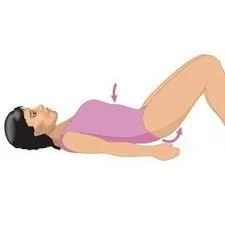
- Pelvic tilts are a gentle movement that can be done easily on the yoga mat or a firm bed.
- Lie flat on your back with your knees bent and your feet on the floor. Allow your arms to fall by your side.
- Engage Core: Deep breath. Breathe out, sucking your belly and glutes really tight.
- The Tilt: Tilt your pelvis slightly and press your lower back flat against the floor. Your tailbone will lift a bit.
- Relax back to a neutral position.
- Reps: Repeat this movement 10-15 times for 2-3 sets.
Cat-Cow Stretch

- How To:
- Set up: Begin on all fours in a tabletop position with your wrists underneath your shoulders and your knees underneath your hips.
- Cow Pose (Inhale): Inhale, lower your belly towards the floor, raise your chest, and look forward.
- Cat Pose (Exhale): Exhale, draw your navel towards your spine, tuck your tailbone, and arch your back like a stretching cat, tucking your chin to your chest.
- Repeat: Flow between these two movements for 5-10 breaths.
Bird Dog

- Extend your right leg behind you while keeping your knees behind your hips and your hands beneath your shoulders.
- At the same moment, extend your left arm parallel to the ground in front of you.
- Repeat on the opposite side after holding for two seconds. One repetition is that.
- Sets/reps: Ten to fifteen reps in two sets
Bridge Exercise

- Execution
- Starting Position: Lie flat on your back on a mat. Bend your knees and put your feet flat on the floor, close to your buttocks and around hip-width apart. Arms are at your sides with palms facing down.
- The movement: Squeeze your glutes, drive through the heels, and lift the hips towards the ceiling.
- The Peak: Lift your hips until your knees, hips,s and shoulders are in a straight diagonal line. Hold and squeeze for 2 to 3 seconds.
- The Descent: Slowly and with control, lower your pelvis back to the floor.
Partial Crunches

- Starting Position: Lie flat on your back on a mat with your knees bent and feet flat on the floor, hip-width apart.
- Hand Placement: You can put your arms over your chest or place your fingertips behind your neck/ears. (Do not extend your neck).The Lift: Suck your stomach in and slowly lift your head and shoulders off the floor, breathing out as you lift. Press your tailbone and lower back into the floor.
- The Hold: Maintain the position at the top for 1 to 2 seconds.
- The Descent:nt Slowly inhale and bring yourself back down to the floor.
Superman Exercise

Superman Exercise steps:
- Start by placing all of your arms and legs on the floor while resting on your stomach.
- Lift your arms, upper chest, and legs a few inches off the ground at the same time after contracting your core muscles to maintain a stable torso.
- After a few moments of holding this position, carefully drop your arms and legs back down. One rep is finished with this.
- To complete a set, repeat the exercise eight to ten times.
- Advice: Holding the pose for longer counts can help you develop strength and endurance as you become more accustomed to this practice.
Child’s Pose Stretch

- How to Do the Stretch
- Starting Position: Get down on your knees. Sit back on your heels with your knees about hip-width apart.
- Fold Forward: Exhale, fold forward, and lower your torso between your thighs.
- Extension: With your arms extended straight out in front of you, palms down, or with your arms at your sides, palms up.
- Rest: Just place your forehead on the floor. Let your shoulders drop and breathe into your belly.
- Hold: Hold the pose for 20-30 seconds or remain there as long as you feel necessary.
Knee-to-Chest Stretch
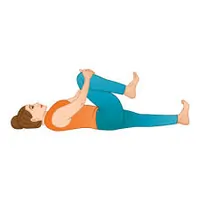
Guidelines:
- Start the knees-to-chest stretch with just one leg for safety.
- Raising one bent knee gently will allow you to grab your lower leg with both hands, interlacing your fingers slightly below the knee.
- Raise one leg first, followed by the other, for the two-legged variant. It’s usually safer to start with one and rapidly follow with the other because lifting both at the same time needs a lot of abdominal power, especially for backs that are fragile.
- If you’re using both legs, clasp your wrists or interlace your fingers between the lower thighs right below the knees, just like in the single-legged variation.
- When the low back muscles remain passive, the stretch is most effective.
- Hold for a short while.
- Put your leg back on the ground.
- On the opposite side, repeat.
- One or two times a day, or as needed, perform the stretch ten to fifteen times.
Cobra Stretch
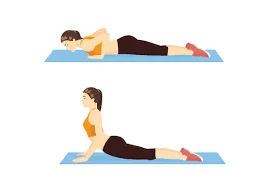
1. Starting Position
Lie on your stomach; then extend your legs while keeping your feet on the ground. The thighs must be softly placed on the mat, and the toes must point backward.
2. Positioning of the Hands
Spread the fingers wide and place the palms beneath the shoulders. The elbows should be relaxed and near the torso. You can put your forehead on the ground. The neck may relax as a result.
3. Prepare the Spine
Breathe deeply to get the spine ready for a soft arch.
4. Take a breath and raise
Take a deep breath, press into your palms, and raise your chest off the ground. Make sure your shoulders are rolled back and away from your ears.
5. Let Your Chest Open
To form an arch in the upper back, extend the chest upward and forward. Be careful not to put too much strain on your neck when you look up a little.
6. Work Your Muscles
Gently stretch the spine and tighten the core. Hold the posture while breathing steadily for 15 to 30 seconds.
7. Release and Exhale
Return the forehead and chest to the ground. Arms should be relaxed down the sides of the body.
8. Repeat:t Do this exercise two or three times. People can take a break in between repetitions.
Plank

The forearm plank is a common exercise to build strength and enhance posture.
How to do it: Lie on your stomach, then prop your body up on your forearms and toes. Place your elbows right under your shoulders.
Position: Keep a straight line from head to heels. Don’t let your hips sag or hike up.
Muscles worked: Core (rectus abdominis and transverse abdominis), glutes, quads, and upper body stabilizers.
Hip & Knee
Straight Leg Raise

Lie down on the floor or a bed. Maintain the foot on the ground while bending the “good” knee. Maintain the afflicted leg’s straightness. Lift the affected leg about 18 inches off the ground while maintaining a straight leg and tightening the quadriceps as described above. Return the leg to the floor or bed slowly. Take breaks as needed. Ten to fifteen repetitions (one set). Do three sets in total.
Clamshell Exercise
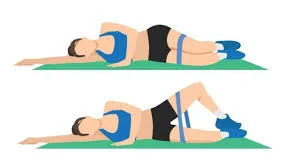
Clamshell with bands:
Place a resistance band slightly above the knee and find a firm, comfortable area to do the workout. If you’d like, you can start without resistance!
In order to maintain a neutral neck position, lie on one side with your head resting on your lower arm. You can support yourself by resting your upper hand on the ground.
Make sure your knees are evenly stacked on top of each other as you bend them to a 90-degree angle. Instead of bending forward or backward, your hips should be stacked on top of one another. Ensuring you work the right muscles requires proper alignment.
Without turning your hips back, slowly raise the top knee as high as you can while maintaining a tight core. Throughout the entire exercise, keep your feet together. To ensure that your feet remain planted, you may also find it useful to press your bottom heel into the ground.
Return to the starting posture by slowly lowering your top knee.
After 10 to 15 repetitions, switch sides. Do this exercise two to four times a week for one to three sets.
Hip Abduction

- This is the easiest and most common way to target the outer hips without equipment.
- Setu: Lie on your side with your legs stacked. Rest your head on your lower arm and balance your top hand on the floor in front of your chest.
- The Movement: With your top leg straight and toes pointed forward, slowly lift your top leg toward the ceiling.
- The Return: Slowly and under control, lower it down.
- Progression: Once you are comfortable, add a resistance band around your thighs or just above your knees to increase the tension.
Side Plank

- Action: Point your kneecap and toes straight up to the ceiling. Slowly slide or lift one leg out to the side as far as you can comfortably.
- Gradually slide your leg back to the center line.
- Volume: 3 sets of 10-15 repetitions per leg.
Dead Bug (Alternate both sides)

The side plank is an excellent way to strengthen your low back and sides of your core muscles.
- How to do it:
- Make an effort to maintain top-to-bottom alignment across your entire body.
- For thirty seconds, maintain the elevated position.
- Perform the side plank on the opposite side now.
- On each side, repeat three times.
Mini Squats
- How to do it:
- Raise your legs to a 90-degree angle off the ground.
- Exhale to lower your ribcage, then aim to flatten your back onto the floor by bracing your core muscles and twisting your pelvis upward. This is the starting posture for the exercise, which you must maintain throughout.
- To begin the exercise, extend your left leg, straighten at the knee and hip, and lower it to just above the floor while keeping your lower back from arching.
- Return your left leg and right arm to the starting position while maintaining the tension in your gluteal and abdominal muscles.
- Continue with your left arm and right leg.
- For 20 repetitions, switch sides.
Sit-to-Stand

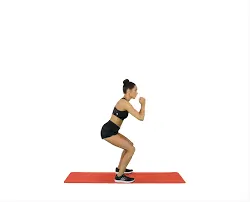
To perform a mini-squat:
- To begin, place your feet comfortably apart.
- As if you are just about to sit in a chair, move your hips back and bend your knees slightly.
- Hold this position while contracting your thigh muscles.
- To get back up on your feet, push through them.
- With each repetition, you might feel your hip, leg, and thigh muscles working.
Terminal Knee Extension

To perform a sit-to-stand exercise:
- Verify that it is a strong chair without wheels.
- To stand and maintain this stance, push through your feet without using your hands.
- To sit comfortably in the chair, bend your knees.
Hamstring Stretch

- You will need a closed-loop resistance band or exercise tubing.
- Secure the Band: Attach a resistance band to a fixed, immovable object like a heavy table leg or a door anchor, at a height that is about knee or mid-shin level.
- The Band: Place the band just behind the crease of the knee you want to work and step inside it.
- Step back. Move forward until you feel enough tension on the band to pull your knee slightly forward.
- Assume your position: Stand in a staggered stance, feet about hip-width apart, the working leg back a little compared to the non-working leg, and the heel of the foot flat on the floor.
- Extend the Knee: Squeeze your quads and glutes, press your heel down firmly into the floor, and push your knee back until it is fully straightened.
- Hold and Release: Hold at the fully extended position for 1-2 seconds to maximize the muscle contraction. Slowly bend your knee into the band and return to the start position.
- Tips for optimum results
- Watch for shape: Lift your chest, engage your core, and sink your weight into your heel.
- Reps & Sets: Do 3 sets of 10 to 15 repetitions twice a day.
Quadriceps Stretch
Take the following actions while holding a towel and finding a cozy spot to stretch:
- Wrap a towel around the back of one thigh while lying on your back, then hold either end of the towel to support the thigh. The thigh can be held with the hands if a towel isn’t available. The opposite leg should remain level on the ground.
- Try to make the bottom of the foot parallel to the ceiling as you gradually straighten the knee until you feel a stretch in the back of the thigh. Only straighten the knee and extend the leg until the stretch is comfortable.
- Work your way up to 30 seconds after holding the posture for 10 seconds at first.
- For a full set, try this stretch four or five times, one leg at a time. Try to complete two sets every day.
Ankle & Foot
Ankle Pumps

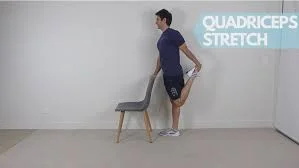
To stretch your quadriceps:
- Hold onto a table, countertop, door frame, or other firm surface while standing with your feet hip-width apart.
- Hold onto your ankle while bending your knee and pulling it back toward your butt.
- After you’re steady, slowly move your foot in the direction of your butt until the front of your thigh is nicely stretched.
- While you hold the stretch, pay attention to maintaining a tall, straight posture.
- After a few seconds of holding it, go back to where you were.
Ankle Circles

- With your leg supported, take a seat or lie down.
- Maintain a relaxed knee.
- Point your foot away from you slowly.
- Pull your foot back toward you after that.
- Only go as far as is comfortable.
- Maintain a steady, fluid motion.
- There shouldn’t be any acute pain.
- Typically, ankle pumps are executed:
- Ten to twenty times
- Three to five times a day
- When there is edema or limited movement, they are often performed more regularly. Depending on your condition, your physiotherapist might modify this.
Heel Raises
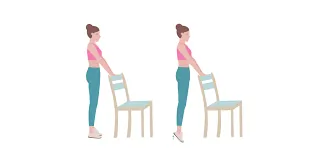
- With your arms by your sides and your feet hip-width apart, stand erect.
- Point your left toes into the ground while shifting your weight to your right leg.
- Make tiny circles with your ankles as you begin to rotate your left foot.
- Use your right foot to repeat the exercise.
Toe Raises
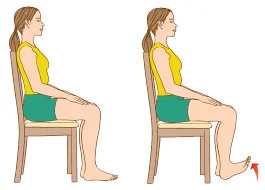
Make sure the surface you are on is level and non-slip. For support, use the back of a chair, a table, a wall, or a countertop.
- Place your feet comfortably apart, about shoulder-width apart.
- To steady yourself, place one or both hands on the support.
- To stand on your toes, slowly raise both of your heels.
- Maintain this posture for a minimum of one second.
- Return your heels to the floor slowly and slowly.
Towel Scrunches
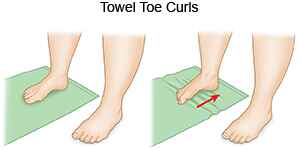
You’ll need a chair or bench to sit on if you’d like, as well as a small towel or an exercise band. Anywhere you can sit or stand with your feet flat on the ground, you can perform this exercise. Compared to carpeting, it is simpler to do on a hard surface like wood or tile.
- Place one flat foot on the towel or band after smoothing it out. Make sure you have enough fabric in front of your foot because you will be moving the towel toward yourself. (If you’re using a band, extend it widely in front of you so your toes have something to hold onto.)
- With your heels beneath your knees, take a seat (standing also helps).
- Make sure your toes are pointed forward, and your legs and feet are parallel to one another. Lift your toes and flex your foot back while keeping your heel down.
- Reach out equally along both sides and the middle of your foot to place your foot as far out on the towel as you can while keeping your heel in place.
- Scoop the towel in with your arch and toes while maintaining a stationary heel.
- Try to form a deep dome beneath the arch area using both sides of your foot (all five toes). Every time you extend and pull back, only a small portion of the towel will move. After a few repetitions, you might need to pause to smooth the band or towel.
- After at least five repetitions, switch to the other foot. This is an activity that you can perform every day or even multiple times a day.
Marble Pick-Up Exercise

- Exercise Setup: How to do the Sit up straight in a chair with your feet flat on the floor. Lay about 10 to 20 marbles and an empty cup or bowl on the floor in front of you.
- The Pick Up: With your heel on the ground, use your toes to pick up one marble.
- The Transfer. Curl your toes tight, pick the marble off the floor and into the cup.
- Repetition: Do this 8 to 12 times per foot, or until you go through 20–25 pickups in total.
Calf Stretch
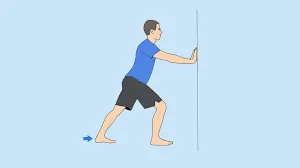
This exercise stretches the Achilles tendon and the calf muscles at the rear of the lower leg. Five days a week, perform this workout three or four times a day. To perform this stretch:
- Place your hands at eye level on the wall while facing the wall. Place the leg you wish to stretch behind your other leg by roughly one step.
- Bend your front knee till your back leg starts to extend while keeping your back heel on the ground.
- For 15 to 30 seconds, hold the stretch. Do this two to four times.
- While keeping your back heel on the floor, repeat the exercise with your back knee slightly bent. Another area of the calf muscles will be stretched as a result.
Single-Leg Balance
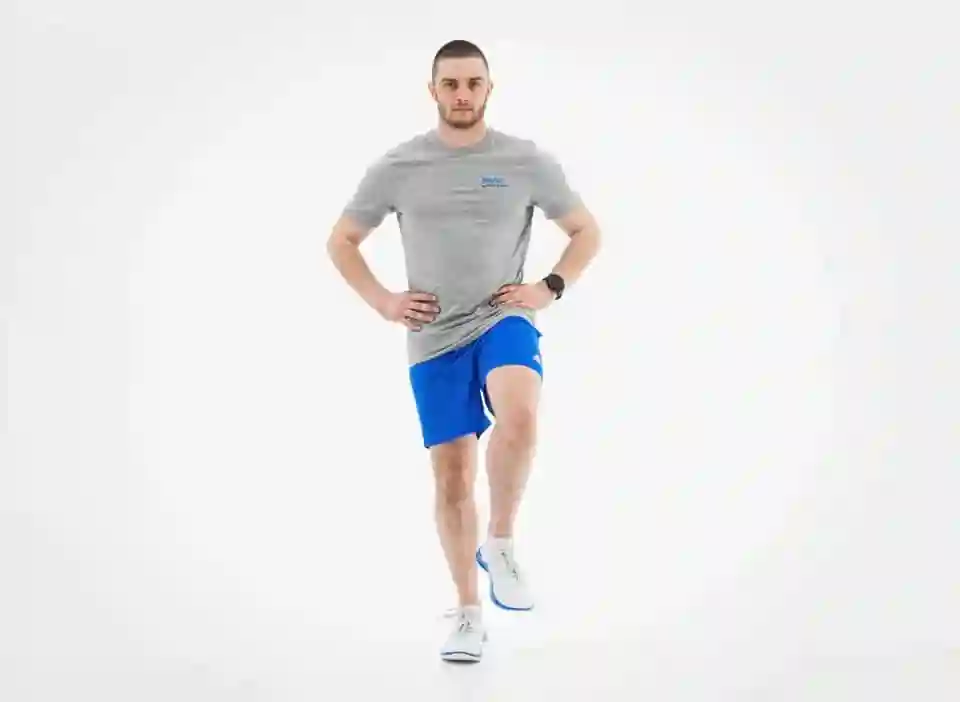
To perform balance on one leg:
- To begin, take a comfortable stance.
- Bring your heel up toward your butt and bend one leg to raise your foot off the ground.
- To assist with your balance, extend your other arm and grasp your foot or ankle with your hand.
- As you maintain this position, pay attention to your breathing and your balance.
- Return to a standing position by letting your foot drop to the ground.
Arch Strengthening Exercise
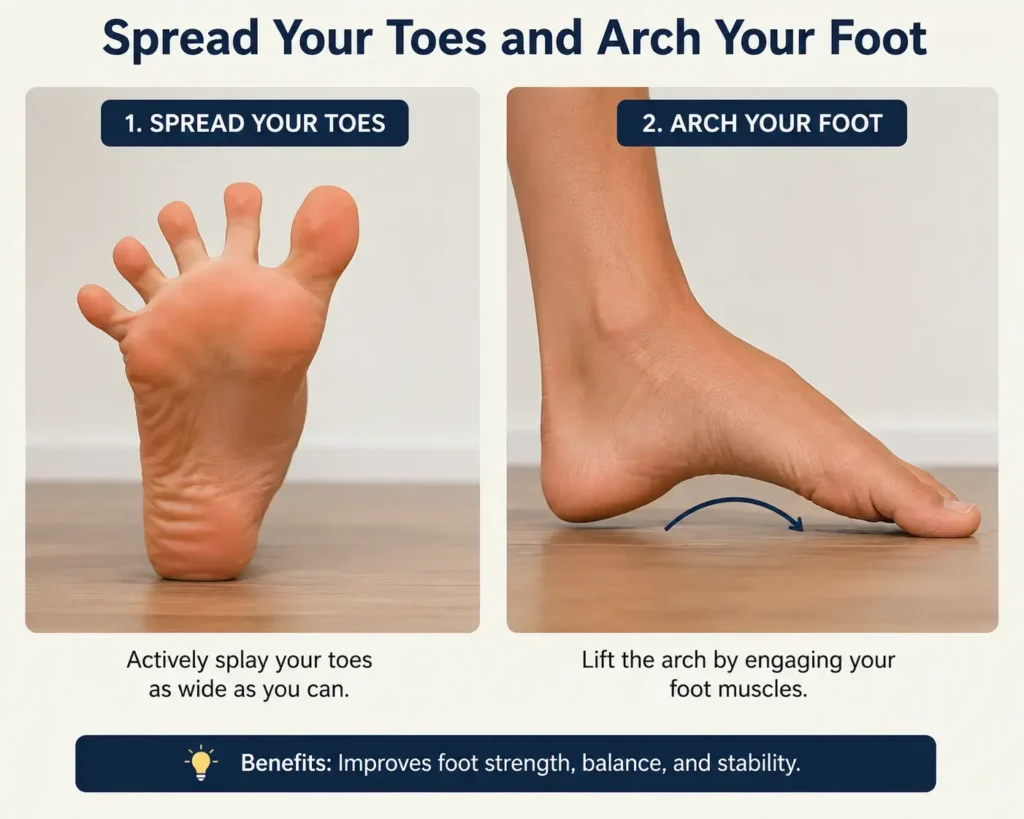
- Raise one leg and cross it over the other while seated on a chair.
- Spread your toes slightly and sandwich your fingers between them, as if you were holding hands with your foot.
- Keeping your ankle stationary, gently move your toes up and down from the toe knuckles while pulling your foot slightly towards your shin.
- Repeat the motion while pointing your foot downward.
- Repeat with the opposite foot after switching sides.
- This should feel like a mild exercise. It’s not about pushing into discomfort or making yourself stretch.
Heel to Toe Walking

This exercise improves coordination and balance.
Procedure:
- To walk in a straight line, locate a clear area.
- Put one foot directly in front of the other so that the toes of your back foot touch your heel.
- If you need support, use a wall.
- For ten to thirty seconds, try walking in this manner.
What are the 7 pillars of physiotherapy?
The “7 pillars of physiotherapy” are the clinical framework used by physical therapists for effective rehabilitation and patient-centered care.
The seven foundational steps are:
Assessment: Obtaining a history and performing tests/measures to identify the source of movement or pain complaints.
Interpretation: Interpretation of the examination data for clinical decision-making regarding the patient’s condition.
Diagnosis: Identifying the specific movement dysfunction, impairment, or physical limitation.
Prognosis: Estimation of the highest level of function expected and the period of time needed.
Intervention: Skilled treatment based on diagnosis (eg, exercise therapy, manual therapy, modalities).
Outcomes: Standardized measures and functional assessments to track progress and assess treatment success.
Reassessment: Ongoing review of the patient’s response to therapy and adjustment of the treatment plan as appropriate.
What are the 4 types of PT?
There are more types of physical therapy: Orthopedic, Neurological, Cardiopulmonary, and Geriatric. These specialties treat different populations and conditions to restore movement, decrease pain,n and improve overall physical function.
- Physical Therapy – Orthopedic
This is the most frequent kind of physical therapy. It deals with the diagnosis, management,nt and treatment of disorders of the musculoskeletal system.
Common Uses: Post-surgical rehab (joint replacements), fractures, sprains, strains, tendonitis, and chronic conditions like arthritis.
Treatments: Joint mobilizations, therapeutic exercises, soft tissue massage, and stretching. - Neurologic Physical Therapy
This specialty is meant to help people with disorders or injuries to the brain, spinal cord, and nervous system. These conditions often impair balance, movement, and independence in daily life.
Common Uses: Stroke, Parkinson’s disease, multiple sclerosis (MS), cerebral palsy, and spinal cord injury.
Treatments include gait (walking) training, balance exercises, and activities to retrain the brain and improve muscle coordination. - Pulmonary Cardiopulmonary PT
Cardiopulmonary rehabilitation is for patients with heart and lung conditions or recent surgery of the cardiovascular or pulmonary systems.
They are commonly used for chronic obstructive pulmonary disease (COPD), heart attacks, heart failure, and rehabilitation following pulmonary or cardiac surgery.
Treatments: Endurance training, breathing exercises, and education on lifestyle modifications to improve functional independence. - Physical Therapy in the Elderly
This branch is designed for the specific movement and physical needs of seniors. It tackles problems that come with growing older, often affecting mobility, balance,e and bone density. Osteoporosis, arthritis, Alzheimer’s disease, joint replacements, and balance or fall issues are common uses. - Treatments include mobility training, flexibility exercises, and low-impact strength training to promote safety and avoid falls.
What are the benefits of physical fitness exercise?
7 Benefits of Physical Exercise – Inspire Healthcare. Physical fitness and regular exercise greatly enhance your overall sense of well-being. Some of the proven benefits include improving sleep quality, improving mental health, strengthening bones and muscles, improving weight management, and reducing the risk of chronic diseases (such as heart disease and diabetes).
Regular activity has profound and immediate benefits in several key areas:
Brain & Mental Health
Sharper Cognition: Enhances memory, processing speed, and executive function.
Mood Elevation: Induces endorphins that help lower feelings of stress, anxiety, and depression.
Protects over time: Reduces the risk of cognitive decline and dementia.
Health – Internal and Physical
Cardiovascular Fitness: Reduces blood pressure, manages cholesterol, and reduces the risk of stroke and heart disease.
Disease Prevention: Reduces the risk of type 2 diabetes, metabolic syndrome, and at least eight types of cancer.
Immune Support: Associated with decreased risk of severe illness and reduced mortality from respiratory infections.
Daily Function and Mobility
Strength & Independence: Supports joint protection, bone density, and muscle mass as you age.
Longer life: Reduces early death from all causes.
Pain Management: Helps relieve symptoms and improve function in those with arthritis.
Wellbeing & Lifestyle
Better Sleep: Helps fall asleep faster, sleep more deeply, and get better quality sleep.
Energy Boost: Increases the amount of oxygen and nutrients to tissues, which helps the body to work more efficiently.
Intimacy: Increases energy, physical confidence, and excitement, resulting in a healthier sex life.
FAQs
Can I do physiotherapy by myself?
Yes, you may perform physiotherapy exercises on your own, but only after a qualified specialist has given you a personalized plan and an initial diagnosis. While expert advice guarantees a safe recovery, self-diagnosing and developing your own regimen might exacerbate injuries.
What are the 4 principles of physiotherapy?
The four pillars of physiotherapy are as follows:
Exercise, Movement, and Rehabilitation: Creating focused physical exercises to improve function, strength, and mobility.
Using practical methods (such as joint mobilization and soft-tissue manipulation) to reduce pain and enhance joint mobility is known as manual therapy and therapeutic handling.
Therapeutic and Diagnostic Technologies: Making use of instruments like ultrasound, electrotherapy, or specialist movement monitoring to diagnose and treat ailments.
Allied Approaches: Including additional treatments in patient care, such as acupuncture, hydrotherapy, or holistic lifestyle counseling.
What is the most common type of physiotherapy?
Orthopaedic, neurological, geriatric, cardiovascular, and pediatric physiotherapy are the most popular. Many physiotherapists are capable of treating patients from a variety of specialties, even though the majority of them choose to specialize in one.
How many types of DPT are there?
The Dry Penetrant method and the Fluorescent Penetrant method are the two primary forms of DPT that provide dependable results with little equipment. This technique is inexpensive, simple to use, and extremely sensitive to even the tiniest surface flaws.
How many minutes of physical therapy per day?
The therapeutic benefit of lengthier sessions: Studies reveal that treatment results are adversely affected by time constraints. Your body reacts better to therapy during a leisurely 45-minute session.
References
- Banded pull-aparts. (n.d.). [Video]. Hingehealth. https://www.hingehealth.com/gb/en/resources/articles/scapular-stabilization-exercises/
- Burtka, A. T., & Dumain, T. (2026, May 13). Neck stretches for pain relief: How to stretch your neck. WebMD. https://www.webmd.com/fitness-exercise/fitness-neck-stretches
- Chin Tucks ET. (n.d.). [Video]. Hingehealth. https://www.hingehealth.com/gb/en/resources/articles/neck-strengthening-exercises/
- Cross-body arm stretch | shoulder and upper back stretch for older adults — More Life Health – Seniors Health & Fitness. (n.d.). More Life Health – Seniors Health & Fitness. https://morelifehealth.com/upper-arm-shoulder-stretch
- How to do the shoulder rolls exercise safely — More Life Health – Seniors Health & Fitness. (n.d.). More Life Health – Seniors Health & Fitness. https://morelifehealth.com/shoulder-rolls
- Neck Flexion and Extension | Exercise Library | ACE. (n.d.). https://www.acefitness.org/resources/everyone/exercise-library/204/neck-flexion-and-extension/?srsltid=AfmBOopY4QmlDCID5fEpHRHFsvI69aC4vX35dVRpofn_8ki4Jo5QUSZY
- Pendulum exercise for use with shoulder repair surgeries. (2026, March 26). UMass Memorial Health. https://www.ummhealth.org/health-library/pendulum-exercise-for-use-with-shoulder-repair-surgeries
- Scapular Retraction | Sport Orthopedics. (n.d.). https://sportsmedtexas.com/blog/scapular-retraction-and-scapular-protraction-exercises
- Scapular retraction exercise | posture and upper back strength for older adults — More Life Health – Seniors Health & Fitness. (n.d.). More Life Health – Seniors Health & Fitness. https://morelifehealth.com/scapula-retractions
- Wall Angels. (n.d.). [Video]. Hingehealth. https://www.hingehealth.com/gb/en/resources/articles/how-to-do-wall-angels/
- Watson, K. (2019, June 18). Benefits of shoulder shrugs and how to do them. Healthline. https://www.healthline.com/health/fitness-exercise/shoulder-shrugs#how-to
- Wrist extensor stretch | Cigna. (n.d.). https://www.cigna.com/knowledge-center/hw/wrist-extensor-stretch-zm6127
- Wrist flexor stretch. (n.d.). [Video]. Hingehealth. https://www.hingehealth.com/gb/en/resources/articles/wrist-flexor-stretch/
- Aiglon, K. (2019, February 9). How to reap the Full-Body benefits of Cat-Cow. Healthline. https://www.healthline.com/health/fitness-nutrition/cat-cow-how-to
- Buettner, K. (2018, September 18). How and Why You Should Do the Clamshell Exercise. Healthline. https://www.healthline.com/health/fitness-exercise/the-clamshell-exercise#clamshell-with-resistance-band
- Clinic, C. (2021, May 10). Got back pain? How the Superman exercise can help. Cleveland Clinic. https://health.clevelandclinic.org/got-back-pain-how-the-superman-exercise-can-help
- Clinic, C. (2025, February 14). Child’s pose. Cleveland Clinic. https://health.clevelandclinic.org/childs-pose
- Daisy, & Daisy. (2021, June 8). Wrist Circles | Illustrated Exercise Guide. SPOTEBI. https://spotebi.com/exercise-guide/wrist-circles/
- Dpt, J. E. (2026, February 19). 4 ways to exercise your fingers – WikiHow. wikiHow. https://www.wikihow.com/Exercise-Your-Fingers
- Ezrin, S. (2021, July 21). The benefits of doing the Cobra pose every day. Healthline. https://www.healthline.com/health/fitness/benefits-of-cobra-pose
- Single knee-to-chest stretch | Cigna. (n.d.). https://www.cigna.com/knowledge-center/hw/single-knee-to-chest-stretch-abw9961
- SpineAZ & SpineAZ. (2019, January 11). 5 exercises to help lower back pain. Spine Institute of Arizona. https://spineaz.com/2019/01/11/5-exercises-to-help-lower-back-pain/
- Sworkit Health. (2020, March 1). Fist and open – Sworkit Health | On-Demand Fitness, Mindfulness, Recovery, and Nutrition. Sworkit Health | On-Demand Fitness, Mindfulness, Recovery, and Nutrition. https://sworkit.com/exercise/fist-and-open
- Thomas R. Gest tgest@health.usf.edu. (n.d.). Module – movements of the upper limb. Copyright 2000 Thomas R.Gest. https://anatomy.ttuhscep.edu/modules/upper_limb_module/upper_limb_15.html
- Thumb abduction/adduction with pencil (exercise video). (n.d.). https://au.physitrack.com/home-exercise-video/thumb-abduction%252fadduction-with-pencil
- Turetsky, L., & Turetsky, L. (2023, November 1). 6 Exercises to strengthen lower back and core muscles. Back Intelligence (Creators of PostureFlow App). https://backintelligence.com/exercises-to-strengthen-lower-back/
- Wikipedia contributors. (2025, May 25). Straight leg raise. Wikipedia. https://en.wikipedia.org/wiki/Straight_leg_raise
- Calf raise. (n.d.). [Video]. Hingehealth. https://www.hingehealth.com/gb/en/resources/articles/ankle-strengthening-exercises/
- Calf Stretch | HealthLink BC. (n.d.). https://www.healthlinkbc.ca/healthwise/calf-stretch
- Clinic, C. (2022, December 22). How to strengthen your ankles. Cleveland Clinic. https://health.clevelandclinic.org/ankle-exercises-weak-ankles
- Daisy, & Daisy. (2021, June 8). Ankle Circles | Illustrated Exercise Guide. SPOTEBI. https://spotebi.com/exercise-guide/ankle-circles/
- Dorahy, R. (2026, May 13). Ankle pumps – Invigor Health. Invigor Health. https://invigorhealth.com.au/exercise/ankle-pumps/
- Feetology, & Feetology. (2026, March 24). Toe spread and hold exercise. Feetology Podiatry Centre. https://www.feetology.com.au/toe-spread-exercise/
- Heel-to-Toe walking | Illinois Extension | UIUC. (n.d.). https://eat-move-save.extension.illinois.edu/move/exercise/heel-toe-walking
- Liz. (2023, July 12). Benefits of heel raise exercises & how to do them. Capital Podiatry. https://capitalpodiatry.com.au/benefits-of-heel-raise-exercises-how-to-do-it/
- Marble pickups | HealthLink BC. (n.d.). https://www.healthlinkbc.ca/healthwise/marble-pickups
- Mini squats. (n.d.). [Video]. Hingehealth. https://www.hingehealth.com/gb/en/resources/articles/mini-squat/
- Pt, R. M. (2020, June 5). Easy hamstring stretches. Spine-health. https://www.spine-health.com/wellness/exercise/easy-hamstring-stretches
- Quad stretch. (n.d.). [Video]. Hingehealth. https://www.hingehealth.com/gb/en/resources/articles/quad-stretch/
- Single-leg balance. (n.d.). [Video]. Hingehealth. https://www.hingehealth.com/gb/en/resources/articles/single-leg-balance/
- Sit to stand. (n.d.). [Video]. Hingehealth. https://www.hingehealth.com/gb/en/resources/articles/sit-to-stand/
- Towel scrunch | Cigna. (n.d.). https://www.cigna.com/knowledge-center/hw/towel-scrunch-zm2223