12 Yoga Poses for Improving Balance
Introduction:
Your balance will be greatly enhanced by the core strength, body awareness, and integration of your upper and lower bodies that come with regular yoga practice. This is beneficial for both challenging yoga poses and healthy ageing.
While the numerous balancing poses in yoga, such as standing poses, arm balances, and inversions, provide you with clear opportunities to practice balancing, every other pose you perform in a well-rounded yoga class also helps you develop strength and flexibility in your legs, feet, hips, and core, which supports improved balance in both your daily life and your yoga practice.
Key Alignments:
Gaze and Head Position:
You may lose your equilibrium if you gaze down or lean your head to one side because it is heavy. In every stance, pay attention to how your head and eyes are positioned.
Hip Alignment:
It is far more difficult to balance when the pelvis is inclined. Learn the difference between closed and open hips in yoga, and make sure your hip points are always level and pointing in the correct direction.
Responsive Legs:
When some forms of yoga instruct you to lock your knees when standing, a small bend in the knee enables your body to make the ongoing adjustments that lead to improved balance.
Wider is More Stable:
Step your feet farther apart toward the sides of your mat for a firmer platform if you struggle to balance in standing poses. Conversely, move your feet closer together if you want to test your balance.
Yoga Poses:
Mountain Pose (Tadasana):

Mountain Pose (Tadasana) steps:
- Place your feet either slightly apart or in contact at the front of your mat.
- With your hands facing front, place your arms at your sides.
- Place your knees over your ankles, your shoulders over your hips, and your pelvis over your knees.
- Work your core and legs.
- Maintain a long neck and stare straight ahead with a neutral glance.
Chair Pose:

- From Mountain Pose, send your hips back and your chest forward while bending your knees as though you were reclining in a chair.
- Put your weight on your heels.
- Raise your arms above your head. They will be at a diagonal due to the tilt of your chest.
- Keep your knees tracking over your toes and facing straight ahead.
Downward-facing dog Pose:

- To straighten your legs and create an inverted V shape, start on your hands and knees, curl your toes under, and raise your hips up and back.
- Press firmly into your hands from fingertips to palms while releasing your heels toward the floor.
- Verify that the distance between your hands and your central line is equal. Apply the same principle to your feet.
- To maintain a neutral neck position, look at your toes.
Plank Pose:

Plank Pose steps:
- Step your right leg straight back while on your hands and knees, tucking your toes under and placing the ball of your foot on the mat.
- Reposition your left leg so that your body is in a straight line from your head to your heels.
- Ensure that your shoulders remain just above your wrists. Extend and engage your fingers.
- Engage your glutes and draw your belly button in toward your spine.
- Lower your knees to the mat while maintaining a straight line from your head to your knees if your hips start to sag or rise too high.
Boat Pose:
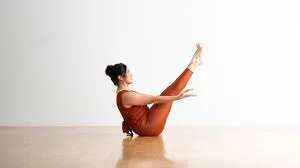
- Take a seat on your mat with your knees bent and your feet flat.
- Lean your upper body back and raise your feet off the ground while holding onto the backs of your thighs.
- Bring your shins parallel to the floor.
- If you can do so without your upper body falling, let go of your legs.
- Turn your palms upward and extend your arms beside your legs.
- Keep your spine long and either stay in this position or straighten your legs to create a V shape with your body.
Low Lunge Pose:

- Step your right foot to the inside of your right hand and lower your left knee to your mat from Downward Facing Dog. If your knee is uncomfortable, place a yoga pad underneath it.
- Make sure both hip points are facing forward by bringing your hands to your hips.
- To move your hips forward, either remain more erect or bend your right knee.
- Raise your arms above your head and let your shoulders drop away from your ears.
Tree Pose:

- Without allowing your hips to slip to the side, transfer your weight into your right leg from Mountain Pose.
- Lift your left foot off the ground and bend your left knee.
- Point your left knee to the left side of the room and use your hands to bring the sole of your left foot to your inner right thigh.
- Tighten your core.
- Make sure your hands are still in the Mountain Pose Position by bringing them to your hips.
- Raise your arms above your head once you are stable.
Corpse Pose:

- Close your eyes, lie on your back, and allow your legs to spread easily.
- Your palms should be facing the ceiling.
- Let your feet drop open.
- Every portion of your body should be relaxed. Soften your tummy, shoulders, and jaw.
- Take ten minutes or so of conscious rest.
Eagle Pose:

- With both hip points pointing front, raise your left foot off the ground while maintaining the Chair Pose.
- Your left thigh should be crossed over your right.
- Put your thighs together in a hug.
- Try to wrap your left foot around your right calf.
- Make sure your hands are still level and looking forward by bringing them to your hips.
- Extend your arms in front of you. At the elbows, cross your right arm across your left.
- If at all feasible, bring your forearms perpendicular to the floor with your palms touching while bending your elbows.
Side Plank Pose:

Side Plank Pose steps:
- Transfer your weight to your right hand from Plank Pose.
- Roll to the outer edge of your right foot and stack your left foot on top, flexing both feet strongly.
- Turn your chest to face the left side of your mat and raise your left arm toward the ceiling.
- To create a long diagonal line with your body, forcefully press against your right palm and raise your hips toward the ceiling.
- Keep your neck extended and look up at your upper hand or straight ahead.
High Lunge Pose:

- Step your right foot to the inside of your right hand while facing downward.
- Reach your fingertips, then use your core to raise your hands off the ground and raise your torso.
- Square your pelvis to the front of your mat while placing your hands on your hips.
- Raise your arms above your head.
- Try moving your feet to the sides of your mat to create a broader base if you are extremely unsteady.
- Bring your right thigh closer to the floor while maintaining your right knee over your right ankle.
- Maintain a powerful, straight left leg.
Half Moon Pose:

- Step your right foot next to your right hand while facing downward.
- Your right hand should be moved forward by 12 to 15 inches. Remain within a block or at your fingertips.
- As you raise your left leg parallel to the floor and straighten your right leg, bring your left hand to your left hip.
- Place your left shoulder over your right shoulder and your left hip over your right hip.
- Engage your entire left leg by flexing through your left foot.
- Raise your head to look at the ceiling.
- Hover your right fingertips a few inches off the ground for an additional balance test.
FAQs
How often should I practise yoga for balance?
Over time, whatever yoga you do will help you become more balanced. To improve your strength, flexibility, and body awareness, try practicing yoga two or three times a week.
Which yoga balance postures are ideal for beginners?
Begin with beginner-friendly yoga balance postures such as Mountain, Chair, and Tree Pose. Before you get to more difficult one-legged balancing, they help you develop the body awareness and leg and core strength you require.
Can yoga poses for balance help as I get older?
Indeed. Maintaining strength, suppleness, and coordination via regular yoga poses for balance will lower your chance of falling and keep you more self-assured as you age.
Are yoga poses for improving balance enough, or do I need other exercises too?
Balance-enhancing yoga postures are a solid starting point, particularly when they incorporate strength and mobility exercises. They can be used with your favourite movement exercises, such as weight training or walking.
Which pranayama is best for balance?
One of the best pranayama methods for attaining balance is Anuloma Viloma (Alternate Nostril Breathing). It stabilises prana flow, relaxes the nervous system, and balances the two hemispheres of the brain.
References:
- The 15 best yoga poses to build better balance – 2022 – Umel/liforme.com/blogs/blog/the-best-yoga-poses-to-build-better-balance?srsltid=AfmBOorZWJQ_hZigXFLuGujzRxzBY8AzCqb_vufKW-L9WiOrWN7Akri_
- 7 yoga poses that improve your balance – 2024 – Peloton/www.onepeloton.com/blog/yoga-balance-poses-beginners
- 15 yoga poses to improve balance – 2026 – Mooney/www.yogajournal.com/practice/yoga-sequences/fall-yoga-15-poses-proven-build-better-balance