Pigeon Pose (Kapotasana)
What is Pigeon Pose?
Pigeon Pose (Kapotasana) is a yoga posture that stretches the hip flexors, glutes, and lower back while improving hip mobility and flexibility.
The pigeon yoga posture requires you to take a low lunge stance, with your right leg ahead and your left leg behind. Your left leg should be stretched behind you, with the top of your foot touching the mat.
This posture focuses on your glutes, hips, and groin. It can also improve your range of motion. If you have tight hips, this stretch will be beneficial.
The pigeon stance requires nothing more than a yoga mat. If you have knee difficulties, you might put a blanket under your right knee to provide support.
Muscle Work During Pigeon Pose:
Psoas Muscle
The iliopsoas muscle is necessary for proper posture and spinal stability. It reaches from the pelvis to the femur.
It flexes your hip joint and lifts your upper leg towards your body. The muscle is located in the lower lumbar region of the spine. The Pigeon Yoga pose stretches and strengthens the psoas muscle.
Piriformis Muscle
The piriformis muscle is a tiny muscle found deep within the buttocks. It links the lower spine to the upper thigh bone (femur), which allows your hip to swivel. It improves hip rotation.
This muscle is also responsible for twisting the leg and moving the foot outward. While the sciatic nerve occasionally crosses diagonally over the piriformis muscles, the muscles are normally vertically above the nerve.
Video of Pigeon Pose
How To Perform?
- Begin in Downward Facing Dog and elevate your right leg into a Down Dog Split.
- Bend your right knee and bring it forward as if you were preparing to lunge. Instead of lunging, rest your right knee on the ground next to your right hand.
- Drop your left knee to the mat. Look rearward to ensure your left foot is pointed directly back.
- Place your hips firmly in front of your mat.
- To make the posture more comfortable, place cushioning (such as a folded blanket or gym towel) under the right side of your hip.
- If you feel steady, lower your chest into a forward bend over your right leg.
- Maintain a square hip stance and evenly distribute your weight over both sides. If you find this too severe, throw a blanket or block beneath your hip or back knee. Reach your brow towards the ground.
- Continue to square your hips while breathing through any pain.
- Return to a standing position with your hands aligned with your hips.
- To exit, tuck your left toes under and return to Downward Facing Dog.
- Repeat the stance from the opposite side.
Benefits of Pigeon Pose:
- This position focuses on opening your hips, which improves mobility and flexibility.
- Pigeon posture is well-known for its capacity to thoroughly stretch and expand the hips, increasing their range of motion and decreasing stiffness.
- This position is also said to aid digestion by mild stretching and movement of the lower belly.
- The pigeon posture enhances hip range of motion by activating the hip flexors, glutes, and piriformis muscles. It might also benefit the muscles that support the hips and lower back.
- Pigeon posture may also alleviate lower back discomfort by extending the muscles and tendons that surround the spine. It may also relieve sciatic pain by stretching the piriformis muscle.
Preparatory poses for Pigeon Pose
- Butterfly Pose
- Seated Forward Bend
- Cat and Cow Pose
Follow-up poses for Pigeon Pose
- Child’s Pose
- Crocodile Pose
- Corpse Pose
Variations:
Resting or Sleeping Pigeon Pose
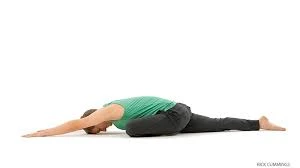
- The sleeping pigeon pose is frequently seen at the end of a yoga flow or Yin yoga session.
- Begin in pigeon stance, with your torso upright.
- As you walk, maintain your upper body folded over your front leg and your fingertips in front. Place your forehead or palms on the carpet. (You may also place it on a block, cloth, or blanket.) Place your forearms on the ground or extend your arms in front of you.
- Make sure your hips are square. Maintain a steady inhalation and exhalation, allowing your breath to ease you into the position and reduce any tightness.
- When you’re ready to exit the stance, slowly pull your forehead up. Bring your hands to your hips. Return to downward-facing dog position by curling your left toes under.
- Repeat on the other side.
Reclined Pigeon Pose / Figure Four Stretch

- Lie on your back on your mat.
- Bend your knees.
- Cross your right ankle across the left thigh. Keep your right foot flexed.
- Lift your left foot off the mat. Interlace your fingers behind your left quadriceps.
- Maintain a steady inhale and exhale while holding the position.
- Release and repeat on the other side.
King Pigeon Pose:
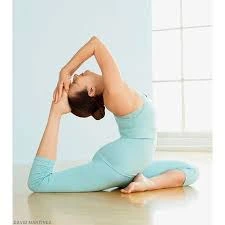
- To assume Classic Pigeon Pose, follow steps 1-5 as described above.
- Bend your left knee and put your left foot behind you while maintaining your right leg straight. Keep your toes plantar flexed (pointed).
- Next, elevate your left arm to the sky, gently bending your elbow backward and gripping your left foot.
- You can slightly elevate your chin and glance up, but avoid bending your neck backward.
- Hold this posture for 5–10 calm, deep breaths.
- Repeat on the opposite side.
Common Mistakes:
Not warming up first
Pigeon is a deep hip opener. If your hips are stiff, you may be at risk of injury if you do not warm up beforehand. Prior to trying the pigeon posture, warm up and stretch your hips.
Pigeon posture can be difficult for beginners to grasp since it demands keeping the hips square.
Unparalleled Shin
If your shin is not parallel, it will cause tension in your knee or ankle.
If the pressure is too much for your knees, place a soft cloth under them. It will assist in protecting your knees.
Rotated Rear Leg
During Pigeon posture, keep your rear leg in a neutral position, rather than rotating it outward. To correct this, tuck your toes under and raise your thigh to make your hips square.
Hips are not square
Try not to collapse onto the hip of your front bent knee. Keep your hips square, and utilise padding as needed.
Contraindications:
- Spinal, neck, and shoulder injuries.
- Insomnia
- Stiff back or a sore back.
- Migraine
- Hypertension
- Weak functions of any organ.
- Women who are pregnant or menstruating.
- Spondylitis
- Any allergies related to breathing.
- Depression
Precautions:
This position is not recommended for persons with knee injuries, recent knee surgeries, spinal, abdominal, or sacral injuries, sacroiliac difficulties, hip injuries, or who have had recent hip replacement surgery. People with sensitive or tight wrists should also exercise caution.
Conclusion:
When the pigeon pose is done correctly, it can help with hip flexor and lower back flexibility, as well as digestion. Some people feel it helps relieve mental tension or concern because Ayurveda says these emotions are stored in the hips.
Always consult with a healthcare expert before beginning any new workout routine. If you want to mix up your yoga regimen, try Pigeon Pose.
FAQs
What is the alternative to Pigeon Pose?
Deer pose (Mrigiasana).
Deer Pose is a Yin Yoga pose similar to Pigeon Pose; however, it is more accessible to more individuals due to less tension on the front knee.
What are the common mistakes in the Pigeon Pose?
4 Common Mistakes in Pigeon Pose: Crooked Hips. Avoid trying to have your front shin parallel to the front of the mat, putting too much weight on your front knee, and failing to keep your back leg straight.
How long can I stay in Pigeon Pose?
The duration of Pigeon Pose varies according to your comfort and ability level, but one to two minutes on each side is a good starting point. As you gain comfort, progressively increase the duration to enhance the stretch and benefits.
Is Pigeon Pose bad for the hips?
Pigeon stretches your glutes to speed up muscle recovery, relaxes your lower back, and increases hip mobility. This stretch is one of the most crucial you can perform for your back and hips, as it improves your leaps, sprints, and squats while also making your back feel good throughout the day.
Who should avoid pigeon pose?
The Single-Leg Pigeon Pose is not suitable for everyone. If you have a knee replacement, have had knee surgery, or are experiencing knee discomfort despite your best efforts to optimize your alignment, you should consider an option like the reclining pigeon (also known as “thread the needle”).
References:
- Volunteer, A. O. L. (2024, August 23). Pigeon Pose: Want More Flexible Hips? This is Your Pose! Art Of Living (United States). https://www.artofliving.org/us-en/yoga/poses/pigeon-pose
- Cpt, K. D. M. R. (2021, March 4). Pigeon Pose: A How-To Guide. Healthline. https://www.healthline.com/health/fitness/pigeon-pose#bottom-line
- Ryt, A. P. (2024, May 10). How to do pigeon pose in yoga. Verywell Fit. https://www.verywellfit.com/pigeon-pose-eka-pada-rajakapotasana-3567103
- Weishaupt, J. (2024, December 10). How to do a pigeon yoga pose. WebMD. https://www.webmd.com/fitness-exercise/how-to-do-pigeon-yoga-pose
- Ross, M. (1970, January 1). This hip opener may be exactly what your body needs. https://www.onepeloton.com/blog/pigeon-pose