10 Best Yoga for Strong Abs at Home
What are Basic Core Exercises?
Basic core exercises go beyond abdominal workouts to target a variety of core muscles that are distinct from what we typically think of as “abs.” Numerous distinct muscle groups make up the core muscles.
Core exercises assist balance these muscle groups to build a strong core, generally rather than concentrating solely on six-pack abs, which are primarily cosmetic and do not support the spine.
The Benefits of Basic Core Workouts
If you wish to finish reading this article today, it would be hard to cover the entire list of advantages of a regular core practice in this introduction.
However, some of our favorite benefits of learning fundamental core exercises are that they
- Improve your balance and posture
- Boost stability
- Encourage general physical fitness
- Relieve back pain
- Boost the health of your spine
As was already noted, core workouts cover a large range of muscle groups, which contributes to their extensive effects. So don’t forget to mix up the 20 workouts listed below!
Is Yoga Good for Core Strength?
Definitely! Yoga is a proven method for strengthening the core. Here are some benefits of yoga:
- Develops Strength: Studies reveal that functional yoga positions such as Boat Pose and Planks can increase core endurance by 25% and abdominal strength by 20%.
- Enhances Posture: Deep stabilizing muscles, such as the transverse abdominis and obliques, are strengthened by yoga and are crucial for maintaining an upright spine. Stronger core muscles promote improved posture in daily life and lessen the pressure on the lower back, according to studies.
- Boosts Endurance: The core must remain active for extended periods of time when performing postures like chair, dolphin, and plank. This greatly increases the endurance of your core muscles, making it easier for you to sit, stand, and move throughout the day.
- Improves Stability and Balance: Tree Pose and Warrior Transitions are two yoga positions that test your stability. These exercises that emphasize balance help you
- Develops Mind-Body Awareness: Yoga teaches you to intentionally engage your core by connecting breath and movement. This helps you develop both mental focus and core awareness in a way that standard workouts do not.
How yoga helps build your core strength
Your core is made up of more than simply your abdominal muscles. What makes up your core is:
- Diaphragm muscle
- Hip adductor and flexor muscles
- Gluteal Muscles
- Pelvic floor Muscles
Every action you take during the day is supported and stabilized by these big muscle groups. By strengthening these muscles, you can lessen the stresses that pass through your joints and absorb forces from everyday tasks. Your core muscles provide the foundation from which all other muscles may perform these functions in unison, regardless of whether you’re concentrating on strength or flexibility.
Additionally, you may lower your risk of common ailments like sports hernias and hip flexor strains by strengthening your core. You can also get much-needed relief from back discomfort by working your core muscles.
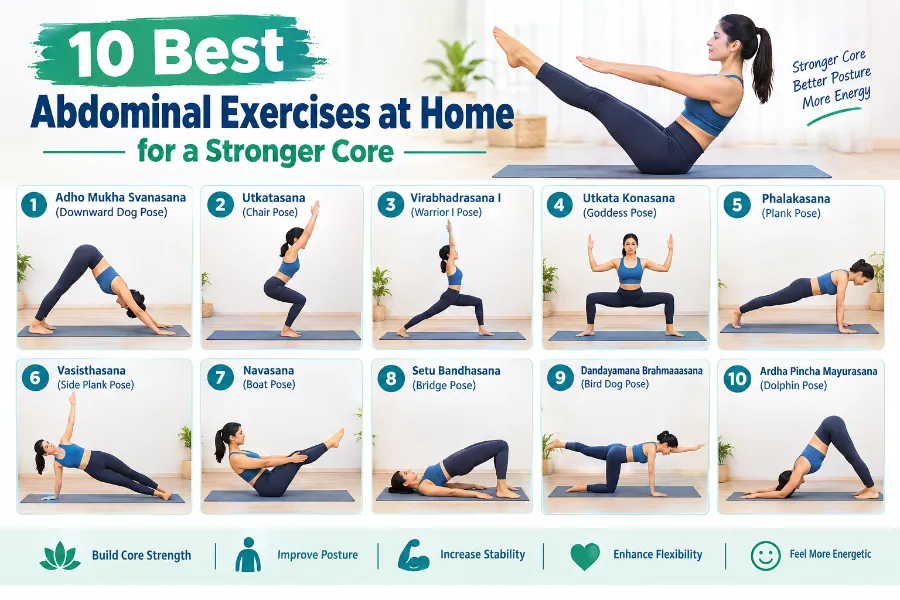
10 Yoga Poses for a Stronger Core
- Adho Mukha Svanasana (Downward Dog Pose)
- Utkatasana (Chair Pose)
- Virabhadrasana I (Warrior I Pose)
- Utkata Konasana(Goddess Pose)
- Phalakasana (Plank Pose)
- Vasisthasana (Side Plank Pose)
- Navasana (Boat Pose)
- Setu Bandhasana (Bridge Pose)
- Dandayamana Brahmanaasana (Bird Dog Pose)
- Ardha Pincha Mayurasana (Dolphin Pose)
Adho Mukha Svanasana (Downward Dog Pose)

How to do
- This position increases overall stability, lengthens the spine, and strengthens the abdominal muscles.
- Take a tabletop position and begin on your hands and knees.
- Press your palms firmly against the mat while spreading your fingers wide.
- Lift your hips up and back, tuck your toes, and straighten your legs as much as is comfortable.
- Lengthen your spine while maintaining an active core.
- Repeat two or three times after holding for 30 to 60 seconds.
Safety and Adjustments:
- If your hamstrings are tight, bend your knees.
- Keep your lower back from collapsing and concentrate on raising your hips.
- Individuals who have wrist problems can use a weave or lay their hands on yoga blocks.
Utkatasana (Chair Pose)

How to do
- Place your feet slightly apart and stand upright.
- With the palms facing down, extend your hands forward. Avoid bending your elbows.
- As though you were sitting in a chair, bend your knees and softly press your pelvis down.
- Be at ease, or at least make an effort! Imagine staying seated while reading a newspaper or typing on a laptop to better understand the Chair Pose.
- Keep your hands parallel to the ground.
- Sit upright and extend your spine with mindfulness. Unwind.
- Make sure your knees don’t extend past your toes as you gently lower yourself deeper into the chair.
Virabhadrasana I (Warrior I Pose)

How to do
- Keep your legs at least three to four feet apart and maintain a straight stance.
- Make a 15-degree turn with your left foot and a 90-degree turn with your right.
- Does the right foot’s heel line up with the left foot’s center?
- With your palms facing up, raise both arms sideways to shoulder height.
- Checkpoint: Are your arms parallel to the ground?
- Bend your right knee while exhaling.
- Look to your right and turn your head.
- Stretch your arms farther as you settle into the yoga pose.
- Push your pelvis down gently. Maintain the yoga pose with a warrior’s resolve. Grin like a contented warrior. As you descend, continue to breathe.
- Take a deep breath and rise.
- As you exhale, lower your hands from the sides.
- Turn your right foot in by roughly 15 degrees and your left foot out by 90 degrees to repeat the yoga pose on the left side.
Utkata Konasana (Goddess Pose)

How to do
- Place your feet wider than shoulder-width apart. Although you should be able to easily bend your knees, you should have a decent amount of space between your feet.
- Turn your feet slightly outward so that your toes face the corners of your mat.
- Bend your knees and start to squat.
- Rotate your thighs externally, tuck your tailbone, press your belly button up and in, straighten your spine, and relax your shoulders.
- Continue descending while keeping your knees above your ankles.
- If it’s comfortable for you, try to position your thighs parallel to the floor.
- You can bend at the elbows or rest your arms wherever feels comfortable
- Anjali Mudra (hands pushed together in prayer posture) and Gyan Mudra (palm up with the tips of your index finger and thumb touching) are two mudras that many yogis like to incorporate into this pose.
Phalakasana (Plank Pose)

How to do
- Begin with Bharmanasana, also known as All Fours.
- With the middle of your wrists as broad as the outer borders of your shoulders, place your wrists beneath your shoulders.
- Align the front of your wrists with the mat’s front edge.
- Step one leg back, straighten it, tuck your toes, and plant the ball of your foot and your toes on the ground.
- Expand your shoulder blades across your back and push through your hands. Your upper back may feel a little rounded as a result, and it should
- Mula Bandha, the muscles at the base of your pelvis, should be toned. Tone your abdomen and tuck your tailbone in a little (Uddiyana Bandha).
- Strive to form a straight line from your heels to your hips, shoulders, and back of your head, not parallel to the ground, but straight.
- Phalakasana is this.
- You can either bend your knees and return to Bharmanasana or push back into Adho Mukha Svanasana to go. Continue with the opposite leg.
Vasisthasana (Side Plank Pose)

How to do
- Start in a high plank or Adho Mukha Svanasana (Downward Dog), with your hands beneath your shoulders and your body in a straight line.
- Change to the Right Hand
- Stack the left foot on top of the right as you turn onto the right foot’s outside edge. Transfer all of your weight to your right hand, placing your right wrist just below your right shoulder.
- To create a straight line, raise your hips.
- Lift the hips till the body forms a single straight diagonal line by applying pressure through the right hand and outer right foot. Firmly contract the lateral abdominals.
- Raise Your Left Arm
- In order to create a single vertical line that is perpendicular to the floor, raise the left arm vertically toward the ceiling. Turn your chest so that it faces the side wall. Look ahead or upward.
- Hold, Then Change Sides
- Hold for three to five breaths. Lower the hips and return to the high plank, then repeat on the left side.
- How to Get Out of Vasisthasana
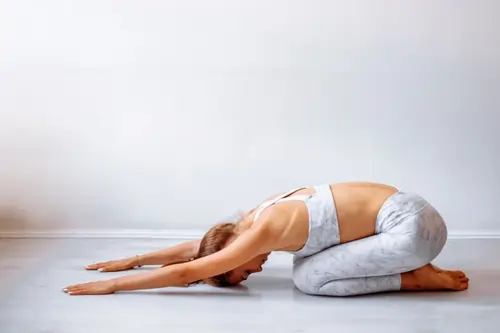
- Exhale and lower your hips to return to a high plank. Before continuing, take three deep breaths in Child’s Pose (Balasana).
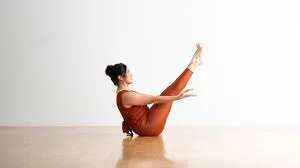
Navasana (Boat Pose)
How to do
- Lie on your back with your arms by your sides and your feet together.
- Inhale deeply, then exhale while raising your feet and chest off the floor and extending your arms in the direction of your feet.
- Your fingers, toes, and eyeballs should line up.
- As your abdominal muscles tense, feel the strain in the vicinity of your navel.
- As you hold the pose, continue to breathe deeply and effortlessly.
- Return to the ground softly and unwind as you release your breath.
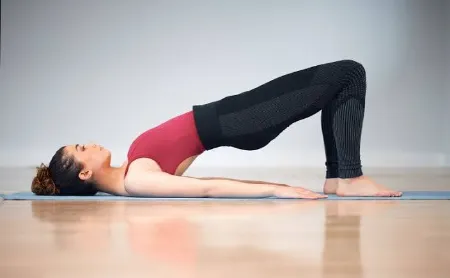
Setu Bandhasana (Bridge Pose)
How to do
- Lie on your back with your arms by your sides.
- Bend your knees and place both feet hip-width apart on the floor.
- With your toes pointing forward, place your heels six to eight inches from your glutes. Squeeze your glutes and contract your abdominals to raise your hips toward the ceiling.
- From your knees to your hips to your shoulders, your body should form a straight line; only raise your hips as high as you can without arching your back.
- Squeeze your glutes for two seconds before dropping your hips gradually to the floor.
- Do it again.
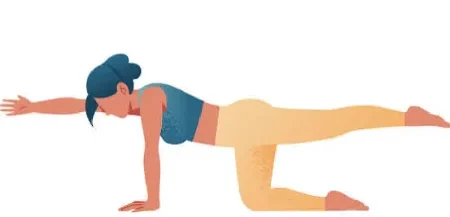
Dandayamana Brahmanaasana (Bird Dog Pose)
How to do
- Pose at the tabletop to begin. Take time to determine the proper alignment, with your knees exactly beneath your hips and your wrists exactly beneath your shoulders.
- Ensure that your spine is straight; this can be achieved by tucking your pelvis and using your abs. To maintain a neutral neck, look down at the ground.
- Lift your left arm and make an effort to maintain it in line with the rest of your body, parallel to the ground. Stretch the palm forward actively.
- When you’re prepared, raise the right leg and transfer the weight to the left leg. Maintain its extension and alignment with the ground.
- If your hip starts to twist upward, contract your glutes and bring it back down.
- Breathe deeply and slowly, holding your breath for as long as you can.
- Repeat on the opposite side after releasing.
Ardha Pincha Mayurasana (Dolphin Pose)

How to do
- Put yourself on your hands and knees in the tabletop position, placing your knees beneath your hips and your wrists beneath your shoulders.
- Press equally through both forearms as you lower them to the mat, keeping the elbows shoulder-width apart.
- If it feels more supportive, interlace the fingers instead of keeping the forearms parallel and the palms flat.
- Get ready to raise the hips by tucking the toes under.
- Raise your hips to form an inverted V shape as you inhale.
- If your hamstrings permit, take tiny steps forward, pausing when you experience a consistent, strain-free stretch.
- Lift your shoulders away from your ears and firmly press your forearms into the mat.
- Avoid flaring the ribs by softly drawing the navel toward the spine.
- Reach the heels toward the floor while pressing the thighs back so they don’t contact.
- Maintain a calm head position between the arms while looking at the face.
Daily Core Yoga Routine
It doesn’t have to take hours to develop a strong core. Whether you have 10 minutes in the morning, a complete 20-minute sequence, or want to progressively develop from beginner to intermediate, these routines fit perfectly into your daily schedule.
10-Minute Morning Core Yoga Routine
A brief, energizing flow that will awaken your core and establish the tone for the day.
| Pose | Duration | Notes |
| Cat-Cow Warm-Up | 1 min | Prepares the core and mobilizes the spine |
| Bird Dog Pose | 2 x 30 sec each side | Increases balance and stability |
| Plank Pose | 30 sec | Works your shoulders and abs |
| Chair Pose | 45 sec | Strengthens the core and thighs |
| Bridge Pose | 1 min | Activates the deep core and glutes |
| Boat Pose | 2 x 30 sec each side | Hip flexors and abs tone |
| Downward Dog | 1 min | Lengthens the spine and activates the abs |
20-Minute Core Sequence
A sequence that is well-balanced to provide full-body benefits and deeper core engagement.
| Pose | Duration | Notes |
| Cat-Cow + Gentle Twists | 2 min | Spine and core warm-up |
| Dolphin Pose | 45 sec | Strengthens the core and shoulders. |
| Plank Pose (Forearm or High) | 45 sec | Increase your endurance |
| Side Plank | 30 sec each side | Focuses on the obliques |
| Warrior I | 45 sec | Activates the legs |
| Goddess Pose | 45 sec | Core activation of the deep abdomen |
| Boat Pose with Pulses | 3 x 15 reps | Boosts the intensity |
| Bridge with Leg Lifts | 45 sec | core +glutes |
| Bird Dog (with elbow to knee) | 1 min | Balance and stability |
| Downward Dog to Plank Flow | 1 min | Activation of the dynamic core |
Progressive Difficulty Levels
Build up gradually by selecting the appropriate routine for your skill level.
| Level | Sequence Example | Notes |
| Beginner | Bird Dog → Bridge → Plank (knees down) | Pay attention to alignment and stability. |
| Intermediate | Chair → Plank → Side Plank → Boat | Develop your oblique strength and endurance. |
| Advanced Dolphin | Side Plank (leg lift) → Boat (straight legs) → Crow Prep | Add advanced holds and balancing. |
Start with a daily 10-minute routine. Add the 20-minute segment on alternating days. As you go through the difficulty levels, your core will become stronger and sturdier.
Yoga for Core Strength: Safety Tips
Yoga is an excellent way to build core strength, but only if done carefully. Remember these steps to safeguard your body and achieve the greatest results:
Safety Tips
- Engage your core rather than your lower back: Always draw your navel toward your spine to reduce tension and back pain over time.
- Begin slowly and work your way up to longer hold times.
- Use props as needed: Blocks, straps, and a yoga ball can all help with support and alignment.
- Listen to your body. If you feel intense discomfort, particularly in your back or neck, stop immediately.
Common Mistakes to Avoid
- Plank and Boat Pose involve arching or sagging the lower back.
- Holding your breath—regular breathing helps to stabilize your core.
- Collapsing shoulders in positions such as Dolphin or Downward Dog.
- Pushing into complex positions too soon, without a solid foundation.
Incorporating Ab Workouts into Your Routine
Begin by introducing core workouts into your current program while avoiding overworking the same muscle group on consecutive days. This allows you to progressively increase your core strength without overdoing it. Incorporate a handful of the above ab workouts into your daily routine two or three times each week, and develop a balanced program that incorporates both aerobic and strength activities.
Patience is essential, as developing core strength takes time. Ab workouts should seem like a natural extension of your training program, helping you maintain a well-rounded and productive fitness plan.
FAQs
Is yoga beneficial for the abs?
Yes, yoga uses practical motions that work the entire core, including the abs. In addition to promoting spine health and easing back discomfort, poses like Boat, Plank, and Bridge tone and develop the abdominal muscles.
Is it possible for yoga to strengthen the core?
Indeed, yoga is a great method for strengthening and tightening the core. The deep core muscles are used in many yoga poses, which enhance posture, stability, and general abdominal strength. Strengthening your core and tightening the muscles surrounding your midsection are the main goals of poses like Boat Pose and Warrior III.
How frequently should I perform yoga poses to strengthen my core?
Try to practice for 30 to 60 minutes three times a week to see results. Duration is not as crucial as consistency.
What is the quickest way to use yoga to strengthen your core?
Over time, consistent yoga practice will strengthen your core. You might try incorporating dynamic movement to increase the intensity. For example, drop your back knee toward the floor from High Lunge or softly transition from Boat to Low Boat.
In what ways does yoga improve core strength?
Yoga strengthens the core muscles in a gradual and long-lasting way. Regular exercise gives the muscles a deep stretch, better blood flow, and nourishment, which has both a relaxing and strengthening impact.
Which yoga positions are most effective for building core strength?
The finest yoga poses for developing a strong core and abs are Plank Pose (Phalakasana) and Boat Pose (Navasana). They’re also great for toning and building stability.
References
- Rushali. (2026). Yoga for Core Strength: 10 Powerful Poses + Expert Tips. MyYogaTeacher. https://myyogateacher.com/articles/yoga-poses-for-core-strength
- Cleveland Clinic. (2023). 5 Yoga Poses You Can Do Right Now To Strengthen Your Core. Cleveland Clinic. https://health.clevelandclinic.org/yoga-poses-that-can-strengthen-your-core-muscles
- Jane Cheung (Liforme). (2026). The 12 Best Yoga Poses for Core Strength | Liforme. Liforme. https://liforme.com/blogs/blog/the-12-best-yoga-poses-for-core-strength?srsltid=AfmBOoqpkBhj7FPjbmpNddSodcwpjXkNNy5wylto4PPIOguiJ-6kU6BQ
- (n.d.). Attention Required! | Cloudflare. 1mg.com. https://www.1mg.com/articles/6-powerful-yoga-poses-to-lose-weight-build-core-strength-at-home/#google_vignette