
Push Jerk Exercise
Introduction:
The Push Jerk Exercise is a powerful weightlifting movement used to develop explosive strength in the shoulders, legs, and core. It involves driving a barbell overhead using a quick dip and powerful leg push, allowing the lifter to generate maximum force.
In order to receive the bar locked out in a half overhead squat posture, athletes now elevate the bar, press under it, and move their feet slightly out. The athlete stands with the bar in the overhead position to complete the lift. Despite its complexity, the mechanics of this technique can be taught to athletes at any developmental stage.
Athletes may lift far more in the push jerk than in the push press because they are now pressing under the bar to receive the load after using their legs and hips to help drive the weight overhead. Athletes might expect to lift about 30% more weight with proper technique.
Because the muscles of the legs and hips must extend before the upper body presses beneath the hips and the hips and knees bend back, the push jerk also develops core-to-extremity timing and synchronisation.
The power output potential for this movement in conditioning exercises for any loading demand or rep scheme can be increased if this movement pattern is understood, allowing for a quick cycle time for numerous reps. The push jerk has several advantages for physical growth when you consider the neurological advantages of this exercise, which include balance, coordination, accuracy, and agility.
Muscle Work During Push Jerk:
- Trapezius Muscle
- Deltoid Muscle
- Rhomboids Muscle
- Lattisimus Dorsi Muscle
- Triceps Muscles
- Core Muscles
- Gluteus Muscle
- Hamstring Muscle
- Quadriceps Muscle
How to Perform?
- Lift the bar from the floor to your shoulders using the power clean or hang power clean exercise, or take it off a power or squat rack at shoulder height.
- With your feet hip-to-shoulder distance apart and your toes pointing forward or slightly outward, stand upright.
- Make sure the grasp on the bar is even, pronated, closed, and slightly broader than shoulder-width once it has been placed in front of the shoulders. The grip on the bar should stay loose.
- The elbows must be either slightly ahead of or beneath the bar.
- This is where all repeats start.
- To lower the bar in a straight downward path, bend the hips and knees at a slow to moderate pace while maintaining an upright torso and a head aligned with the spine. Keep your arms in the same position.
- During the dip, the hips shouldn’t slide rearward. Rather, they ought to stay just beneath the shoulders.
- The downward movement is a dip to a depth no deeper than a quarter squat or the power clean’s catch position rather than a full squat. A depth of no more than 10% of the lifter’s body height is another rule of thumb.
Differences between Push Press and Push Jerk:
Movement pattern: The push jerk leverages momentum to propel the weighted barbell above in a more forceful manner than the push press.
Level of difficulty: Compared to the push press, the push jerk’s movement pattern is typically more intricate.
Weight level: Compared to a regular push press, the push jerk allows you to lift a larger weight due to its more explosive movement.
Benefits:
Stability and Strength:
Compared to exercises like the shoulder press and push press, the push jerk enables substantially more weight to be lifted. It is possible to lift about 30% more weight with sound mechanics than with the previously mentioned push press. The muscles in the upper body are heavily required to press beneath the bar and actively support the load, even though they may not always help with pressing the bar upward.
Before employing the upper body, the lower body is trained by vigorously extending to push the bar off the shoulders.
Strength and Velocity:
The push jerk’s drive phase, which involves the quick extension of the knees and hips, teaches the athlete how to apply force swiftly or forcefully to the ground. The power potential of this action is increased when the time of the upper and lower bodies is properly sequenced. The athlete’s speed will rise as they get greater proficiency. Furthermore, the driving phase and the ability to press beneath the bar both require faster execution as the load increases.
Adaptation of the Nervous System:
The push jerk’s core-to-extremity component is evident when the load is raised with a strong leg drive before the arms are employed to press beneath the bar. Coordination, accuracy, agility, and balance are among the neurological abilities that are developed by doing the lift correctly with the right sequence, footwork, and receiving position of the load.
Tip for Beginners:
- To ensure that you maintain precision, begin with three sets of up to five repetitions each.
- Perform the push-jerk exercise twice a week.
- Since learning the form is your top concern, use either extremely light weights or an empty barbell. You can increase the weight by five to ten pounds until you can do the exercise with flawless form.
Push Jerk Modifications:
Stance and Grip:
The grip and stance can be changed to suit the athlete’s requirements. To help maintain their torsos upright during the dip and drive portion of the exercise, some athletes may adopt a slightly wider stance than hip-width during the setup position.
If the athlete has tight shoulders, widening their grip may help them reach the right overhead position.
Load:
To learn the movement pattern and drill method, the push jerk can be reduced to a PVC pipe.
Alter the Movement to a Push Press:
If shoulder instability in the receiving position poses a risk of injury, the push jerk might be changed to a push press. This is not advised and should only be used in certain circumstances.
Variations:
Dumbbell or Kettlebell Push Jerk:
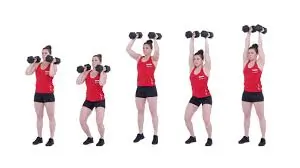
You can perform the push jerk with two kettlebells or two dumbbells. These variants considerably stimulate the shoulder and core muscles by allowing for a slightly variable range of motion and requiring the athlete to stabilise each side independently of the other.
During the receiving posture, athletes must maintain their arms straight, either immediately over their shoulders or near their ears. Athletes may be able to address specific wrist, elbow, or shoulder concerns by using dumbbells or kettlebells.
Single-Arm Push Jerk:
The single-arm push jerk, performed with a single dumbbell or kettlebell, puts a lot of strain on the core muscles as the body tries to balance the uneven loading overhead. Because single-arm lifting allows for greater movement pattern flexibility, an athlete can address concerns related to discomfort, mobility, or flexibility.
Precautions and Safety:
Before starting an exercise program, speak with your doctor if you have a history of or current medical problems. An exercise program’s safety and efficacy depend on proper technique, but depending on your unique demands, you might need to adjust each activity to get the best results.
Always choose a weight that gives you complete control over your body during the exercise. Keep a tight eye on your body during any workout, and stop right away if you experience any pain or discomfort.
Common Mistakes:
Lack of Hip and Knee Extension:
Athletes frequently hurry to get under the barbell by neglecting to fully extend their lower bodies during the drive phase of the exercise.
This limits the potential load that can be lifted, negates maximal power potential, and results in the posterior chain and quadriceps not being used efficiently.
One way to start is to concentrate on jumping more forcefully or to intentionally squeeze the glutes and quadriceps during the drive part of the exercise.
If the issue continues, the athlete can start with unloaded jump-and-land exercises and work their way up to light loads, emphasising lower body extension before increasing the difficulty of the exercise.
Too Wide of Feet When Landing:
In order to compensate for stiff shoulders by maintaining an extremely upright torso, athletes often bounce their feet disproportionately outward to get under the bar.
When doing several repetitions, this is ineffective at best, and at worst, the knees may be harmed by rolling inside the feet while in the catch position.
Generally speaking, the feet should land at shoulder width or in the athlete’s typical squat position. To help with this mistake, the athlete can draw lines in chalk on the floor outside of their feet and concentrate on keeping their feet inside the lines during the push jerk.
Inactive Shoulders or Bent Arms in the Receiving Position:
Receiving a weight overhead is not supported by landing with bent arms or by not actively pressing the shoulders toward the bar in the catch position.
When the feet touch the floor, proper execution requires the shoulders to be active and the arms to be locked.
Athletes can use a ‘tall jerk’ drill to concentrate on the press-under component of the exercise or concentrate on hitting the bar forcefully after extending their hips to address this problem.
Not Raising Your Weight Before Lowering It:
The whole range of motion of the movement is not demonstrated if one does not stand tall after receiving the weight overhead.
Compared to other overhead exercises like a shoulder press or push press, this exercise aims to show that bigger loads can be raised at the same distance. Rushing this crucial part of the movement may be made easier by possibly slowing down the change from the receiving position to the finish position.
FAQs
What are push jerks good for?
The push jerk improves stamina, power, speed, technical skill development, and upper body strength and stability.
What is the correct Push Jerk form?
In order to accelerate the bar off the shoulders during the push jerk exercise, a quick hip and knee extension is necessary. To truly throw (or jerk) the bar forward, the push jerk also requires a strong hip and knee thrust. The bar is then caught with extended elbows in the overhead position with the hips and knees slightly flexed.
Is push jerk or split jerk better?
The push jerk, which emphasises speed and power, may be best performed by lifters with strong leg drive and explosive strength. The split jerk is the safer option for near-maximal or maximal loads since it provides more margin for error if you depend on balance and stability.
Is the push jerk a full-body workout?
The push jerk is a full-body workout that can strengthen your hamstrings, glutes, quads, calves, triceps, and core, among other muscles.
How do push jerks improve strength?
Athletes might expect to lift about 30% more weight with proper technique. Because the muscles of the legs and hips must extend before the upper body presses beneath the hips and the hips and knees bend back, the push jerk also develops core-to-extremity timing and synchronisation.
References:
- CrossFit | The Push Jerk – instruction, benefits & technique | CrossFit.com/www.crossfit.com/essentials/the-push-jerk
- Push Jerk – 2018 – Exercise Technique Manual for Resistance Training, Third Edition/www.nsca.com/education/articles/kinetic-select/push-jerk
- Push Jerk: technique, benefits, and common mistakes – 2024 – Api/store.torokhtiy.com/blogs/exercises/push-jerk-exercise