
12 Best Stretching Exercise for Hip Mobility
Introduction
Hip mobility stretches are crucial for preserving joint health, enhancing functional movement, and averting musculoskeletal abnormalities. As the primary center of motion for the lower body, the hips affect stability, posture, and gait. Prolonged sitting, bad posture, or tight muscles can all impair hip mobility, which can result in compensatory habits, decreased performance, and a higher risk of injury.
Targeted stretches, including gluteal stretches, hip flexor releases, and dynamic openers, can improve circulation, restore range of motion, and support anything from walking and squatting to sports performance. Regular hip mobility exercises promote fluid motion, lessen stiffness, and increase the durability of the joint over time.
Anatomy
Anatomy or mechanics, the hip joint’s build strikes a compromise between stability and motion. The head of the thigh bone, the femur, fits into the acetabulum of the pelvis at this ball-and-socket synovial joint. Walking, running, and dynamic movement all depend on this configuration because it permits a broad range of motion, including flexion, extension, abduction, adduction, rotation, and circumduction.
Bone Structures:
- The spherical top of the femur that articulates with the pelvis is known as the femoral head.
- The concave pelvic socket where the femoral head is received is called the acetabulum.
- The ischium, pubis, and ilium are among the pelvic bones that make up the acetabulum.
Providing Soft Tissue Support:
- The femoral head and acetabulum are covered by cartilage, which absorbs shock and reduces friction.
- The labrum is a fibrocartilaginous rim that improves joint stability and deepens the acetabulum.
Ligaments:
- Hyperextension is prevented by the iliofemoral.
- Limiting excessive abduction is the pubofemoral.
- Ischiofemoral: Strengthens the back of the capsule.
Joint capsule:
Contains lubricating synovial fluid and encloses the joint.
Nerves:
- Femoral, obturator, and superior gluteal nerves.
Closed chain position:
- The closed-packed posture is when the hip joint is fully extended because it tightens the joint’s strong ligaments, which provides stability.
Open chain position
- Because flexion and external rotation have a tendency to uncoil and slacken ligaments, the hip joint is one of the few joints where the ideal articular contact position (combined flexion, abduction, and external rotation) is open-packed rather than closed-packed.
Muscles Supporting Hip Movement:
- Flexors: rectus femoris, iliopsoas
- Extensors: hamstrings and gluteus maximus
- The gluteus medius and minimus are abductors.
- Adductors: Magnus, Brevis, and Longus
- Rotators: quadratus femoris, obturator internus, and piriformis
Stretching Exercise for Hip Mobility
Butterfly Stretch

- Position: Sitting position.
- Press the soles of your feet together while sitting on the floor or a prop.
- Bring your feet closer to your hips to increase the intensity.
- Dig into your sitting bones and legs.
- Tuck your chin into your chest and straighten and lengthen your spine.
- Feel the line of energy radiating out through the top of your head as you lengthen your spine with each breath. Drop heavily to the floor with each inhalation, then relax or sink a little deeper into the stretch.
- Ten to fifteen repetitions per session are recommended.
- Hold duration: 5 seconds is enough.
Pigeon Pose

Pigeon Pose steps:
- Position: sitting position.
- Bring your right knee to your right wrist by shifting your weight forward. Slide your right foot across to your mat’s left edge. Lean your right foot out.
- Make sure your right shin is parallel to the top of your mat for a deeper stretch. Keep your shin at an angle and bring your right heel closer to your torso to lessen the pose’s intensity.
- Ensure that your hip bones face forward and are parallel to one another.
- Bring your left leg down to the floor. Backward, slide your left thigh. With the toes pointed back, keep your left foot flat against the surface. The length of the mat should be parallel to your left leg.
- Ten to fifteen repetitions per session are recommended.
- Hold duration: 5 seconds is enough.
Lunge Hip Flexor Stretch
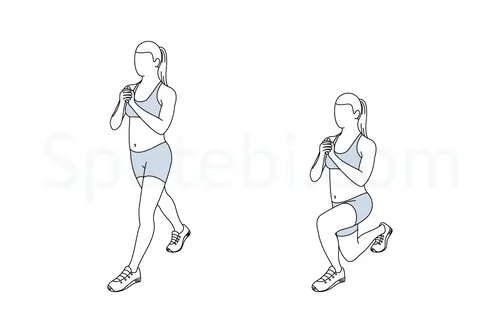
- Position: Kneeling Position.
- Put your hands on your forward knee or hips.
- To get into a split stance, take a step forward with your right foot.
- To make your right knee 90 degrees, lower it.
- Ten to fifteen repetitions per session are recommended.
- Hold duration: 5 seconds is enough.
Seated Figure 4 stretch

- Position: Sitting position.
- Raise and spread your right leg’s inner thigh. Your right ankle should be just over your left knee. To strengthen your lower leg muscles and support your knee, flex or “point” your right foot (foot pointing, toes flexed).
- To raise your left leg off the ground, place both hands on your left knee or behind your left thigh. Your right hip and glute muscles ought to feel stretched.
- You can either place both hands on the back of your left thigh and bring your left leg toward your chest, or you can use your right hand to gently press your right knee away from your torso, creating space between your right knee and shoulder, to deepen the stretch.
- Ten to fifteen repetitions per session are recommended.
- Hold duration: 5 seconds is enough.
Hip Controlled Articular Rotation

- Position: Standing position.
- Before your back begins to round, raise your right leg as high as you can.
- Without rotating your hips, raise your knee and bring it to the side. Be sure to maintain a straight hip-bone alignment.
- Next, internally twist your hip by turning your knee inward.
- Make sure your hips are still facing forward as you bring your leg back behind you, making a circle with it. Avoid arching your back too much.
- Bring your knee back to the beginning position to repeat this movement sequence.
- Ten to fifteen repetitions per session are recommended.
- Hold duration: 5 seconds is enough.
Standing Hip Flexor stretch with Side Reach
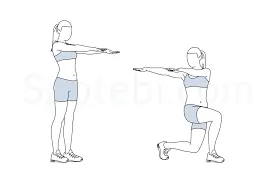
- Position: Kneeling Position.
- Place your right knee on the floor behind you and your left foot flat in front of you as you kneel on the floor.
- When performing this exercise, maintain a tall trunk. For balance, you can continue to place your hands on your left knee.
- Slide your right knee back slowly until the front of your hip starts to expand a little.
- Bring your hips and trunk toward your left foot by squeezing your right glute as if you were pushing forward. Create a pelvic tilt by slightly tucking your hips.
- Ten to fifteen repetitions per session are recommended.
- Hold duration: 5 seconds is enough.
Deep Squat

- Position: Standing position.
- Squat down as though you were seated on a chair to start. While your spine remains straight, your ankles, knees, and hips will all bend simultaneously. To maintain your centre of gravity over your feet as you start to lower, your hips will go backward and your knees forward over your toes.
- Throughout the entire action, your feet should stay flat on the ground.
- As you bend at the hips, your pelvis and trunk will remain neutral and in alignment. Your pelvis and shins will be in relative alignment at the lowest depth. Your pelvis should ideally not lean backward or tuck under; rather, it should stay in a neutral position.
- From the front, your knees will remain in line with your feet.
- Lastly, return to the beginning posture by pushing through your feet while keeping your weight centred immediately in front of your ankles.
- Ten to fifteen repetitions per session are recommended.
- Hold duration: 5 seconds is enough.
Standing Quadriceps Stretch

- Position: Standing position.
- Hold on to your ankle while bending your knee and bringing it back toward your butt.
- After you’re stable, slowly bring your foot up toward your butt until the front of your thigh feels well stretched.
- As you maintain the stretch, concentrate on maintaining a tall, erect posture.
- Ten to fifteen repetitions per session are recommended.
- Hold duration: 5 seconds is enough.
Supine figure 4 Stretch
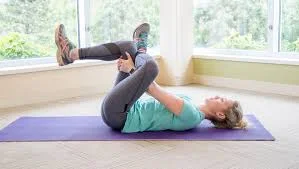
- Position: Supine lying position.
- The outside of your ankle should be just above the knee of your good leg when you cross this leg over your other knee.
- Bend your good leg and slide your heel toward your buttocks while letting the knee of your injured leg drop out to the side.
- Your affected buttock could feel stretched.
- Pull your thigh in toward you, elevating the foot off the ground, and interlace your fingers behind the thigh of your healthy leg to increase this stretch.
- Press your elbow into the affected leg’s thigh to extend this stretch even more.
- Keep this position.
- Ten to fifteen repetitions per session are recommended.
- Hold duration: 5 seconds is enough.
Knee-to-chest stretch
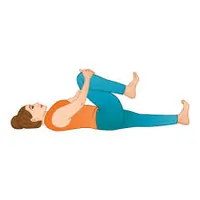
- Position: Supine lying position.
- To stretch, keep your hand on the knee and apply a little band to one leg.
- As much as you can, attempt to relax your low back, pelvis, and legs while you’re tugging.
- Ten to fifteen repetitions per session are recommended.
- Hold duration: 5 seconds is enough.
Fire Hydrant stretch

- Position: Tabletop Position.
- Lie on your hands and knees in a comfortable position. (Practicing this on a yoga mat or other soft surface might be beneficial.)
- Move your knee out to the side and toward the ceiling as you raise one leg off the ground. Throughout the entire exercise, keep your knee bent.
- Squeeze your glute muscles together as you hold this position for a few seconds. Pulling your abdominals in also helps maintain a neutral spine and a stable pelvis.
- Return your knee to its initial position.
- Ten to fifteen repetitions per session are recommended.
- Hold duration: 5 seconds is enough.
Indications:
In both clinical and wellness contexts, hip mobility stretching exercises are frequently recommended to enhance range of motion, lessen stiffness, and promote functional movement. This is a well-organized summary based on your interests in ergonomic integration and physiotherapy:
- Decreased hip range of motion as a result of postural habits, aging, or a sedentary lifestyle
- Tightness in the rotators, abductors, adductors, or hip flexors (e.g., piriformis, gluteals, iliopsoas)
- Post-operative rehabilitation (e.g., under supervision following joint replacement or hip arthroscopy)
- Recovery from lower limb, lumbar, or pelvic musculoskeletal conditions.
- Treatment of long-term conditions such as sacroiliac dysfunction, femoroacetabular impingement (FAI), and osteoarthritis
- Getting ready for exercise (such as dancing, yoga, Pilates, or athletics)
- enhancing gait mechanics and decreasing tendencies of compensatory movement
- Improving ergonomics for extended periods of standing or sitting
Contraindications
- Avoid doing end-range flexion or rotation if you have hip impingement symptoms (like FAI).
- Advanced osteoarthritis: Avoid forceful stretching and only use mild movement.
- Syndromes of joint hypermobility—give stability precedence over flexibility.
- Passive movement pain: reevaluate your technique or look for underlying pathology
- Pregnancy: prevent overstretching because of ligamentous laxity, especially in the third trimester.
- Stretching is delayed for 48 to 72 hours after recent corticosteroid treatments.
- Track the tissue’s reaction to peripheral vascular disease or impaired circulation.
- Recent dislocation or fracture of the hip
- Restrictions following surgery (such as following hip replacement or hip arthroscopy, particularly in the early stages)
- Hip joint infection or acute inflammation (e.g., septic arthritis)
- Elevated risk of fracture due to severe osteoporosis
- Unstable spinal or pelvic injuries
- Cancer in the thigh area
- Uncontrolled neurological disorders that impair motor control, such as severe Parkinsonism or spasticity
Special Test
Flexion, Abduction, External Rotation, or FABER Test
- The goal is to screen for sacroiliac (SI) or hip joint problems.
- Method: The patient is in a supine position.
- The examined leg is positioned in a figure-4 by the examiner, with the ankle over the opposing knee.
- Gently press down on the bent knee while stabilizing the opposing pelvis.
- Positive Sign: Back pain (SI joint) or groin pain (hip pathology)
- Shows: SI joint dysfunction, labral tears, and hip osteoarthritis
Flexion, Adduction, Internal Rotation, or FADIR, test
- Its objective is to identify femoroacetabular impingement (FAI).
- Position: Supine lying position.
- The examiner adducts and internally rotates after flexing the hip to 90 degrees.
- Positive Sign: Sharp discomfort in the anterior hip or groin
The Thomas Test
- Objective: measures hip flexor tension in the rectus femoris and iliopsoas.
- Procedure: Supine lying position.
- Check the location of the opposing leg. Signs include the opposite thigh lifting off the table or an increase in lumbar lordosis.
- Signals include anterior pelvic tilt and tight hip flexors.
The Trendelenburg Test
- Objective: Assess pelvic stability and gluteus medius strength.
- Procedure: The patient stands on one leg while the examiner checks the alignment of the pelvis.
- Pelvic drop on the unsupported side is a positive sign.
- Shows: Dysfunction of the gluteus medius and weak hip abductors
Quadrant test, or scour test
- The goal is to screen for intra-articular disease, such as arthritis and ligament tears.
- Procedure: lie down in a supine position.
- The examiner rotates through a range of motion while flexing the hip and applying axial compression.
- Positive Indications: Grinding, clicking, and pain
- Signs include loose bodies, osteoarthritis, and labral tears.
The Piriformis Test
- Objective: Diagnose sciatic nerve irritation or Piriformis Syndrome.
- Procedure: Side-lying position and their hips are flexed to 60 to 90 degrees and adducted across their midline.
- Indications: sciatic nerve entrapment, piriformis stiffness, buttock or posterior thigh pain or tingling.
Ely’s Test
- Objective: Determine the tightness of the rectus femoris.
- Procedure: The examiner passively flexes the patient’s knee while they are prone.
- Positive sign: Hip lifts off the table.
- Rectus femoris contracture is an indication.
Stinchfield Test
- Objective: to identify intra-articular hip disease.
- Procedure: The patient lies down.
- At 30°, the examiner resists a straight leg raise.
- Positive Indication: Pain in the groin
- Signs include arthritis, synovitis, and labral tears.
Log Roll Test
- Objective: evaluate labral tears or capsular laxity.
- Procedure: The patient lies down, and the examiner passively rotates their leg in both internal and external directions.
- A positive sign would be excessive mobility or pain.
- Indication would be ligamentous laxity or labral disease.
Role of Physiotherapy for hip mobility
Evaluation and Diagnosis
- To find restrictions in hip range of motion, strength, and stability, physiotherapists employ functional screening and specialized tests (such as FABER, FADIR, and Scour).
- They assess postural habits, compensatory movements, and biomechanical patterns that impact hip function.
Individual Treatment Strategy
- Therapists create customized programs utilizing manual therapy, stretching, strengthening, and neuromuscular re-education based on the results.
- Age, activity level, pathologies, and ergonomic requirements are taken into consideration when designing plans (e.g., tech users vs. athletes vs. the elderly).
Techniques for Stretching and Mobility
- Hip flexor, extensor, rotator, and abductors can all be made more flexible by using static, dynamic, PNF, and passive stretching techniques.
- Combining soft tissue treatments with joint mobilizations to improve capsule mobility and decrease stiffness.
Integration of Stability and Strength
- Strengthening of the pelvic stabilizers, core, and gluteals to promote dynamic hip control.
- Functional mobility is reinforced through the use of balance drills and closed-chain exercises (such as squats and bridges).
Pain Control and Recovery
- application of techniques (such as cryotherapy, TENS, and ultrasound) to lessen pain and inflammation.
- Gradual movement exposure to boost self-esteem and lessen fear-avoidant tendencies.
Instruction and Ergonomic Guidance
- teach good posture, joint protection techniques, and movement mechanics.
- Giving advice on how to set up a workstation, lift objects, and change activities to stop recurrence.
Rehabilitation and function
- procedures to fully restore hip mobility and reintegrate into daily or athletic activity following surgery or an injury.
- To ensure a safe return, incremental loading and functional milestones are used.
FAQs
What kind of workout works the hip flexors?
Stretching the Kneeling Hip Flexors
You can do a kneeling lunge stretch to work your hip flexors by putting one leg on the floor and the other foot forward. Then, slowly lean your hips forward until you feel a stretch in the front of your hip. The Spiderman stretch, which involves stepping one foot forward to the outside of your hand and extending your hips forward, is another useful stretch. You may intensify the stretch by using your glute muscles and maintaining a straight back in these poses.
Is it okay to stretch three times a day?
Yes, you can usually stretch three times a day, but you need to warm up beforehand, pay attention to your body, and avoid pain. Although stretching several times a day is frequently good for muscular health and flexibility, you should make sure it’s a part of a comprehensive fitness program that also includes cardio and strength training. Watch out for overstretching, which can cause harm, and get professional advice if you have any injuries or medical concerns.
Which kind of stretching improves mobility the most?
Stretching Types: Dynamic Stretching
The goal of dynamic stretches is to move the body and prime it for exercise. It is excellent for warming up before any physical activity, even vigorous workouts. Arm or leg swings that are slow and controlled (through the complete range of motion) are an example of dynamic stretching.
Which posture improves hip mobility the most?
The deep squat, often known as the “third-world squat” or Malasana in yoga, is one of the best poses for increasing hip mobility. In addition to stretching the gluteal muscles, adductors, and hip rotators, this pose naturally activates the three hip movements of flexion, abduction, and external rotation. The deep squat decompresses the hip joint, stimulates the circulation of synovial fluid, and activates the pelvic floor when done correctly. Additionally, it aids in the restoration of normal movement patterns that are lost as a result of extended sitting or sedentary lifestyles. It can be done safely if the feet are a little wider than shoulder-width, the hips are lowered below knee level, the spine is neutral, and the toes are pointed outward.
What are the basic types of stretching?
Stretching can be broadly divided into a number of forms, each with specific use in mobility improvement, fitness, and physiotherapy. Static stretching, which is frequently used after exercise to increase flexibility and relieve muscle tension, entails maintaining a muscle in an extended position for a predetermined amount of time, usually 15 to 60 seconds. Dynamic stretching is perfect for warm-ups and enhancing the functional range of motion because it involves controlled, movement-based stretches that replicate activity patterns. Rapid, bouncing movements are used in ballistic stretching to strain muscles beyond their normal range; however, because of the increased danger of damage, this technique is usually only used by experienced athletes. Proprioceptive neuromuscular facilitation, or PNF stretching, is frequently utilized in clinical rehabilitation to increase flexibility by combining passive stretching with isometric contractions.
References
- Cronkleton, E. (2020, January 17). How to do a better butterfly Stretch. Healthline. https://www.healthline.com/health/butterfly-stretch#steps
- Ross, M. (1970, January 1). This hip opener may be exactly what your body needs. https://www.onepeloton.com/blog/pigeon-pose
- Walsh, K. (1970, January 1). Why Figure 4 stretch can offer your hips the relief they’re craving. https://www.onepeloton.com/blog/figure-4-stretch
- Supine Figure 4 stretch (exercise video). (n.d.). https://us.physitrack.com/home-exercise-video/supine-figure-4-stretch
- Cpt, A. A. (2024, August 6). Knees to chest stretch for low back muscles. Verywell Health. https://www.verywellhealth.com/knees-to-chest-exercise-296870
- Quad stretch. (n.d.). [Video]. Hingehealth. https://en-gb.hingehealth.com/resources/articles/quad-stretch/
- Muinos, L. (2024b, January 4). 7 Essential hip flexor Stretches. Verywell Fit. https://www.verywellfit.com/7-best-hip-flexor-stretches-5088569
- Pt, K. G. (2025, August 12). This 60-Second hip stretch loosens tight muscles and improves mobility. EverydayHealth.com. https://www.everydayhealth.com/workouts-activities/standing-hip-car-exercise/
- Kelly, E. (2023, March 17). 8 of the Best Hip Flexor Stretches and Exercises. Healthline. https://www.healthline.com/health/fitness-exercise/hip-flexor-exercises#stretches


