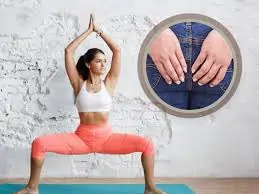

10 Yoga Poses for Spine Flexibility
Introduction:
By increasing your range of motion and body awareness, yoga helps maintain the health of your spine. Additionally, yoga positions help enhance your posture, stretch your back, and strengthen the muscles that support your spine.
Your general well-being is rapidly impacted by pain and limited movement if your spine isn’t functioning properly. While some spinal misalignments are inherited, others are made worse by inactivity and excessive screen time.
Anatomy of Spine:
The 24 vertebrae in your spine, along with the joints, discs, ligaments, and nerves that unite them, make up a complicated system. A robust, flexible spine, which extends from the base of your skull to your tailbone, is essential to the operation of your entire body.
The cervical (neck), thoracic (upper back), lumbar (lower back), sacrum, and coccyx (tailbone) are the five parts of your spine. The spine’s natural curvature is produced by developmental motions like sitting, walking, crawling, standing, and raising the head.
The vertebrae shield the spinal cord, an essential component of the nervous system that runs down the middle of the spinal column.
Benefits:
Improved Flexibility and Strength:
A well-balanced musculoskeletal system, improved joint mobility, and stress release are all facilitated by gentle stretching and strengthening. Additionally, it helps build a stronger core and tone muscles, which reduces back pain and the risk of injury during other exercises. Additionally, yoga enhances hand-eye coordination and balance (hello, surfing!).
Improved Digestion:
You can help stimulate the digestive organs and enhance overall gut health by using twists, forward folds, and spine bends. In addition to lowering inflammation, gentle internal organ stretching helps improve blood flow and circulation.
Stress Reduction:
By focusing inward, you can achieve inner peace, control your breathing, and detach from outside stressors. Movement, breath awareness, and mindfulness all work together to reduce stress hormones and encourage relaxation.
Good Mood and Emotional Well-Being:
The “feel-good” hormones known as endorphins are released during yoga, which can improve your mood and cultivate a positive outlook for the remainder of the day.
Yoga Poses:
Child’s Pose:

- Bend forward and place your forehead on your head from the Vajrasana or thunderbolt position. Place your hands at the base of your spine or extend them out in front of you.
- You can make a fist with your palms and rest your forehead on it if you are unable to reach the mat.
- Take a few minutes to unwind here and try to breathe deeply.
- To exit the pose, carefully raise yourself, return to Vajrasana, and then straighten your legs to release them.
Cat and Cow Pose:

- Place your knees beneath your hips and your palms directly beneath your shoulders as you drop to all fours. On all fours, make sure your weight is spread evenly.
- As you lower your belly toward the mat, take a breath and fill your abdomen with air. As you do this, your back will arch. Lengthen your neck and throat while looking up at the ceiling.
- As you release the breath, bury your chin into your chest, curve your back, and bring your naval towards your spine.
- For a few breaths, keep doing this motion. As you perform the motions, let your breath guide you.
- Release and adopt a child’s position after a few rounds.
Cobra Pose:
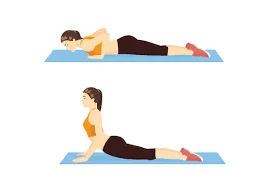
- With your feet together, your legs straight, and your soles facing up, lie flat on your stomach.
- With the fingers clasped and pointed forward, place the palms of the hands flat on the ground beneath and slightly to the side of the shoulders.
- Arms should be positioned with the elbows toward the sides of the body and pointing backward.
- Shut your eyes and place your forehead on the ground.
- Let your entire body relax, paying particular attention to your lower back. Now slowly lift your head.
- To further elevate the trunk and arch the back, straighten the elbows, utilising the back muscles first, followed by the arm muscles.
- In the final position, the navel is lifted by a maximum of 3 mm while the pubic bone stays in contact with the floor.
- Depending on how flexible the back is, the arms may or may not be straight.
Locust Pose:

Locust Pose steps:
- On your stomach, lie down. Stretch your arms back and place them next to your thighs while keeping your forehead on the ground.
- Take a deep breath and raise your head, torso, hands, and legs off the ground. Avoid twisting your hips and keep your legs straight.
- Hold and continue to breathe. Make sure your neck is long, and you look straight.
- Keep your thighs active while holding the pose with your core muscles.
Easy Spinal Twist:
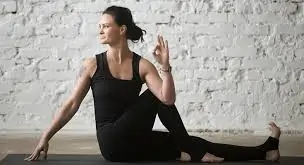
- With your legs out in front of you, take a seat on the mat. Keep your hands by your sides.
- At the knee, fold the left leg. Put your left foot on the ground close to your right knee. Now put your left hand away from your spine on the back of your left hip.
- On the other side of your left knee, place your right hand.
- Now glance up, gaze behind, and turn your back.
- As you maintain the stance, continue to breathe normally.
- Return to the starting position softly after a few breaths. Do the same with the other leg.
Half-lord of the Fishes Pose:

- With your feet together and your spine straight, take a seat in Dandasana.
- Now position the left foot flat next to the right hip while bending the left leg.
- Place your left hand on your right knee, your right hand behind you, and your right leg over your left knee.
- Now gaze over the right shoulder while slowly turning the neck, shoulders, and waist to the right.
- Make sure your back is straight.
- Now take slow, deep breaths and glance over your right shoulder.
- Let go and do it again on the opposite side.
Triangle Pose:

Triangle pose steps:
- Breathe out, place your right leg between your palms, and extend your left toes to a 90-degree angle.
- Slightly beneath the right heel, with the right palm either on the ground or on the fingertips
- Take a breath, raise the left arm to the heavens, and turn the hip, abdomen, and chest to the left;
- Maintaining a lateral stretch on the left side of the body, straighten the front knee while pressing the hips back.
- gaze down to find your equilibrium, then gaze up at your left fingertips.
- Breathe out, gaze down, and place your left hand on the ground. Take a breath, retract your right leg, and adopt a downward-facing dog stance.
Gate Pose:
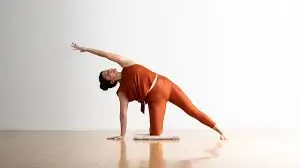
- Your thighs should be perpendicular to the floor when you first kneel. Put your hands on your hips.
- Now reach out to the side with your left leg. Keeping your big toe near the mat, spin your leg externally from your hip socket. Maintain alignment between your knee and your other hip.
- Take a breath, extend your back, and extend your right arm to the side. Once again, rotate externally such that your palm is toward the ceiling.
- Breathe out and bend laterally, sideways, toward your outstretched leg. Move your left hand down your left leg.
- Now, remain in this position, take a deep breath, and keep your eyes under the elevated arm.
- Make sure your chest is not falling inward but rather open toward the ceiling.
- To exit the pose, move your hand back up, place your shoulders over your hips, and return to your kneeling position in Vajrasana, also known as the thunderbolt pose.
Downward-facing dog Pose:

- Start by positioning yourself on your palms and knees in the cat-cow pose. Lift your hips and push back through your hands from this position. Make your legs straight.
- Spread your fingers and keep your hands firmly on the mat. There will be feet on the mat. You can also just put your toes on the mat if you’re having trouble.
- Avoid putting your shoulders close to your ears. Take a look at your belly.
- To maintain the posture, contract your thighs and core. Continue inhaling deeply and slowly.
- Bend your knees to release the posture.
- Reach the position of a youngster.
Mountain Pose (Tadasana):

Mountain Pose (Tadasana) steps:
- Place your feet on the mat a little apart. Make sure your weight is split equally between your feet.
- Take a breath, lift your arms above your head, and clasp your fingers together. The palms ought to be pointing upward.
- Now, gradually bring your shoulders up to your ears. Breathe out, open your chest, straighten your posture, and roll your shoulders back and down your spine.
- Remain motionless, relaxed, and with a steady gaze.
- Return to your natural position gradually and unwind after taking a few breaths.
Tips For Spine Yoga:
- Before performing more difficult backbends or twists, warm up.
- Draw in your navel to activate your core.
- To maintain ideal alignment, use props.
- To control your nervous system, take steady breaths.
- For long-term advantages, practise regularly.
FAQs
Can yoga improve back flexibility?
Torsion exercises improved the spine’s range of motion and developed the back and abdominal oblique muscles. Our findings showed that even once a week, performing yoga poses (asanas) increased hamstring muscle flexibility and spinal joint mobility.
What are the types of spinal movements?
There are five different ways that the spine can move. These include side bending or lateral bending, flexion (forward bending), extension (backbending), rotation (twisting the spine), and axial extension, which lengthens and decompresses the spine. A certified yoga instructor would typically incorporate one asana for each of these kinds in a lesson. You can make sure the back is consistently receiving the necessary stretch and stimulation for improved flexibility by including various kinds of bends.
Why is back flexibility important in yoga?
Most people have tight backs that lack power and flexibility as a result of sedentary and unhealthy lifestyles. Increasing your back’s flexibility will not only keep you healthier and more fit, but it will also help you reach more difficult yoga poses.
How to get flexible spines fast?
One excellent spinal stretch is the supine spinal twist. It enhances your ability to move your spine. To perform this stretch, lie on your back, raise your knees to your chest, and then lower them to one side. Regularly performing this stretch helps avoid back pain and aids in the healing of injuries.
How long does it take to increase spine flexibility?
Improving flexibility can take anywhere from two to three weeks of regular stretching to several months. Depending on personal circumstances and commitment, significant progress may occasionally take many months.
References:
- The 15 best yoga poses for spine health & alignment – 2025 – Umel/liforme.com/blogs/blog/yoga-poses-for-spine-health-alignment?srsltid=AfmBOooh-o6QDmHrwnnMSsEKDgJqN12CTI8tjpTKojmBcCLxkmX_3UsV
- The Best Yoga Routine for Spinal Flexibility & Strength – 2023 – Stoenner/www.bodhisurfyoga.com/yoga-routine-for-spine
- 10 yoga poses for back flexibility – 2023 – Gupta/www.shvasa.com/yoga-blog/10-yoga-poses-for-back-flexibility