
10 Yoga Poses for Hip Opening
Introduction:
Yoga poses for hip opening are designed to gently stretch and strengthen the muscles around the hips, improving flexibility, mobility, and overall joint health.
Tension frequently builds up in your hips because they support the weight of your upper body and connect it to your legs. The hips can become stiff and tight without regular stretching or mobility work, leading to back pain, muscular imbalances, and poor posture. By releasing these muscles, yoga hip openers facilitate more comfortable and easy daily motions.
Benefits:
Relieves Tightness: Sitting for extended periods of time can shorten and tighten the hip flexors. Yoga positions that open the hips gently stretch these muscles, releasing tension and stiffness and lessening the sensation of the hips being “locked.”
Increases Mobility to Avoid Injuries: Walking, climbing stairs, and even crouching are all made easier and safer by hip mobility. Over time, holding positions like the Goddess Pose and Garland Pose can increase flexibility and mobility. Hip flexibility can also enhance performance and lower injury risk for regular bikers and runners.
Enhances Alignment and Posture: Tight hips can strain the lower back, leading to discomfort or poor posture when sitting or standing. Long holds and gentle yoga poses alleviate this tension, promoting a healthy spine and a neutral pelvis.
Reduces Lower Back Pain: Because the lower back and hips are closely related, stiffness in one frequently affects the other. Relieving tense hip muscles can provide long-term comfort and lessen lower back discomfort. Learn some beginner-friendly poses here if you suffer from persistent lower back pain!
Encourages relaxation and emotional release: Yoga philosophy holds that emotional strain and stress are stored in the hips. Hip openers are a conscious exercise that helps reduce emotional tension and encourages relaxation.
Yoga Poses:
Low Lunge Pose:
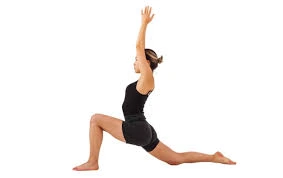
- Step one leg forward into a lunge position after standing up.
- Maintain a straight front knee over your ankle.
- Make sure your back heel is pressed down as you lower your back knee toward the floor.
- For a deeper stretch, you can reach your hands aloft or maintain them on your hips.
- Repeat on the opposite side after holding for 30 to 45 seconds.
Lizard Pose:

- Put your right foot ahead and begin with a low lunge.
- As you descend, place your elbows and forearms on the mat and bring both hands to the inner of your right foot.
- Feel the stretch in your hips and groin as you lower your hips closer to the floor.
- After 30 to 60 seconds of holding, switch sides.
Goddess Pose:

- Place your feet widely apart and point your toes at a 45-degree angle.
- Maintaining your knees in line with your toes, lower your hips into a deep squat.
- With your hands facing ahead, extend your arms to shoulder height.
- Hold for 30 to 60 seconds.
Butterfly Pose:

Butterfly Pose steps:
- With your knees bent outward and your feet together, take a seat on the floor.
- Gently press your knees toward the floor while holding your feet with your hands.
- To deepen the stretch, lean forward a little while maintaining a straight back.
- Hold for 30 to 60 seconds.
Child’s Pose:

- Begin by getting on your knees.
- Stretch your arms forward on the mat while lowering your hips back toward your heels.
- For 30 to 60 seconds, place your forehead on the ground.
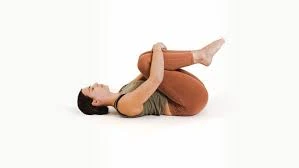
Happy Baby Pose:

- Bend your knees and tuck them against your chest while lying on your back.
- Your knees should be wider than your torso.
- Grab the outside borders of your feet and bring your ankles directly over your knees.
- Press your lower back into the mat while flexing your feet and gradually pulling them down toward you.
- For five to ten breaths, maintain the position.
Garland Pose (Malasana):

Garland Pose (Malasana) steps:
- With your toes pointing outward, place your feet wider than hip-width apart.
- Press your elbows on your inner knees as you squat down, bringing your hips closer to the floor.
- Use a wall for additional support.
- In a prayer position, place your hands together in front of your chest.
- Hold for 30 to 60 seconds.
Pigeon Pose:

- Take a tabletop position to begin.
- Place your right leg behind your right wrist by bringing it forward.
- Keeping your hips square, extend your left leg straight back.
- Hold the position for 30 to 60 seconds while lowering your chest over the bent leg.
- On the opposite side, repeat.
Frog Pose:

- Make sure your knees are wide apart and in line with your hips as you begin on your knees.
- Keeping your knees bent and your feet flexed with the soles facing up, lower your hips toward the floor.
- Lower your chest gradually toward the floor while placing your hands on the ground for support.
- To assist you in relaxing into the pose, hold the stretch for 30 to 60 seconds while taking deep breaths.
- Gently raise your hips and bring your knees back together to emerge.
Figure Four Pose:
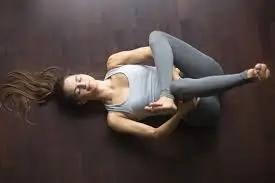
- With your feet flat on the ground and your knees bent, lie on your back.
- Cross your left knee with your right ankle.
- Put your hands around your left thigh by reaching through your legs.
- Pull your left leg gently in the direction of your chest.
- After 30 to 60 seconds of holding, switch sides.
Safety tips:
Always warm up: A thorough warm-up improves blood flow to the hip region, increasing the suppleness of the muscles and connective tissues. Think of doing:
- Cat-Cow: These softly arouse the pelvis and spine.
- Low Lunge: Begin to extend the front hip muscles.
- Hip flexors are warmed up by the cobra pose.
Listen to your body: While a slight stretch is natural, intense or shooting pain indicates that you shouldn’t push yourself too hard, particularly if you’re a beginner.
For improved support, think about props: Blocks, blankets, and bolsters are examples of props that can improve the comfort and accessibility of hip openers. Using props can help you maintain good alignment and lessen joint strain if you’re a beginner, have limited flexibility, are injured, or have age-related mobility concerns.
Conditions that call for caution: Some hip openers may need to be modified or even avoided. Among them are:
- Dysfunction of the sacroiliac (SI) joint
- Sciatica or a herniated disc
- Osteoarthritis
- injury to the tailbone
Collaborate with a coach: A yoga instructor can offer tailored advice and adjustments. They can assist you in expanding your practice in a safe and efficient manner, particularly if you have any limits or injuries.
FAQs
How can the hips be opened up most effectively?
Regular stretching and strengthening exercises that focus on the hip flexors, glutes, and surrounding muscles are the greatest approach to open up your hips. The hips can be gently stretched and opened with the use of yoga movements, including Butterfly Pose, Lizard Pose, and Pigeon Pose. Your flexibility and mobility will gradually increase if you include hip-opening yoga poses in your practice, preferably under a coach’s supervision.
Do hip openers help with emotional release?
Indeed, hip openers can facilitate the release of emotions. Emotional strain is said to build up in the hips, particularly from stress or traumatic experiences. As they release accumulated tension and relax the muscles, several hip-opening yoga positions, such as Happy Baby Pose and Frog Pose, can cause a sense of emotional release. Many people discover that hip-opening exercises improve mental clarity and emotional well-being in addition to relieving physical discomfort.
Is yoga good for opening hips?
Hip yoga offers several advantages, including: Relieves Tightness: Sitting for extended periods of time can shorten and tighten the hip flexors. Yoga positions that open the hips gently stretch these muscles, releasing tension and stiffness and lessening the sensation of the hips being “locked.”
Why do hip openers feel so good?
Better oxygen delivery to the hips, legs, and back is accompanied by improved blood circulation. Better mental stability results from the discharge of stress. Athletes, runners, bikers, and dancers can all benefit greatly from hip-openers.
How often should I do hip opening exercises?
Hip mobility exercises are typically less taxing on the body than intense strength training. For most people, three to five sessions a week are ideal for consistent improvement. You can even engage in brief mobility exercises practically daily if your objective is more significant, such as reaching a front or middle split.
References:
- 10 Effective hip opening yoga poses: Step-by-Step Instructions + expert tips – 2026 – MyYogaTeacher/myyogateacher.com/articles/hip-openers
- 7 yoga poses for hips – 2023 – Sattamaya/www.shvasa.com/yoga-blog/7-yoga-poses-for-hips
- 7 Hip opening stretches for strong, Tension-Free hips – 2024 – Jain/www.arhantayoga.org/blog/hip-openers-unlocked/