
Eka Pada Rajakapotasana
What is Eka Pada Rajakapotasana?
One of the best poses for hip opening is Eka Pada Rajakapotasana, an advanced sitting back-bending pose. Additionally, it helps to increase pelvic and groin flexibility. Additionally, it works on the torso’s twisting, which helps with the poses that call for a great deal of flexibility.
This posture is difficult due to its progress, yet the goals involved are crucial. Regular Eka Pada Rajakapotasana practice calms the mind, which in turn sows the seed of optimism in life to grow the most fruitful crops of mental and emotional values.
Meaning:
The Sanskrit phrase “Eka Pada Rajakapotasana” means “one,” “Pada” means “foot,” “raja” means “king,” “kapota” means “pigeon,” and “asana” means “pose.” King Pigeon Pose is the name given to this asana. When executed by the practitioner, this pose’s skill contributes to its outstanding qualities. For this reason, its name begins with the title of King.
The pigeon is a symbol of abundant thanks, love, and serenity. By living a happy life, practitioners of this position cultivate compassion and kindness towards others.
Muscle Work During Eka Pada Rajakapotasana:
- Chest Muscles
- Lower Back Muscles
- Middle Back Muscles
- Pelvic Muscle
- Hip Muscles
- Psoas Muscle
- Gluteus Muscle
- Hamstring Muscle
- Quadriceps Muscles
How to Perform?
- Put your hands on the floor, slightly away from your shoulders, and start in the tabletop position with your knees directly under your hips.
- Now, place your right knee behind your right wrist and insert your right foot such that the heel is facing your left knee. From here, carefully lower your right hip to the ground while simultaneously sliding your left leg back.
- To establish the stance, straighten your left knee and keep your left leg straight while you gaze at it. Then release your breath to lower your torso. To prepare the torso, extend your arms forward and backward.
- Now elevate your torso away from your right thigh by pressing your fingertips into the ground. At the same time, stretch your lower back and press your tailbone downward.
- Next, raise your body all the way through your ribs so that your sternum is towards the side of the ceiling. As you turn your head back, give your neck a small inward curve.
- Now, bend your left knee and reach for it with your hand so you can touch it close to your head. After a few seconds of holding the position, carefully lower the left foot to the ground. Straighten your head and put your hands on the ground to bring your torso forward.
- Next, raise your right hip off the ground and slide your right foot back while placing your left leg on your knee. Position yourself on four limbs like a tabletop and then let go.
Benefits:
Serves as a hip opener:
This improves the hip region’s blood circulation and range of motion. Additionally, it eases back pain by relaxing back muscles and supporting the spine.
Bolsters the reproductive organs:
This asana’s stretching forces muscles to work on themselves, which demands energy and is met by the increased blood flow. This also provides the right nourishment to support the reproductive tissues. Consequently, it guarantees their operation and eventually fortifies them.
Prevents harm:
It has been noted that the most frequent cause of serious injuries, such as those to the neck, lower back, wrist, knee, and shoulder, is either a beginner’s advanced approach or bad technique or alignment. However, regular practice of Eka Pada Rajakapotasana, which aids in body opening to lessen flexibility regarding ailments, can eliminate this.
Activates the organs in the abdomen:
This asana’s stretching of the external body also strains the internal organs, causing them to subtly constrict and relax. These exercises serve as a detoxifying process for them, which enhances the body’s ability to function healthily.
Lowers the risk factor for cardiovascular disease:
Regular Eka Pada Rajakapotasana practice aids in preserving optimal blood pressure throughout the body.
Beginner’s Advice:
- Maintaining a stretch between the right leg bent forward and the left leg straight behind may cause difficulty for beginners. One should avoid going overboard because this could be the cause of tense hamstrings.
- It can be difficult for novice practitioners to complete and maintain posture at the same time when bending the left leg to grasp it with both hands. Flexibility exercises for each participating body part can readily accomplish this.
- To touch your left leg to your head, beginners should refrain from overbending their upper back. To move your left leg near enough that you don’t need to bend your upper back, try working on your pelvis. To prevent the damage, do not, however, shorten the spaces between your neck.
Preparatory Poses:
Baddha Konasana (Bound Angle Pose): While seated in Staff pose, bend your knees so that your legs resemble butterfly wings. To prevent your knees from rising above the floor, your feet must be in contact with one another, and your hands must be holding both of your feet together.
Feel the flexion around your pelvis and inner thighs while sitting with your back straight. For one to two minutes, maintain this position. For improved blood circulation in your legs, you can also flap them up and down for a short while.
Salamba Bhujangasana (Sphinx Pose): The Sphinx stance, sometimes referred to as the Baby Cobra pose, is a warm-up backbend that stimulates blood flow to the lower back, tailbone, and spine.
Place your arms half-bent at your sides, near your chest, and begin by reclining on your stomach. As you elevate your upper body like a baby cobra’s raised hood, take a gentle breath. Feel the activation of your lower back and compression of your core. For two to five minutes, maintain this posture.
Revolved One Leg King Pigeon Pose: Take the Lizard Pose to prepare your arms and legs for the main asana. Put your knee on the mat and bend your leg while keeping one leg behind you.
Hold the foot of the same leg with your hands, twist your spine gently, and look back. After a minute of holding this stance, switch to the other leg.
Modifications:
- The leg is bent forward when the practitioner is unable to position the hip on the ground. The next step is to reach the floor by placing a folded blanket or block beneath the right hip. Ensure that your weight is spread equally over both hips.
- When practitioners bend forward and press their fingers, they are unable to reach the floor. Blocks should then be placed beneath the forehead or forearms to ease the forward bend.
- While touching the head with the left leg straight behind. Basic practitioners may find it difficult to maintain the hand in that position or lose their balance. In order to drag the left leg towards the head, one needs to bind the left foot with a strap or rope.
Variations:
Ardha Eka Pada Rajakapotasana (Half Pigeon Pose):
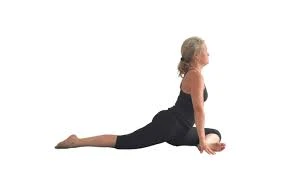
- Start by assuming the position of a tabletop. Your knees under your hips, your hands beneath your shoulders, and your head looking down at the ground.
- Now, slip your right leg behind your right wrist while gradually shifting your weight on your hands. From here, maintain the position of the right leg while simultaneously lowering the right hip to the ground and moving the left leg backward.
- After that, fix the base of the stance by pressing your finger deeply into the ground. From here, slowly lift your torso.
- Now, straighten your left leg behind you while attempting to press your tailbone down and forward. Straighten your back here, gate forward, and place your hand next to your hip.
- After holding the pose, return by bending forward and placing your hands on their location. Lift your right hip slowly to return your right knee and left leg to the tabletop position, then release.
Mermaid Pose:
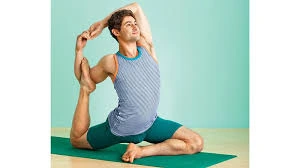
- Start by assuming the tabletop posture, keeping your knees beneath your hips and your hands beneath your shoulders.
- Now, much like in Eka Pada Rajakapotasana, slide your left knee behind your left wrist and your left foot inward to face your right hip.
- To balance the bodyweight on both hips, slide your right leg back and place your left hip on the ground. To enter the posture steadily, make sure your hips are square.
- Now elevate your torso by pressing your fingertips into the ground. Now, use your hands to call your right leg to bend towards your head while simultaneously calling your left foot inside towards your inner thighs.
- Elevate your pelvis slightly to elevate your torso and create a small curve in your lower back as you bring your left leg up to your head. The spine will become less compressed as a result.
- Now, place your right foot in the area behind your right elbow and place your hand behind your shoulder.
- To return to the tabletop position, carefully free the feet from the gap and rest the right leg after holding the pose for as long as it feels comfortable. After that, unwind.
Precautions:
- Make your body weight move to the right as you raise your right knee behind your right wrist. The foundation must be sturdy enough to withstand the weight shift because this will put pressure on your right hand.
- The left leg should remain straight behind the torso. If the leg is positioned incorrectly in either way, there may still be some risk of muscle damage. As a result, one should use caution to prevent any muscular accidents.
- Practitioners should pay attention to how their right heel is positioned when they slide their left leg back to place their pelvis on the floor. Disorientation could put pressure on the right knee, so try to keep it facing the left hip. Therefore, exercise patience.
Contraindications:
- This asana should not be performed by practitioners who have any kind of injury to their shoulder, knee, ankle, groin, or pelvis. Given the current condition of that body part, this could be getting worse.
- Later-stage pregnant ladies avoid doing Ek Pada Rajakapotasana. However, before starting the practice in the early stages of pregnancy, one should speak with a qualified yoga instructor.
- practitioners suffering from sciatic nerve disorders. When the sciatic nerve senses something in the extremity, it should refrain from touching it. Therefore, one should proceed cautiously to avoid seriously harming the nerve.
FAQs
Can beginners perform the Pigeon pose?
Pigeon position is a great way for novices to strengthen their back and hip muscles.
Your lower body’s range of motion will be expanded by the pigeon posture, which also lays the groundwork for more difficult yoga poses.
For novice yogis who wish to increase their power while doing the Eka Pada Rajakapotasana or Kapotasana positions, this pose is ideal.
What is a Reclining Pigeon pose?
Dead pigeon stance, also known as the reclining pigeon pose, is a pose that helps you relax your legs and back. Put your legs in a number four pattern while lying on your back.
Next, perform a deep lower-body opening stretch by holding your lower leg and drawing it towards your chest. You may release all of the tension in your lower body by doing this on both sides for four to five minutes. This pose relieves tense hamstrings, lower back, quadriceps, and groin muscles.
Why is the Pigeon pose painful?
Beginners with tight hamstrings, glutes, and inner thighs may find the pigeon position uncomfortable. If you practise the posture frequently, the pain usually subsides after a few days, allowing your muscles to become accustomed to the strain and eventually strengthen.
What are the benefits of Eka Pada Rajakapotasana?
Enhances the balance of the body while seated.
Opens the shoulders, chest, pelvis, legs, and thighs.
Therapeutic for work-related stress and minor lower back pain.
Strengthens and lengthens the spine, shoulders, and chest.
Increases the body’s range of motion, flexibility, and agility.
Who should not perform Rajakapotasana?
Rajakapotasana should not be performed if you have inflammatory arthritis, are a beginner with limited flexibility, are in the final trimester of pregnancy, are currently going through your menstrual cycle, or have had a major accident or surgery.
What are the common mistakes in Eka Pada Rajakapotasana?
Your pelvis may tilt unevenly and put strain on your front knee if your front hip hangs over the surface unsupported. Long-term hip and joint strain or discomfort may result from this imbalance. To help level the pelvis and preserve stability, place a block or folded blanket beneath the hip.
References:
- Allen, W. (2025e, August 26). Eka pada rajakapotasana. https://myyogateacher.com/yoga-asana/eka-pada-rajakapotasana
- Eka Pada Rajakapotasana (One-Legged King Pigeon Pose): Steps, Benefits – Fitsri Yoga. https://www.fitsri.com/poses/eka-pada-rajakapotasana
- One-Legged King Pigeon Pose Yoga Pose (Eka Pada Rajakapotasana). Tummee. https://www.tummee.com/yoga-poses/Eka Pada Rajakapotasana