
Parighasana (Gate Pose Yoga)
What is Parighasana?
Parighasana, or Gate Pose, is a gentle side-bending yoga posture that opens the rib cage, stretches the hamstrings, and improves spinal mobility. It helps release tension along the sides of the torso while enhancing balance and breathing capacity.
In this pose, one leg is straightened sideways while kneeling on the mat. Your obliques will feel deeply stretched when you extend your arms to the side. Gate stance is great for anyone who wishes to sculpt their obliques or lose side belly fat.
Hatha yoga’s Parighasana is a kneeling, side-bending pose. It provides an active stretch to the legs, hips, and core muscles in addition to a deep lateral stretch to the body’s sides. In yoga, it’s known as “Gate pose” because it serves as a gateway to areas of the body that require a lot of oxygen but have been blocked by lifestyle choices and inactivity.
Muscle Work During Parighasana:
- Neck Muscles
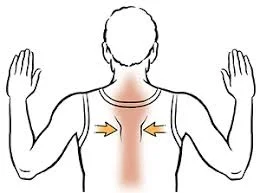
- Upper Back Muscles
- Chest Muscles
- Pelvic Muscles
- Hip Muscles
- Psoas Muscle
- Hamstring Muscle
- Gluteus Muscle
- Quadriceps Muscle
How to Perform?
- Start by kneeling with your trunk upright and your hand next to your hips. Take a gentle breath!
- In the proper direction, extend your right leg. Your ankle, left knee, and torso should line up. To securely hold your left foot on the ground, straighten your right knee.
- Inhale now, then extend your arms to each side of your trunk.
- Breathe out and shift your trunk to the right, in the direction of your extended right leg. The shinbone should support your right forearm, and the ankle should support your right wrist.
- The palm on your right is inverted. Place your left palm on your right palm after lifting it over your head. If at all feasible, place your hands on your ankle during Namaste so that your right ear touches your top left palm.
- This is the last gate stance position; stay in this position. Hold the position for at least 30 to 50 seconds. Max can be used to suit one’s comfort level.
Benefits:
Encourage deep breathing: The intercostal muscles are stretched by the sideways bending. It facilitates effective breathing and improves chest mobility. In this way, Parighasana helps people with COPD and asthma develop healthy breathing habits.
Restores the health of the abdominal organs: The liver, kidneys, stomach, intestines, spleen, and pancreas are all massaged individually while bending to the left and right. Through the exchange of oxygenated and deoxygenated blood, Parighasana improves the function of abdominal organs and balances the digestive system.
Overcomes obesity: Bending on either side puts muscles under extreme strain, which increases cellular activity to meet energy demands (more calories burned). As a result, consistent gate posture practice makes use of excess fat from different body areas.
Boost adaptability: The calves, hamstrings, quadriceps, biceps, triceps, abdomen, hip flexors, gluteus, etc., are all deeply stretched by it. The body becomes flexible as a result of the muscles’ back-to-back contraction and relaxation, which loosens the muscle fibres.
Aids in pranayama (yogic breathing): This position strengthens the chest muscles and increases the thoracic volume by stretching the intercostal muscles. The lungs’ freedom of movement is ensured by this change to the thoracic cavity, which is crucial for Pranayama practice.
Mobilises the pelvic joint: In Parighasana, holding a stretched leg sideways allows the pelvic muscles and joint to open up. This can be improved by extending the holding time, which will lead to better motions.
Beginner’s Advice:
- A stiffened hamstring may make it challenging for a novice to stretch their leg sideways. In this instance, start by warming up your tense hamstrings:
- Step 1 involves bending your trunk forward, placing your hands on the floor, and slowly moving your leg from the centre to the outside and back.
- If your hands are not reaching your ankles when you bend, avoid overstressing your trunk. Put your hands on the legs where it is reaching. Regular practice will help you improve your side bending.
Preparatory Pose:
Virabhadrasana II (Warrior Pose II): You can strengthen your knees and quadriceps and enhance your side body balance by doing this pose. Step your feet three to four feet apart while in the Tadasana stance.
With your hands facing the floor, raise your arms at your sides to shoulder height. To align your heel with the arch of your left foot, turn your right foot out 90 degrees.
Next, do a 45-degree turn with your left foot. Align your thigh with the floor by bending your right knee over your right ankle. Make sure your left leg is straight behind you and your knee is positioned over your ankle. Look at your right hand. Repeat the pose on your other leg after holding it for five to ten breaths.
Parivrtta Janu Sirsasana (Revolved Head to Knee Pose): To begin, sit with your toes pointing towards the ceiling in the wide-angle sat position. While keeping your right leg straight at your side, bend your left leg and bring your foot near your groin.
Now bend your body sideways onto your right leg, extend your left arm overhead, and gently turn your tailbone to the right. For a few seconds, hold your right toe with your left hand.
On the opposite side, repeat the process. Your side body, pelvis, hip flexors, and hamstrings will all be deeply stretched by this seated hip opener.
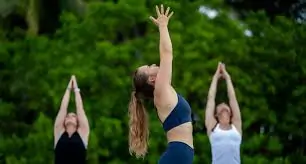
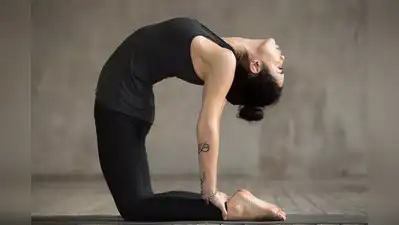
Ustrasana (Camel Pose): It is optional to perform this pose because it is an intermediate-level back stretch. Place your knees hip-width apart to begin. Pull your tailbone near your navel, arch your back, and tighten your core.
Bend your neck back gently, put your arms behind you, and grasp both ankles with your fingers. Hold this position for a short while. Your lower back, spine, quadriceps, neck, and core will all be activated in this pose.
Props and Modifications:
- For beginners who can’t reach their ankles, a block can be an option.
- Put a block next to the extended leg, then move it to a location that your hands can reach.
- When doing Parighasana for extended periods of time or in the beginning, knee pain may occur.
- To protect the knees and ankles from pain in this situation, place a folded blanket underneath them.
- One can use wall support by shifting the balls of their feet on it if they are repeatedly losing their balance.
Variations:
Resting Arm Variation:

It’s strongly advised to maintain your upper arm pointed straight up and the other arm resting on the ground if you’re new to the Gate posture and don’t have the strength to bend sideways.
Beginners can open their side bodies with this version without overstretching their muscles. Additionally, you can add more power and balance to your primary posture practice by doing this adjustment on a daily basis.
Deep Variation:

You can gradually deepen your side bending even more if your basic Gate position practice makes you feel strong and solid.
Continue in the Gate pose, raise both arms in prayer formation overhead, and begin to hinge sideways for this variant. Hold this position for a few seconds on each side while resting your upper body over your extended leg at your side.
Precautions and Modifications:
- If you have an ankle or knee injury, do this pose gently under supervision or while seated.
- This asana may be avoided by practitioners who suffer from cervical and lower back pain because it may exacerbate their pre-existing conditions.
FAQs
What is Parighasana Ashtanga?
A kneeling side stretch that works your obliques, spine, neck, tailbone, shoulders, and knees is called Parighasana Ashtanga or Gate Pose. Over time, mastering this stance will help you tone and strengthen all of the aforementioned areas.
What is the meaning of Parighasana?
Parighasana is a combination of two Sanskrit words, ‘Parigha’, which means crossbar (the bar that’s used to close the gate), and ‘Asana’, which means position.
Can beginners perform Parighasana?
Low-side abdominal flexibility should not be used when performing Parighasana. Although this posture might not be the best option for novices, they can begin with modified Gate pose modifications to increase their obliques’ strength and mobility before gradually progressing to the primary practice.
What should we perform before Parighasana?
Before beginning Parighasana practice, it’s a good idea to warm up your legs, knees, spine, abs, and obliques in Warrior Pose II, Revolved Head to Knee Pose, and Camel Pose. This will guarantee that you don’t hurt yourself while practicing the main position.
What are the different types of variations in Parighasana?
Gate Pose with a Deep Side Bend for expert yogis or Gate Pose with a Resting Arm on the yoga mat for newcomers are a few regularly utilised position variants in Parighasana.
What are the benefits of Parighasana?
Some advantages of Parighasana include the following:
Tones the waist on the side.
Lessens the pain in the lower back.
Increases the flow of prana.
Allows the knee joints to move
The intercostal muscles are stretched.
Lengthens the body in a sideways direction.
Improves the obliques’ flexibility and strength.
Stretches the hip flexors, quadriceps, and abductors.
What are common mistakes in the Gate Pose?
Twisting the torso to bend forward rather than just to the side is the most frequent mistake people make when performing Parighasana. It’s simple to make this error in our eagerness to extend the stance.
References:
- Parighasana (Gate Pose Yoga): Steps, Variations, Benefits, & Precautions – Fitsri Yoga. https://www.fitsri.com/poses/parighasana
- Allen, W. (2025l, August 26). Parighasana. https://myyogateacher.com/yoga-asana/parighasana
- Gate Pose Yoga Pose (Parighasana Pose). Tummee. https://www.tummee.com/yoga-poses/Parighasana