
Pilates
What is Pilates?
Pilates enhances flexibility, strength, and stability through repetitive movements on a mat or other equipment. This technique cultivates body awareness to enable effective and appealing everyday movements.
Proponents of Pilates note that by strengthening the core, the method enhances balance and posture. Pilates improves strength in the lower back, pelvic floor, hips, and glutes. Pilates promotes deep, focused breathing and is frequently utilised in rehabilitative situations, much like yoga. Fitness lovers and professional athletes also benefit from it.
Benefits of Pilates:
- Whole-body fitness
- For all ages and abilities
- Strengthens muscles
- Increases flexibility
- Develops core strength
- Improves posture
- Increases energy
- Supports a healthy weight
- Involves the mind and body
Principles of Pilates
- Centering: You focus on the middle part of your body, which is the space between your pelvis and lower ribs, when using this technique. This core region powers all Pilates exercises.
- Concentration: Put your all into every workout to get the most out of every movement.
- Control: Every Pilates exercise calls for deliberate, deliberate action in order to attain total control of the muscles.
- Breath: The movements are coordinated with the breath since it plays a significant role in the Pilates approach.
- Flow: Pilates exercises aren’t supposed to be inflexible. Every movement has grace, ease, and fluidity. According to the theory, the energy of an exercise that is performed from the central “powerhouse” links every body part to move in unison. Since the reformer and other Pilates equipment work best when a practitioner executes exercises with accuracy and fluidity, they are excellent signs of flow.
Types of Pilates
Pilates workouts come in two varieties: mat exercises and equipment routines. The size and usability of Pilates equipment for use in a studio or at home can also be used to classify it.
Pilates studios usually have huge equipment, but you may buy Pilates reformers to use at home. Certain kinds of equipment use pulleys with varying spring levels and additional resistance from the user’s body weight. The studio also includes little equipment that is readily available for purchase for at-home practice.
Pilates Equipment
Large equipment (apparatus): The reformer is the resistance training tool that is most frequently used in a Pilates studio. A Pilates studio’s most popular resistance training tool is the reformer. In the house, the tower versions are intended to be mounted on a door. Since the Cadillac, often called a trap (trapeze table, requires extensive training, it is usually utilized in private Pilates studio sessions. The studio also has a ladder barrel and a Pilates chair, among other essential pieces.
Small equipment: It is common to employ smaller Pilates equipment to increase resistance or balance in mat exercises. This includes resistance bands, dumbbells, various-sized exercise balls, foam rollers, tennis balls, therapeutic balls, and the increasingly well-liked Pilates ring, sometimes known as the “magic circle,” which was also created by Joseph Pilates.
Instead of calling Pilates equipment a machine, it is more typical to call it an apparatus.
Pilates exercises that strengthen the core.
1. Breathing

Level of difficulty: beginner
Muscles used: the respiratory and pelvic muscles, supported by the abdomen
Reps: 3–5
How to perform:
- Lie on your back with your hands on your rib cage, your knees bent, and your feet flat on the floor.
- Breathe in through the back of your ribs and your hands after taking a deep breath through your nose.
- As you release your breath, feel your rib cage drop towards the floor and your hands move towards each other.
How to modify. Although this exercise is suitable for all skill levels, try doing it with your legs in an elevated position on the table to make it more challenging.
Advice: Visualise an umbrella located at your ribs. Your rib cage swells in every way as you inhale. Try to maintain a relaxed neck, shoulders, and chest while feeling your rib cage’s back resting on the ground.
2. Shoulder bridge preparation

Level of difficulty: beginner
Muscles worked: The Gluteus, hamstrings, inner thighs, pelvic floor, and back muscles were all used.
Reps: 5
How to perform:
- Your legs should be parallel and hip-width apart when you’re lying down. Between your thighs, you can place a tiny pillow, block, or ball.
- Take a breath to get ready. Having positioned your feet firmly, remove your back from the mat and squeeze the small ball. To align your shoulders and legs, adjust the tilt of your pelvis. Next, raise your mid-back and straighten your back.
- Take a breath and maintain the pose.
- After breathing, expand your upper body by repositioning your spine on the mat.
How to modify. To increase the challenge, hold the position at the top, squeeze the ball on your exhale, and engage your glutes for five repetitions on the third rep.
Advice. As much as possible, keep your neck and shoulders relaxed. Make an effort to avoid overbending your back.
3. Leg lifts
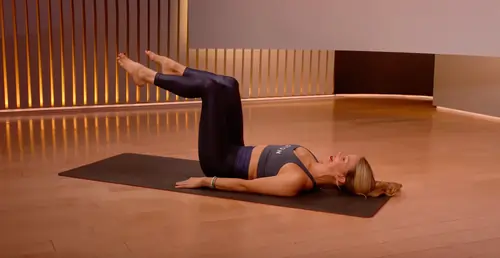
Level of difficulty: beginner
The following muscles were used: back, transverse abdominis (your deepest abdominal muscle, located beneath the belly button)
Reps: 3–5 sets
How to perform:
- Ensure your feet are hip-width apart from your back and your knees are bent.
- Breathe deeply into the area beneath your ribcage.
- Your abdominal floor and pelvic muscles will get stronger as you exhale. Place one leg on the tabletop and raise it as if you were carefully tightening a belt, without moving your hips, pelvis, or back.
- To maintain the position, take a breath.
- You can elevate the second leg onto the tabletop by exhaling without arching your back or blasting your abdominal muscles.
- Inhale and maintain the position for five counts.
- Returning to standing requires controlling your exhale.
How to modify. Put your feet closer to your hips for a more difficult position.
Advice. This is a tough workout when done correctly. Place your palms on your hip bones to see if you’re stretching your abdominals or transferring your weight.
4. Toe Tapes

Level of difficulty: beginner
Muscles worked: abdominals, hip extensors
Reps: 5 on each leg
How to perform:
- Place your feet hip-width apart, bend your knees, and keep your back straight.
- Put one leg on the tabletop and release the breath, just like in the last exercise.
- To maintain the position, take a breath.
- When you exhale, the second leg should land on the tabletop without causing your abdominals to pop or your back to arch.
- Breathe in the posture.
- After a gentle exhale, touch one foot to the floor while keeping the other leg steady.
- After you’ve taken a breath, place your leg back on the table.
- Do the same with the other leg.
How to modify. Tilt your pelvis back more so that your lower back is closer to the floor if you’re having problems maintaining your abdominals contracted, and you feel your back arching. For a bit more challenge, extend your foot away from your upper body.
Advice: Using one hand, feel your lower back, and using the other, feel your belly button. You will receive haptic feedback from this, which will help you avoid cheating. Avoid arching your back or exposing your abdominals.
5. Single leg stretch
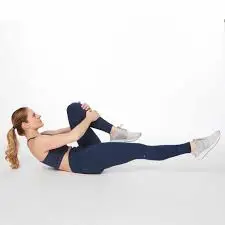
Difficulty level: beginner/intermediate
Muscles worked: abdominals, back, hip extensors
Reps: 8 on each leg
How to perform:
- Try placing both legs on the table while lying on your back.
- To check your knees, raise your head, neck, and shoulders off the ground and then bring them back down. Breathe by placing your hands on your knees.
- Exhale and keep your pelvis and back at a 45-degree angle or less while you descend one leg as far as you can. Maintain an erect posture and concentrate on your main abdominal muscles. The opposing ankle will be reached by the hand on the side of the extended leg.
- Do the same with the other leg.
How to modify. It’s harder to keep your head down and shoulders relaxed without arching your back than it is to curve forward and raise your head. Keep your hands on the tabletop at a 90-degree angle so they are in front of your knees. This will make the deep abdominal workout more challenging.
Advice: Continue to bring your abs in and up while maintaining awareness of your breath. Your leg should be stretched such that the back of it connects beneath your butt. This expands your hips and helps you establish a stronger connection with your powerhouse.
6. One leg circle
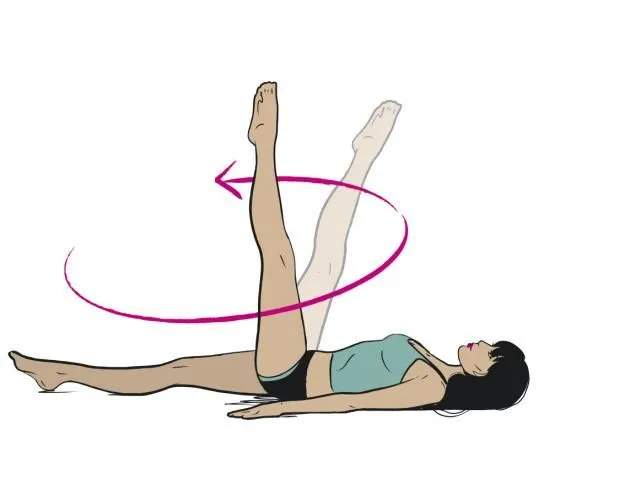
- Difficulty level: beginner
- Muscles worked: abdominals, hamstrings, hip flexors, hip abductors, and adductors.
- Reps: 5 times in each direction
How to perform:
- Make sure that when you lie on your back, both of your legs are straight. Make an effort to keep your pelvis neutral.
- After exhaling, lift one leg into the air with the knee bent.
- Breathe in while maintaining hip immobility to elevate the leg over your torso.
- Try not to let your pelvis sway as you exhale and move your leg in a circle.
- After five repetitions in each direction, switch legs.
How to modify. If two straight legs make you uncomfortable, bend both knees a little and gradually straighten them.
Advice: To activate the supporting leg, gently press it against the floor. Your arms should remain level on the floor, and your ribs, shoulders, and neck should remain relaxed. Keep your abdominal and pelvic floor muscles active.
7. Side bend preparation

Difficulty level: beginner/intermediate
Muscles worked: obliques, shoulder girdle stabilizers
Reps: 8–10
How to perform:
- Apply pressure to your forearm and elbow while lying on your side with both knees bent. Align your hips and knees as you place your feet behind you.
- Your hips rise into the air as you exhale, and your forearms fall to the ground.
- Take a breath to halfway lower your hips.
- To raise your hips once again, exhale. Do this 8–10 times.
- Take a breath to regulate the lowering of your hips. Continue on the opposite side.
How to modify. You can make it harder by straightening your legs and aligning your head with your foot.
Advice. You can visualise yourself squeezing the tennis ball in your underarm to keep it from slipping into your shoulder or tensing your neck.
8. Sidekick

Difficulty level: beginner/intermediate
Muscles worked: abdominals, hip extensors, and flexors
Reps: 8–10 on each side
How to perform:
- While lying on your side, extend your lower arm above your head and rest your ear against it. Your legs can be positioned with your feet forward and your knees straight between 30 and 45 degrees in front of your body.
- Consider gradually tightening a belt as your abdominal muscles contract and rise.
- Bring the upper leg up to your hip.
- Breathe without bending or arching your back, then kick your leg forward.
- Exhaling can be accomplished by kicking your leg back with your hamstrings and glutes while also widening your hip.
- Moving your leg through its full range of motion should prevent you from arching, tucking, or moving your pelvis out of position. Instead, make an effort to maintain a long spine and stacked hips.
- After 8–10 repetitions, switch sides.
How to modify. Bend your lower leg to make it easier and more stable. Lift onto your elbow and forearm to test your stability and make it more difficult.
Advice: Instead of kicking your leg with momentum, kick it with control while keeping it in line with your hip.
9. Side leg lifts

Difficulty level: beginner/intermediate
Muscles worked: abdominals (especially the obliques), back, inner thighs
Reps: 8–10
How to perform:
- The side position requires your legs to be straight and parallel to your hips. Make sure your lower arm is sufficiently above your head and press your ear on it. For balance, place the upper arm’s hand on the ground in front of your lower abdomen.
- In order to extend your upper body and legs in opposition, exhale to lift both legs off the ground.
- Control your breathing to bring your legs down.
- After 8–10 repetitions, switch sides.
How to modify. Test your balance and strength by using your legs to raise your upper body off the ground.
Advice. You can preserve alignment by maintaining a straight body. Examine your lower back and ribs to make sure you’re not overhanging.
10. Swan dive

Difficulty level: beginner/intermediate
Muscles worked: back extensors, abdominals, hip extensors
Reps: 5–8
How to perform:
- Place yourself on the floor. Make sure your hands are level on the floor and your elbows are bent.
- Inhale, then picture reaching into your skull. With your hands lightly pressed onto the floor, raise your head, chest, and ribs as high as your body will allow without straining them.
- Exhale, then go back to the mat to stretch your torso.
- Do this five to eight times.
How to modify. Keep your abdominal muscles connected and simply move as far as you can.
Advice: Use all of your muscles during the activity. Imagine lifting your rib cage off your hips to gain height and make more room. Be careful not to squeeze your lower back by just pressing up into the position with your arms alone.
11. Swimming preparation ( Bird Dog)
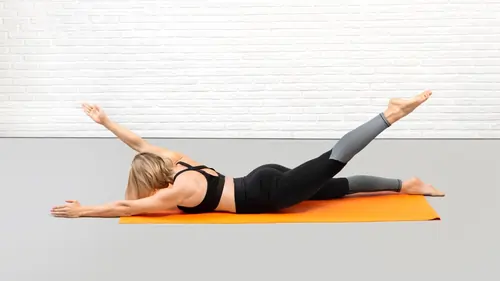
Difficulty level: beginner/intermediate
Muscles worked: abdominals, hip extensors, back extensors
Reps: 8–10 on each side
How to perform:
- Start with your knees under your hips and place your hands under your shoulders.
- You should have parallel shoulders and a neutral spine.
- Exhale to draw your abdominals in and up. Without adjusting your weight or arching your back, raise one arm in front of you and one leg behind you.
- While taking a breath, hold the stance for three slow counts.
- To enable your hand and leg to touch the floor again, control your breathing.
- Continue on the opposite side.
How to modify. Add five pulses to your arm and leg to raise them a little while maintaining a stable and active core. This will strengthen the region directly below your butt and target your abs more deeply.
Advice. When you raise your arm and leg, pay attention to maintaining a long back. Imagine balancing something valuable on a table with your back to it.
12. Crisscross
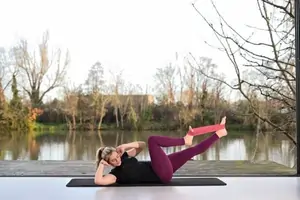
Difficulty level: beginner/intermediate
Muscles worked: abdominals (especially obliques), hip flexors
Reps: 8–10 (both sides)
How to perform:
- With your hands behind your head and lying on your back, place both legs on a tabletop.
- Sliding your ribs towards your belly button, release the breath to raise your head, neck, and shoulders.
- To maintain the position, take a breath.
- The same leg should straighten as you exhale to shift your upper body to the opposing knee.
- To get back to the starting position, inhale.
- To turn to the other side, exhale.
- One set is finished; repeat 8–10 times.
How to modify. Unless you have enough coordination to do the complete version, keep your feet on the floor or your legs on the tabletop.
Advice. As you twist, visualize bringing the opposing side of your rib cage to your hip bone. To open the front of your hip, use your rear hip extensors to straighten your leg. Throughout the workout, maintain a broad elbow position.
13. Plank

Difficulty level: intermediate
Muscles worked: abdominals, shoulder girdle, stabilizers, legs
Reps: 3–5
Plank steps:
- Begin on your knees and forearms.
- Pull the abs upward and inward by straightening one leg, then the other, and then letting out the breath.
- Wait 30 to 60 seconds.
How to modify. To gain strength before trying the full version, keep your body in a straight line from the top of your head to your knees on the floor.
Advice. Attempt to force your forearms into the ground while squeezing tennis balls at your underarms. Use your core and lift your seat a little to avoid arching and sinking your lower back.
FAQs
What is Pilates?
Using repetitive actions on a mat or other apparatus, Pilates improves stability, strength, and flexibility. This technique cultivates body awareness to enable effective and appealing everyday movements.
Proponents of Pilates point out that by strengthening the core, the method helps with balance and posture. The pelvic floor, hips, glutes, and lower back all get stronger with Pilates. Pilates promotes deep, focused breathing and is frequently utilised in rehabilitative situations, much like yoga. Fitness lovers and professional athletes also benefit from it.
What are the benefits of Pilates?
Whole-body fitness
For all ages and abilities
Strengthens muscles
Increases flexibility
Develops core strength
Improves posture
Increases energy
Supports a healthy weight
Involves the mind and body
What are the principles of Pilates?
Centering: You focus on the middle part of your body, which is the space between your pelvis and lower ribs, when using this technique. This core region powers all Pilates exercises.
Concentration: Put your all into every workout to get the most out of every movement.
Control: Every Pilates exercise calls for deliberate, deliberate action in order to attain total control of the muscles.
Breath: The movements are coordinated with the breath since it plays a significant role in the Pilates approach.
Flow: Pilates exercises aren’t supposed to be inflexible. Every movement has grace, ease, and fluidity. According to the theory, the energy of an exercise that is performed from the central “powerhouse” links every body part to move in unison. Since the reformer and other Pilates equipment work best when a practitioner executes exercises with accuracy and fluidity, they are excellent signs of flow.
What are the types of Pilates?
Pilates workouts come in two varieties: mat exercises and equipment routines. Pilates equipment can also be categorised by size and suitability for usage in a studio or at home.
Pilates studios usually have huge equipment, but you may buy Pilates reformers to use at home. Certain kinds of equipment use pulleys with varying spring levels and additional resistance from the user’s body weight. The studio also includes little equipment that is readily available for purchase for at-home practice.
Details about the Pilates equipment?
Large equipment (apparatus): The reformer is the resistance training tool that is most frequently used in a Pilates studio. In a Pilates studio, the reformer is the most popular resistance exercise equipment. In the house, the tower versions are intended to be mounted on a door. Since the Cadillac, often called a trap (trapeze table, requires extensive training, it is usually utilized in private Pilates studio sessions. The studio also has a ladder barrel and a Pilates chair, among other essential pieces.
Small equipment: It is common practice to use smaller Pilates equipment to increase balance or add resistance to mat movements. This includes resistance bands, dumbbells, various-sized exercise balls, foam rollers, tennis balls, therapeutic balls, and the increasingly well-liked Pilates ring, sometimes known as the “magic circle,” which was also created by Joseph Pilates.
Instead of calling Pilates equipment a machine, it is more typical to call it an apparatus.
References:
- Clinic, C. (2025, June 17). Pilates 101: What it is and health Benefits. Cleveland Clinic. https://health.clevelandclinic.org/everything-you-want-to-know-about-pilates
- Menzies, R. (2021, April 26). Core Galore: 15 Pilates Exercises to develop your powerhouse. Healthline. https://www.healthline.com/health/fitness/pilates-exercises