Sarvangasana (Shoulder Stand)
What is Sarvangasana?
Sarvangasana (shoulder stand) is a yoga practice in which the shoulders support the entire body. As the name implies, Sarvangasana affects how all parts of your body work.
This stance is extremely helpful to both physical and mental health. Sarvangasana, as the name implies, is a full-body workout that works several muscle groups while also improving posture, balance, and tranquilly in a variety of ways.
Which Muscles are Used in Sarvangasana?
- Neck flexors
- Shoulder flexors
- Erector spinae
- Rhomboids and trapezius
- Abdominal muscles
- Quadriceps
- Hamstrings
- Calf muscles
- Wrist and Forearm
Health Benefits of Sarvangasana
- Promotes blood circulation throughout the body.
- Increases blood flow inside the brain.
- It strengthens the shoulders, core, back, and neck.
- Improves the function of the reproductive organs.
- Improves metabolism and aids in weight loss.
- Increased blood flow to the eyes can help improve vision.
- Strengthens and enhances spine flexibility.
- Causes the thyroid and parathyroid glands to work appropriately.
- Helps to calm the brain and relieve symptoms of sleeplessness.
Video of Sarvangasana
How to do Sarvangasana?
- On your back, lie flat. Keep your chin tucked and your legs firmly together.
- Draw a deep breath. Take a breath. Lift your legs such that your feet are perpendicular to your chest or pointing straight up.
- Prepare to lift your torso by putting your hands beneath your buttocks.
- When slowly elevating your body, your torso should rest on your shoulders.
- Place your hands behind your back for support. Make sure your legs are over your head.
- Straighten your back gradually.
- Relax your calf muscles while keeping a solid knee stance. Maintain your posture.
- Lower your legs till they make a 45-degree angle with your head to aid in relaxation. Lower your arms to the ground. Slowly relax.
Follow-up Poses for Sarvangasana
- Halasana
- Purva Halasana
- Eka Pada Sarvangasana
Beginner’s Tip for Sarvangasana
- Keeping the body on a straight path.
- Maintaining a stable balance.
- Using the abdomen to breathe.
- The thyroid and throat may also receive attention.
Variations of Sarvangasana
There are some versions of sarvangasana:
- Supported Shoulderstand
- Ardha-Sarvangasana (Salamba Sarvangasana)
- Niralamba Sarvangasana (Unsupported Shoulder Stand)
- Urdhva Padmasana with Sarvangasana
- Eka Pada Sarvangasana
- Parsvaika pada Sarvangasana
- Parsva Pindasana in Sarvangasana
Supported Shoulderstand

What is the Supported Shoulder-stand?
Sarva refers to the entire body, anga to a limb, and salamba to support.
Niralamba (pronounced near-ah-LOM-bah) is a variant of the “unsupported” shoulder stand.
How to do a Supported Shoulder-stand?
- Bend two or more sturdy blankets into one-by-two-foot rectangles and stack them on top of one another. Covering the blankets with a sticky pad can help keep the upper arms in place during the pose.
- Sleep on the blankets with your head on the floor since your upper body has help and is capable of being in one of the larger corners.
- Place your arms beside your chest before putting your feet level on the ground, heels against your sitting bones. Flex your knees.
- Exhale, bring your thighs to the front of your body, raise your feet off the ground, and slam your arms into the floor.
- Curl your pelvis and back torso away from the floor as you elevate, bringing your knees closer to your face.
- Extend your arms so that your thumbs point behind you and your fingers are flush with the ground, aligned with the blanket’s edges.
- Flex your elbows to bring them closer together.
- Raising your pelvis over your shoulders will position your upper back about perpendicular to the floor.
- Keep your elbows from spreading wider than shoulder width apart as you walk your hands up your back (towards the ground).
- As you take a breath, align your thighs with your upper body and hang your heels by your buttocks while lifting your bent knees towards the ceiling.
- Compress your tailbone towards your pubis while slowly rotating your upper thighs inward.
- Take one more breath before pressing your heels to the ceiling and bowing your knees.
- Raise through the balls of the big toes until the backs of the legs are completely stretched, with the inner legs slightly longer than the outer.
- Make your throat and tongue gentler. Push the sternum in the direction of the chin, maintaining the scapulae firmly on the back.
- Your skull should be nearly level with the ground, with the tip of your chin horizontal to it.
- Attempt to elevate your upper spine off the ground by aggressively pressing the backs of your upper arms and the top section of your shoulders into the blanket support. Look softly at your chest.
- A novice holds the position for around 30 seconds. Each day, gradually increase your stay by five to ten seconds until you can comfortably hold the stance for three minutes.
- After that, repeat the stance for three minutes every day for a week or two, or until you feel relatively comfortable. Continue to extend your stay by 5 to 10 seconds every day until you can hold the posture for 5 minutes without feeling uncomfortable. With your head still on the ground, take a deep breath, flex your knees into your body again, and gently roll your back torso onto the floor to fall.
Ardha-Sarvangasana(Salamba Sarvangasana)

How to do Ardha-Sarvangasana?
- As you recline on the mat, keep your palms close to your body and your toes in touch.
- As you exhale, move your feet closer to your hips and bend your legs towards your thighs.
- Gently elevate the lower body vertically while tugging the abdominal muscles, using your hands (thumbs above, fingers beneath the hips).
- The ultimate posture requires balancing the entire body weight on the back of the head, neck, elbows, and palms.
- Exhale and do the aforementioned actions in four seconds.
- Hold this position for as long as it feels comfortable, but not longer than two minutes. Breathe softly, naturally, and rhythmically.
- Return to the beginning position by taking a breath and slowly lowering your hips towards the mat while holding your hands for four seconds.
- After releasing your hands from behind you, return to the beginning position.
- After a few deep breaths, take a small rest and then resume your normal breathing.
Niralamba Sarvangasana (Unsupported Shoulderstand)
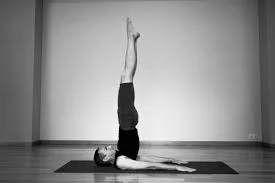
What is Niralamba Sarvangasana?
Niralamba Sarvangasana is a modern balancing inversion that promotes equilibrium, stimulates the thyroid gland, and requires shoulder and neck flexibility.
It is known as an unsupported shoulder stand in English. Niralamba Sarvangasana is a challenging version of Sarvangasana (Shoulderstand Pose) performed without using the backhands.
How to do Niralamba sarvangasana?
- After taking a deep breath, flex your knees and pull your legs to your stomach, squeezing your thighs on it.
- Place your hands on the back of your hips and stretch your elbows until they are flat on the floor to provide support for your hips.
- Your chest should rest on your chin.
- When you exhale, straighten your legs and point them at the ceiling.
- Continue to stretch your body upward until your weight is supported solely by your head, shoulders, and the backs of your upper arms and elbows, which rest on the floor.
- After that, let go of the arms and stretch them out on the floor, resting on the ground but extending above the head. Finally, while holding them firmly by your side, extend them towards your legs as if you were reaching for your toes.
- Hold your breath for 30 seconds right here. Then, carefully let go of the posture.
Urdhva Padmasana in Sarvangasana
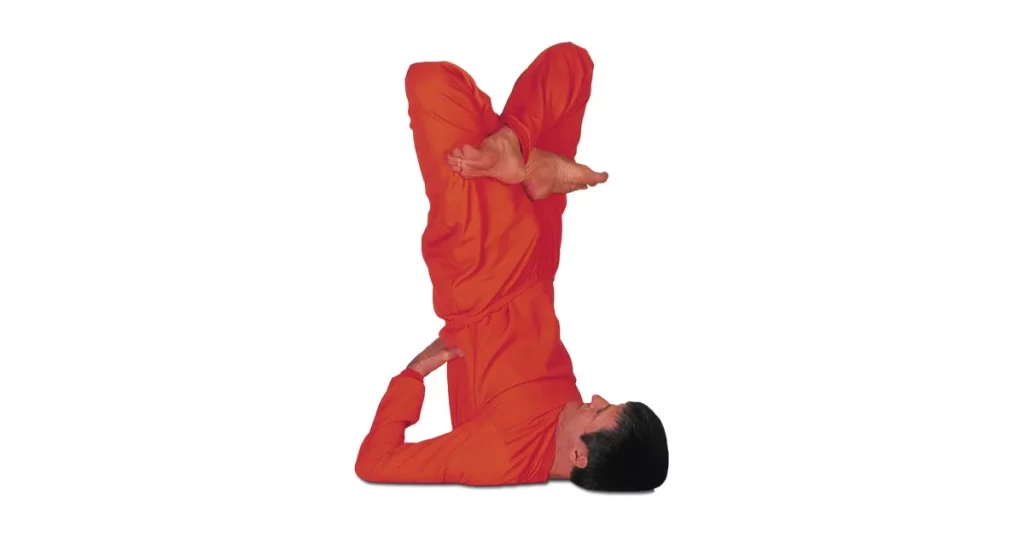
What is Urdhva Padmasana?
The last set of Ashtanga yoga poses is Urdhva Padmasana, sometimes known as an ascending lotus, followed by Sarvangasana. This pose can only be achieved after mastering Padmasana and Sarvangasana.
Asana indicates posture, Padma the lotus, and Urdhva, “upward.”
How to do Urdhva padmasana in Sarvangasana?
- On a yoga mat, stand upright with your back stretched and your face up. Maintain a slight distance between the hands and the thighs.
- Keep your knees stiff and your legs stretched wide.
- Take several deep breaths. When elevating both legs transversely to the floor, breathe forcefully. Take a breath and keep your legs stable to maintain this stance.
- Exhale, then lift the hips and back off the floor, gently pressing your hands into the ground to elevate your legs even higher.
- Once the entire trunk is off the ground, firmly plant the shoulders, fold the elbows, and press the palms into the ribs. We call this posture Sarvangasana.
- This is an alternative position.
- Flex the folded leg to ensure it is parallel with your face. Help forward by placing your palms on your knees.
Eka Pada Sarvangasana

What is Eka Pada Sarvangasana?
“eka” = “one or single”
“pada” = “foot or leg”
“Sarva” = “all”
“anga” = “limb”
“asana” means “pose or posture”
Sarvangasana, commonly known as the Mother or Queen of Asanas, is one of the most significant positions. Maintaining the lift takes some effort initially, but with repetition, it becomes a calm and tranquil position. Eka Pada Sarvangasana (One-legged Shoulderstand Pose) is an asymmetrical variation of Sarvangasana that focuses on hip launching, hamstring power, and flexibility.
Eka Pada Sarvangasana is commonly done after a sequence, when the body and mind relax, just as in the complete version of the practice. It may also be performed as a transitional position in conjunction with Salamba Sarvangasana. Given that it is followed by other peaceful poses, such as supported forward bends, it can be included in the first exercise.
How to perform the One Leg Shoulder Pose?
- Let us all adopt the Shoulder Pose, also known as Salamba Sarvangasana. Hold this position for the first time.
- Keeping the right leg in the shoulder stand position, gently descend the left leg as in Halasana while breathing in and out.
- There should be no knee joint bends, and the left leg must be firm and straight.
- The right leg, which stands straight with no knee bends, is held to the same standards.
- After a while, attempt the reverse stance, with the left leg raised and the right leg down.
- While keeping the left leg straight and in line with the chest, bend the right knee and bring it closer to the torso. Allow for a forward tilt of the pelvis. Hold the right side of your body gradually, with your right hand holding your waistline.
- Release the right hand’s support and place your arm on the ground.
- Keep the left leg above the hips as you gradually lower it.
- When the left hand and shoulders are stable, extend the right arm sideways in line with the shoulder to balance the left’s weight.
Parsvaika Pada Sarvangasana
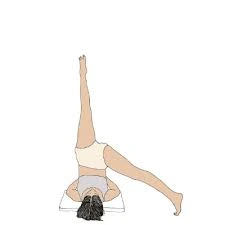
What is Parsvaika Pada Sarvangasana?
The side is what Parsva suggests. In this posture, the lower leg is sideways and parallel to the trunk, whereas in Eka Pada Sarvangasana, it is behind the head.
How to do Parsvaika Pada Sarvangasana?
- Return to Sarvangasana after completing Eka Pada Sarvangasana on both sides.
- Exhale, then lower your left leg to the ground, parallel to your trunk.
- Do not flex your left knee; instead, maintain it firm and straight.
- If your leg is unable to make contact with the ground, lower it as far as possible.
- The vertically lifted right leg should be straight, not slanted to the left.
- To fully stretch the chest, lift the ribs with your hands.
- After 20 seconds of holding the position with regular breathing, release the tension and return to Sarvangasana.
- Return to Sarvangasana after repeating for an equal amount of time with the opposite leg.
Parsva Pindasana in Sarvangasana
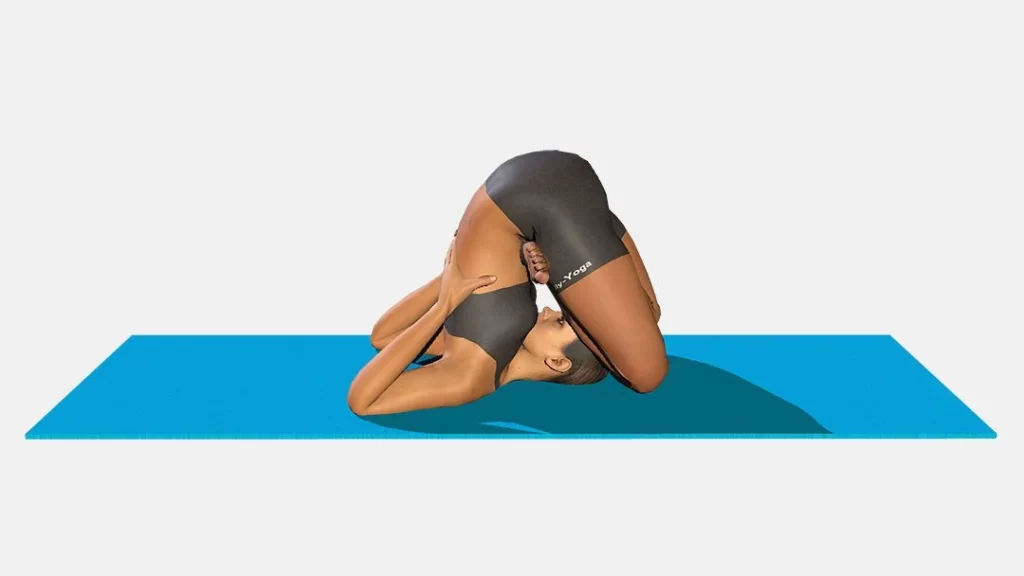
What is Parsva Pindasana in Sarvangasana?
Parsva means flank or side. The previous position is repeated in Pindasana, with both flexed knees sideways on the same side of the trunk. This is Sarvangasana’s lateral embryo pose.
How to do Parsva Pindasana in Sarvangasana?
- Exhale in Pindasana and then move your hips to the left.
- The right knee and ear should be contiguous.
- Initially, the right shoulder will be elevated off the ground.
- Firmly press the right hand on the back, then force the shoulder against the floor.
- If you do not do this, you will lose your balance and tip over to one side.
- The diaphragm is squeezed in this posture; therefore, the lateral twist causes fast and difficult breathing.
- Only with prolonged repetition can the knee near the ear begin to rest on the ground.
- Maintain consistent breathing while keeping this posture for 20 to 30 seconds.
- Exhale, elevate yourself from the left, and move your crossed legs to the right, bringing your right foot near your right ear.
- Hold for the same length of time here as well.
- Return to the Padmàsana Ûrdhva. Uncross your legs to release the lotus posture, and then return to Sâlamba Sarvangasana.
- The crossed legs should be repositioned.
- Instead of crossing the legs the other direction as previously, cross them again with the right foot over the left thigh first, then the left foot over the right thigh.
- As previously said, repeat the moves on each side.
Sarvangasana precautions:
- You should be informed of the risks and contraindications of yoga practices. The following is a list of Sarvangasana’s cautions.
- Individuals with high blood pressure should avoid practicing this asana.
- Avoid this stance during menstruation.
- If you have spinal difficulties, avoid this position.
- Do not practise if you have glaucoma, acute thyroid problems, persistent neck pain, shoulder injuries, or retinal concerns.
- People with heart disease, middle ear problems, capillaries, spondylosis, slipped discs, or fragile age should avoid it.
Contraindications of Sarvangasana:
- Back Pain
- Spondylitis
- Heart Issues
- High Blood Pressure
- Pregnant or Menstruating
- Throat or Ear Infection
- Diarrhea
- Headache
- Neck injury
- glaucoma
FAQs
What is Sarvangasana good for?
Sarvangasana is a tough yoga position that works the arms, neck, and core. It also improves hip flexibility while increasing overall body strength and flexibility.
Who should not do Sarvangasana?
Individuals with high blood pressure should avoid practicing this asana. Avoid this stance during menstruation. If you have spinal difficulties, avoid this position. Do not practise if you have glaucoma, acute thyroid problems, persistent neck pain, shoulder injuries, or retinal concerns.
How long should you do Sarvangasana?
Beginners can hold the Sarvangasana position for 30 seconds before gradually extending it to 3 to 5 minutes. How many times per day should you execute Sarvangasana? Sarvangasana may be practiced for one minute during the day and one minute at night.
Which pose is the Queen of yoga?
The term “King and Queen of Yoga Asana” refers to the headstand (sirsasana) and shoulder stand (salamba sarvangasana).
References:
- Sarvangasana – The Shoulder Stand | Steps | Benefits | Learn Yogasanas Online | Yoga and Kerala. (n.d.). Yoga. https://www.keralatourism.org/yoga/reclining-postures/sarvangasana
- Sarvangasana Yoga (Shoulderstand Pose) | Yoga Sequences, Benefits, Variations, and Sanskrit Pronunciation | Tummee.com. (2017, November 20). Tummee.com. https://www.tummee.com/yoga-poses/sarvangasana
- Sarvangasana (Shoulderstand Pose). (n.d.). MyYogaTeacher. https://myyogateacher.com/yoga-asana/sarvangasana
- Dr.Nidhiphysio. (2024b, September 29). Sarvangasana: Health Benefits, How to do? – Variation – Mobile Physio. Mobile Physiotherapy Clinic. https://mobilephysiotherapyclinic.in/sarvangasana-yoga-pose/#What_are_the_Follow-up_Poses_for_Sarvangasana
- Vastralphysiotherapyclinic. (2024b, February 7). Sarvangasana. Mobility Physiotherapy Clinic. https://mobilephysiotherapyclinic.net/sarvangasana/
- Dudhat, D. (2024b, December 2). Sarvangasana – The Shoulder Stand – Physical Therapy Treatment and Exercise. Physical Therapy Treatment and Exercise. https://physical-therapy.us/sarvangasana-the-shoulder-stand/